
HW1200: two detachable pressure connections
HW1200: two detachable pressure connections — numbered controls and physical routes explained by the legend.
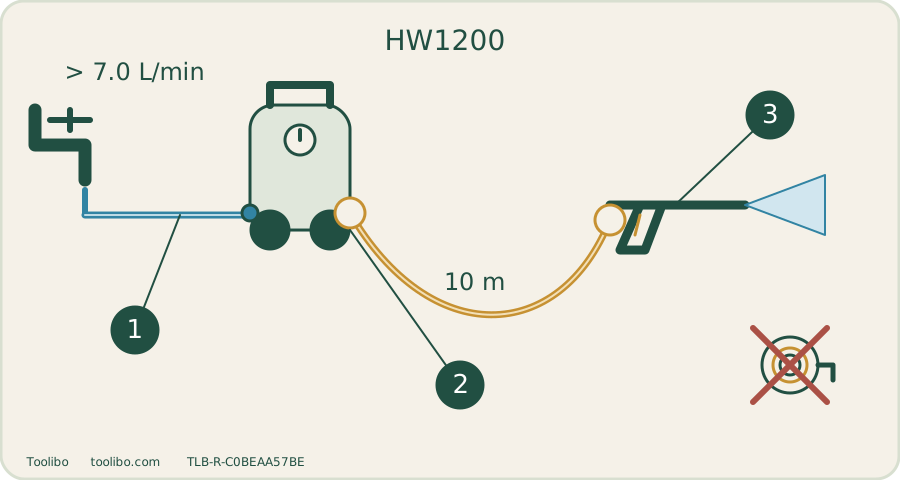
Supply
Clean supply greater than 7.0 L/min
Hose
Check both threaded connections
Gun
Lock attachment before starting
Original explanatory diagram; not a dimensioned service drawing.
Match HW1200 to the ENEU instructions
The HW1200 covered here has a simple on/off switch and a detachable machine-end high-pressure hose. It does not have the HW1300 reel. A UAE promotional description conflicts on that point, and regional power figures disagree, so this guide deliberately makes no wattage claim. Verify the plate and instructions on your actual machine before using this ENEU procedure.
The regional catalogue lists a 10 m pressure hose. That can be useful for a car parked near the supply, but route it around the vehicle before starting. Avoid a layout that pulls the washer over when you reach the far side. A detachable hose also means checking two pressure connections rather than leaving the machine-end joint permanently attached.
Prepare enough clean water
The ENEU figures are 100 bar working pressure, 120 bar maximum permissible pressure, 5.5 L/min water flow and 7.0 L/min maximum feed volume. The manual separately requires inlet supply greater than the pump’s maximum feed volume: plan for more than 7.0 L/min, not merely the 5.5 L/min output figure. Use a pressure-resistant inlet hose at least 13 mm in diameter, as short as practical, and the required backflow protection. Maximum inlet pressure is 10 bar and maximum water temperature 40 °C.
If the only available supply loses flow when another tap opens, test the real arrangement before choosing this washer. A shorter adequate supply route may matter more than another accessory. Do not expect 120 bar on the label to compensate for an undersupplied pump.
Assemble and start on a tap supply
- Keep the switch off and plug disconnected. Attach the pressure hose to the machine outlet marked with the gun symbol and to the gun; ensure both nuts seat properly without cross-threading.
- Fit the clean-water connector at the tap-marked inlet. Connect the supply hose and open the tap. Keep the inlet filter installed.
- With the trigger locked, fit the chosen lance and turn it into its secure position. Arrange dry electrical connections, check the supply rating, then plug in with the switch still off.
- Switch on, unlock the trigger and hold the gun by its grip and barrel. Check for a steady jet from a safe surface-test position; the manual specifies at least 30 cm nozzle distance. This minimum is not a promise that every coating tolerates that distance.
If the jet is weak, stop and inspect the water route and filter before blaming the motor. If the nozzle is obstructed, isolate the machine, release pressure and use the supplied cleaning pin without enlarging the opening. Persistent faults belong with authorized service.
Use the right spray, not the most aggressive one
Rotate the Vario-Power nozzle to adjust jet pressure; do not pull it back toward the gun while turning. The dirt blaster produces a concentrated rotating action and is excluded for car bodies and windows. The foam attachment uses its own container and neutral detergent; acidic or alkaline products can damage it. Optional fittings for HW112/HW121 attachments are not proof that every Makita accessory fits directly.
A useful first car-wash trial is a small sound painted area with the suitable controlled spray, not a hidden test with the dirt blaster. If grime remains, change the approved cleaning method rather than automatically moving closer. Keep hands away from the jet even when checking a small part.
Drain and store this particular machine
The ENEU after-use procedure leaves the switch on while you close the tap and disconnect the inlet hose, then discharge remaining water with the trigger. Stop when discharged; motor running in this stage must not exceed 1 minute. Then switch off and unplug before disconnecting the pressure hose from gun and machine. This is a bounded model-specific draining step, not permission to run a dry pump while investigating a fault.
Store the drained hose without sharp bends and the machine indoors above freezing. Clean the inlet filter periodically. Water or oil leakage, damaged wiring, or a fault beyond the documented external checks requires service; do not dismantle the pump. The manual also limits continuous use to no longer than 1 hour followed by an equally long break, so do not plan a whole-day uninterrupted session around the hose’s reach.
Models referenced