
Three controls that should not be confused
The top range slider, front collar and trigger are individually marked; an increasing curve represents trigger travel within one selected range.
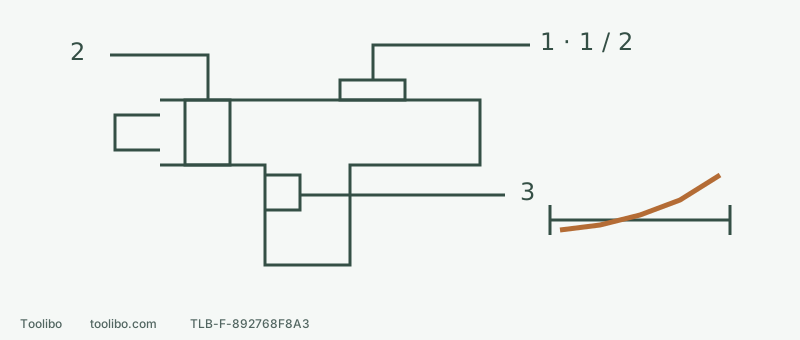
1 · Gearbox range
Select 1 or 2 only after stopping; a light trigger pull in 2 does not mechanically select 1.
2 · Clutch or drilling
Trial screws at a low marked setting; drilling locks the clutch rather than offering finer screw control.
3 · Trigger modulation
Start smoothly, observe seating, and stop and disconnect before changing the next setting.
Locations are conceptual and the curve is not calibrated. The manual disagrees on 22 versus 23 clutch settings; follow actual markings and verify the matching version.
Locate the three controls
The two-speed slider on top selects ranges 1 and 2. The trigger in front of the handle varies speed with pressure. The torque collar behind the chuck selects a numbered clutch setting or drilling. Light trigger pressure in high range does not shift the gearbox into low range.
The US FX1151 has no-load ranges of 0–600 and 0–2,200 rpm. Those are ranges, not a material cutting-speed chart. Range 1 favours torque and slower speed, with screw-driving, suitable larger holes and metal or plastic work among the manual’s examples. Range 2 favours speed and lighter drilling. Accessory limits and material requirements remain essential; range selection is not a capacity check.
Address danger before ordinary preparation
A smoking, swollen, leaking or unusually hot battery is not something to approach and handle to follow these steps. Stop using it and contact the manufacturer. For equipment without those danger signs, release the trigger and wait for all rotation to stop, centre-lock the direction button and remove the battery before accessory or control adjustments.
Match the bit size and profile to the screw, with the shank centred and chuck hand-tight. Fully engage the top slider and align the collar with its indicator. Do not shift during cutting or repeatedly start the tool to force a selector into position.
Check the actual scale rather than choosing between 22 and 23
The FX1151/FX1251 manual is internally inconsistent: its specification table lists FX1151 as 22 clutch settings plus drilling, but the FX1151 operating paragraph says 23 and describes positions 1–23. This is not a reason to aim automatically for the highest number, or to borrow FX1251’s separate function ring and hammer action.
Begin a trial at a clearly marked low setting on the actual tool. If its markings, model and manual cannot be reconciled, ask FLEX for the applicable version. This guide does not decide which printed number is wrong. The drill symbol locks the clutch for drilling; it is not a finer screw-driving setting.
Run one controlled comparison
Use an ordinary screw, matching material of similar thickness and the pilot hole required by the fastener. Clamp the scrap. With power disconnected, choose mechanical range 1 and a low numbered clutch setting. Change one variable at a time. Check the accessory and area, install and latch the specified battery with your finger off the trigger, then release the centre lock and select the correct driving direction.
Seat the bit fully, keep the axes aligned and press the trigger gently with a secure grip. Reduce trigger travel near the target position. Release and wait for a stop before inspecting. For any adjustment, remove the battery, change one setting, then repeat the battery, direction and grip preparation before a fresh trial position.
Three results require different responses
Swipe or scroll horizontally to see all columns.
| Result | Meaning | Next action |
|---|---|---|
| Correct seating without head or material damage | This trial combination works | Record material, screw, pilot hole, range 1 and clutch |
| Normal clutch release before seating | A small increase may be appropriate after checking the bit and pilot hole | Stop, disconnect, adjust and retest elsewhere |
| Slipping recess, split material or head driven too deep | Damage or a mismatch is already present | Stop and identify the cause rather than increasing the number |
An actually stalled motor, slipping chuck, abnormal control or obvious heating is not normal clutch release. Stop and resolve it; do not switch to drilling to bypass the clutch and force the screw. A successful sample still needs reassessment when the material, thickness or fastener changes. The numbered clutch is not a calibrated torque wrench.
Models referenced