
Read the screw seat
Three screw sections show a proud head, a seated countersunk head and an overdriven damaged seat.
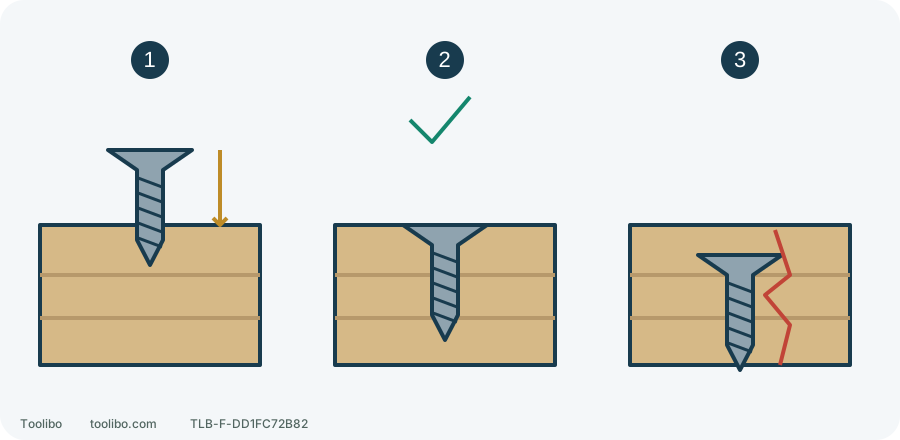
1. Still proud
Increase gradually only when the recess and material are sound and resistance is normal.
2. Intended seat reached
Release the trigger and inspect.
3. Damage or overdrive
Stop and reassess the joint; a different setting does not repair it.
The intended head style determines the correct seat; the collar number alone does not.
Separate the three controls
The numbered collar limits screwdriving effort, the mechanical gear selects a transmission range, and the trigger controls speed within that range. On a Milwaukee 3403-20, choose a numbered clutch position for screwdriving. The drill symbol is a different mode, not an extra calibrated torque step above the largest number.
If you want to limit how far a screw is driven, check that a numbered position is selected. Do not expect drill mode to behave like a low clutch setting. Remove the battery before changing or fitting accessories, and let the tool stop completely before changing controls.
Make the trial representative
Clamp scrap of the same material and similar thickness. Use the intended screw, a correct and undamaged driver bit, and the same pilot-hole and countersink preparation. A shorter screw in softer scrap may give a misleading setting.
Decide what seated means before starting. A countersunk head may need to meet a prepared recess; a pan head normally bears on a fitting rather than disappearing into the wood. Neither running until nothing moves nor hearing clutch chatter proves the joint is finished correctly.
Change one condition at a time
After fitting the accessory, securing the work and checking the settings, keep your finger off the trigger, refit a compatible battery by the tool’s procedure and verify retention before the trial below.
- Select a low numbered setting, check the driving direction and seat the bit fully in the screw recess.
- Keep the bit in line with the screw and start slowly. Clamp the work; keep hands away from the possible screw exit.
- Release the trigger when the clutch operates or the screw reaches the intended seat. Stop and inspect rather than letting the clutch chatter continuously.
- If the screw remains proud, the recess is sound and there is no unusual resistance, increase the collar a little with the tool stopped. Do not simultaneously change gear, bit and pressure.
- Once the head sits correctly without damage, confirm on another similarly prepared part of the scrap before working on the finished piece. Record tool, screw and material, not just a number.
Read the result
Swipe or scroll horizontally to see all columns.
| Result | Next step |
|---|---|
| Screw remains proud, clutch slips early, material and recess are sound | Increase gradually only if there is no abnormal resistance |
| Intended seating reached without crushing the material | Release the trigger; use this as a starting setting for matching work |
| Head driven too deep, screw spinning, rounded recess or split wood | Stop and reassess screw, pilot hole, material and bit; a lower setting does not repair damage |
A sudden load increase, stalled tool or twisting housing calls for a stop, not an automatic higher setting. A hidden hard object, unsuitable screw or poor pilot preparation can look like a need for more torque.
Do not transfer the number blindly
Screw size, material, pilot preparation and battery conditions affect the result. Repeat the trial when the screw, material or joint changes, even if the drill is the same model.
Where a connection specifies tightening torque, use the installation method and measuring tool required for it. A drill clutch trial is not a torque-wrench substitute or proof of a structural, load-bearing or safety-critical connection. This method is for ordinary non-structural assembly, judged by the actual seat and condition of the work.