
Diagnose a straight top line with a sloping bottom edge · Diagram
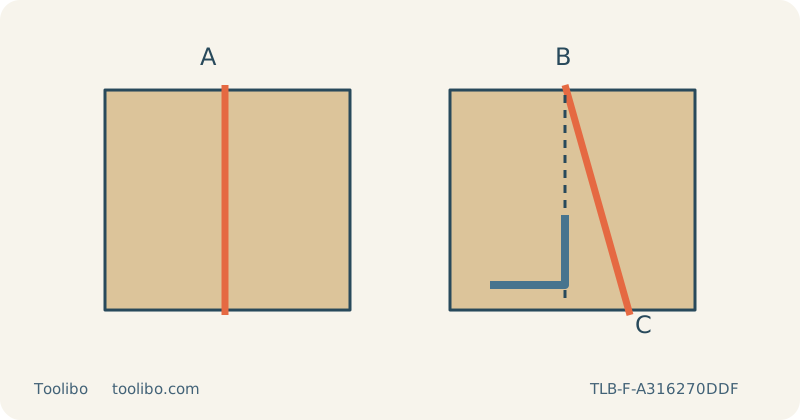
Two wood cross-sections compare a vertical cut with a cut that begins at the same top reference but leans below.
A
Check a square sample
B
The top line is only one reference
C
Inspect the lower edge too
Separate layout, blade installation, support and feed effects before blaming the base angle.
Identify which edge is wrong
A jigsaw can follow a pencil line on the upper face while leaving a sloping or wandering edge underneath. These are separate observations. Before adjusting a guide or moving the layout, inspect a stopped sample from both faces. Mark its original upper face and feed direction so that turning it over does not confuse left and right. Compare the cut with a square at several points, rather than judging only the end where the blade entered.
This external diagnosis applies to known, loose, uncoated wood and an otherwise intact tool. It does not authorize bending the blade back into shape, adjusting internal guides or dismantling the drive mechanism. If the saw has been dropped, the base is visibly damaged or the clamp cannot retain a correct blade, stop using it and seek authorized service before investigating cut quality.
Remove installation errors first
Switch off and disconnect power completely: remove the battery or unplug the cord. Let the blade cool before handling it. Inspect the blade for a bend, missing teeth, heavy wear or an unsuitable profile. A damaged blade must be replaced, not straightened and returned to work. Confirm that the blade is specified for this wood and thickness, and remains long enough to pass through the work throughout its stroke.
Refit a suitable blade according to the exact tool instructions. Seat its shank fully and verify that the back is in the intended guide roller groove. Check retention and secure the base at the selected zero-bevel setting. A blade held partly outside the clamp or missing its roller support is not a setting problem. If correct installation cannot be achieved, do not attempt a powered trial.
Check whether the work is steering the cut
Clamp matching scrap to a stable bench and support the waste independently. Both pieces should remain level without closing the kerf. Leave complete clearance under the moving blade and keep clamps clear of the whole base route. An offcut that drops or a bowed panel pulled flat by uneven clamping can change the forces on the blade during the cut, so reproduce the actual thickness without reproducing poor support.
Check the intended curve. A broad straight-cut blade may resist a tight radius, while a narrow curve blade may not hold the square edge required through thick stock. Do not force either blade sideways to rescue a line. For the diagnostic sample, use a simple straight route first. If that is acceptable but the project curve is not, investigate the radius and blade suitability rather than immediately blaming the base angle.
Change one cutting variable at a time
Wear eye and hearing protection and suitable respiratory protection. Provide compatible dust extraction and ventilation. Start with the base supported, blade clear of the wood and an appropriate speed selected. Let the saw reach speed before feeding and keep the base flat. Feed steadily without pushing the saw faster than its blade can clear material. Excessive forward or sideways force can make a thin blade deviate below the visible surface.
If the saw labours, burns the wood or loses base contact, switch off. Wait for the blade to stop fully before withdrawing it, setting the tool down or examining the underside. Isolate power before each adjustment. Compare trials that change one relevant factor, such as replacing a worn blade or reducing feed pressure, while keeping the work support and layout consistent. Several simultaneous changes make the result difficult to interpret.
Trace changing deflection along the route
Mark where the new cut begins to deviate and compare that position with changes in the route: a tighter turn, a longer reach, hose drag or waste beginning to move. After a full stop and power isolation, improve the relevant support or handling arrangement and repeat on matching scrap without changing the locked base angle. A difference between these controlled trials can help identify a dynamic cause, but does not prove an internal fault. Do not attempt to watch underneath or touch the waste while the saw runs.
Do not keep trimming the finished part progressively smaller while hoping the bottom edge improves. Establish an acceptable sample first. If the tool remains inaccurate with a correctly installed fresh blade, secure base and controlled feed, arrange service or choose a method suited to the required joint. Leave finishing allowance where appropriate, but do not disguise a structurally important poor fit with filler or treat a decorative cut as evidence of load-bearing suitability.
Models referenced