
Four inlet checks for a pulsing jet
Supply route drawing shows a stable source, an unpinched hose, a sealed inlet connector and two clear strainers before the closed pump.
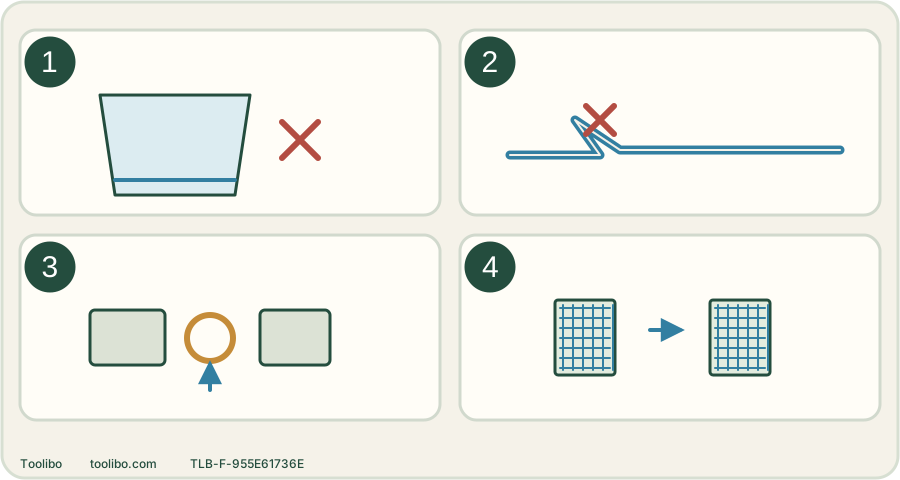
Stable source
Do not keep running with an empty tank or absent supply.
Open hose path
Look beyond the machine for a reel or corner crushing the hose.
Sound inlet seal
Check seals only after isolation; suction lines must not admit air.
Clear filters
Rinse and refit both filters before the matched air-clearing process.
Follow the water path before repeating air clearing. Pulsing while spraying is not the same as restarting after the trigger is released. Conceptual schematic, not a product image or scale drawing.
Confirm which kind of cycling you have
Hold the gun normally and observe whether the pulses occur while the trigger is deliberately pressed. If the motor instead restarts by itself with the trigger released, use the separate self-starting fault branch; that may indicate lost pressure inside the closed circuit. Do not confuse normal auto-stop when releasing the trigger with a fault.
If there is almost no water, stop the motor. Do not keep it running in the hope that a disconnected tap or empty tank will recover. Note whether the problem began after reconnecting a hose, cleaning a filter or switching to a water container, because each change can introduce air.
Trace the low-pressure side first
Check the tap is open and the source is not running out. Walk the entire supply hose: a reel, gate or tight bend can restrict water even when the section beside the machine looks normal. Inspect the inlet coupling for a loose connection or displaced seal with the machine isolated. A tank suction line also needs airtight joints and a submerged strainer.
The UniversalAquatak 135 troubleshooting table specifies a supply hose of at least 1/2 inch, approximately 13 mm. This is a model requirement, not proof that any hose of that diameter supplies enough water. Length, kinks and source flow still matter. Compare all inlet requirements in the exact manual before changing the plumbing.
Clean the filters before bleeding air again
Shut down and release pressure, unplug and disconnect the supply. Inspect both Bosch inlet filters and rinse them if dirty; damaged elements must be replaced. Reassemble the seals correctly. A clean but poorly seated adapter can create a new problem while fixing the old one.
Reconnect the water and perform the model’s specified air-clearing procedure. For this Bosch, normal startup first uses the open tap and depressed gun trigger with the main switch off until the water flows steadily. Its troubleshooting table also describes running with the trigger open and nozzle at low pressure to stabilize pressure. These are defined procedures, not permission for prolonged dry running or for copying another brand’s timing.
Remove complications from the comparison
If the problem began after adding a high-pressure extension, stop and isolate before returning to the original hose arrangement. The Bosch table identifies excessive high-pressure extension length as a possible cause and gives a 7 m maximum extension in that context. That does not mean every generic 7 m hose is compatible, or that 7 m is the total hose limit for every machine.
Check the nozzle for contamination if the supply route is sound. Clean only the detached nozzle with the approved method. Change one thing at a time, then make a short controlled comparison with the correct accessory and safe target.
End repeated restart attempts
Stop if a steady supply, clean filters and the permitted air-clearing steps do not restore normal operation. Document whether the pulse occurs with all approved accessories or only one, whether it changes between tap and tank supply, and whether water is leaking. This evidence is more useful to service than a description such as “the pump is bad.”
Never open the pump, adjust the pressure switch or hold the trigger tied open as a cure. A damaged hose, leak near electrics, repeated protection trip or abnormal mechanical noise ends the test immediately.
Record the symptom before the next safe check
Swipe or scroll horizontally to see all columns.
| Observation | Next check with power isolated and pressure released | What it establishes |
|---|---|---|
| Began after reconnecting the inlet | Check seating, seals and a kink-free supply route, then perform the permitted water-fed purge | A connection change is a clue, not proof the pump is damaged |
| Occurs only with one approved nozzle | Inspect and clean that detached nozzle using the matched method | A difference between accessories narrows the report; it does not prove internal pressure settings need adjustment |
| Appears with tank supply but not the correctly established tap setup | Check the approved suction kit, airtight joints and submerged filter | The two inlet arrangements differ; do not improvise suction plumbing |
| Motor restarts with the trigger released | Stop and use the separate self-starting fault guidance | This is not the same symptom as pulses during deliberate spraying |
For example, if a formerly steady jet pulses immediately after reconnecting a hose, record that timing and inspect the isolated inlet first. If correct reseating and the permitted purge do not help, stop repeated tests and give service the observation. Do not deliberately starve the inlet or recreate a leak to confirm a theory.