
Distinguish a lifted thread from continuous leakage
One glue gun leaves a fine thread as it is lifted after application; a second rests above repeated drops without trigger pressure, while a rear leak is marked as a stop condition.
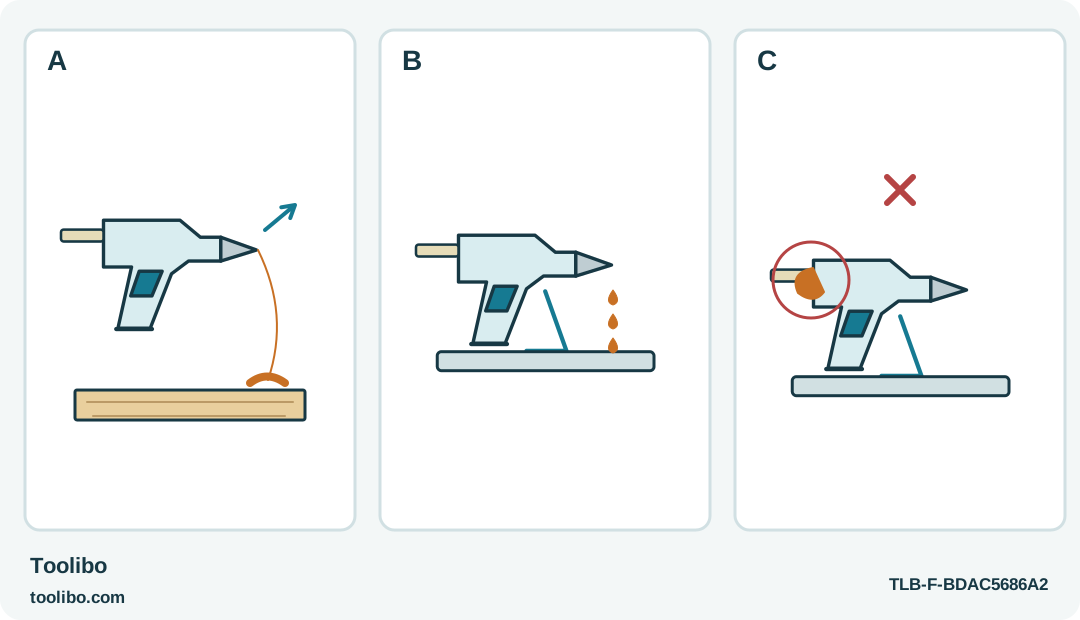
A · End the feed
Release the trigger before finishing the application and lifting away.
B · Persistent dripping
Check the exact adhesive match; continued abnormal flow calls for stopping.
C · Rear leakage
Adhesive at the rear or a jammed feed is not corrected by squeezing harder.
Symptom illustration, not an internal diagnosis. Keep the tool supported and stop abnormal leakage; no wire, probe or forced-feed remedy is shown.
Describe what happens before trying a cure
A fine thread left as the gun is lifted is not the same symptom as glue flowing continuously while the trigger is untouched. It also differs from glue emerging around the rear of the stick or a trigger that will not move normally. Naming the behaviour helps avoid a familiar mistake: changing temperature, squeezing harder and pushing the stick all at once until the original problem becomes impossible to identify.
This guide is limited to safe external observations on the identified household glue systems. It does not diagnose an internal heater, thermostat, seal or battery. If the housing is damaged, there is smoke or an unusual smell, a cable is suspect, or adhesive escapes where it should not, stop using the tool and arrange appropriate service. Do not continue a test to see whether the problem clears itself.
Keep the workpiece on a protected heat-resistant surface and give the hot gun its normal stable resting place. No fault check should require touching a hot nozzle, holding thin material behind the glue or inserting a probe into the feed path.
Check the cold information first
Read the gun identity and the adhesive packet before another heated attempt. Confirm the required diameter, recommended adhesive and working-temperature pairing. A clear stick that fits loosely or happens to be nearby is not evidence of compatibility. Leave an unidentified inserted stick alone rather than pulling it backwards through the mechanism.
The Bosch GluePen troubleshooting guidance connects persistent dripping with an unsuitable low-melting adhesive and feed problems with incorrect stick size or length. Those are model-specific diagnostic clues, not a reason to declare that every dripping gun has the same fault. A Dremel 930 adds a temperature-selection question: low-temperature colour or glitter sticks must not be treated as high-setting general-purpose stock.
If the adhesive or temperature pairing is wrong, stop and follow the exact manufacturer’s correction procedure. Do not improvise a purge, add liquid glue or pour a cleaning agent through the inlet. If the safe correction is unclear with material already inside the gun, ask the manufacturer or a qualified service provider rather than experimenting on a heated tool.
Test the end of the application movement
For a sound tool with a confirmed correct adhesive, prepare a small scrap joint. Let the gun reach its prescribed ready state and use gentle, steady feed. Watch whether the thread begins because the trigger remains pressed as the nozzle is lifted away.
Release the feed just before completing the application, then move away without dragging the hot end across the finished work. Keep the tool over the protected area while returning it to its support. This changes the end of the movement without introducing a different adhesive or a guessed temperature setting.
Inspect the cool sample. If the thread is reduced and the bead is otherwise controlled, the useful correction may simply be a more deliberate end to feeding. Do not chase a warm strand with bare fingers. Let the sample cool before dealing with unwanted adhesive, using only a method suitable for the actual material and tool.
Know when a drip stops being a technique question
A drip-control feature should not be treated as a guarantee that the nozzle is touch-safe or that no adhesive can ever emerge during a pause. Keep the resting area protected even when the product description mentions drip control. Equally, persistent flow after feeding has stopped is not something to hide by leaving the gun over the project.
If abnormal leakage continues with the correct system, stop the trial and shut down as the instructions require. Do not lay the tool on its side to redirect the glue or insert a screw, wire or pin into the nozzle. Glue appearing at the rear, a jammed feed mechanism or an unusually hard trigger calls for stopping, not a stronger squeeze.
Uneven flow also needs context. A gun still warming up is not ready for a finished joint, while a residual-heat tool may no longer have enough stored heat for the next one. Use the actual readiness and reheating instructions. Increasing pressure cannot replace them and can turn a small flow problem into a mechanical one.
Preserve the work and finish safely
Move the finished object away from further drips without carrying it by a fresh joint. If the bond was made with uncertain adhesive or poor flow, do not assume that trimming the visible strings makes the joint sound. Let it cool, inspect it and reject it if ordinary light handling shows lifting or separation.
Switch off or unplug the gun as appropriate, leave it supported until fully cool and keep inserted adhesive in place unless its instructions explicitly direct otherwise. Record the exact gun, stick and symptom for service if needed: “continues dripping without trigger pressure after normal warm-up” is far more useful than “glue is messy.” A clear description can lead to a safe correction without opening the tool or disguising a fault as a craft technique.
Models referenced