
Reproduce the real joint on a small sample
Three sample cross-sections show a matching coated surface, a flat cooled bond, and a rejected curled or separated bond.
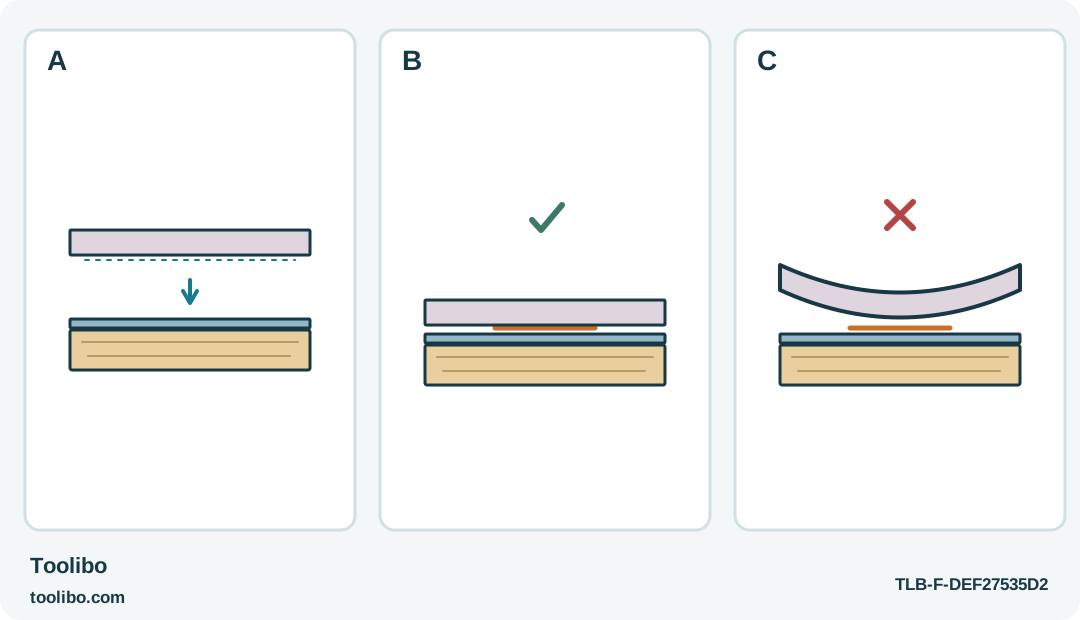
A · Match the faces
Include the same coating, backing and overlap that the finished joint will use.
B · Inspect after cooling
Look for flat contact and an acceptable visible surface before light handling.
C · Reject damage
Melting, distortion or easy separation means stop using that combination.
A small screening trial checks appearance and ordinary light handling. It is not a strength test or approval for a structural, wet or food-contact repair.
Ask the sample to answer one clear question
A scrap trial is useful when it reproduces the part of the project that might fail. If the concern is glue showing through thin paper, a thick cardboard sample tells you very little. If the final joint touches varnish, a test on bare wood checks the wrong surface. Start by naming the question: will this exact pair of faces stay flat, look acceptable and remain attached during the light handling the object is intended to receive?
This is a screening method for small, noncritical indoor crafts. It does not measure rated strength or approve a repair to a chair, shelf, drinking vessel, electrical item or protective equipment. Those jobs cannot be qualified by pulling a small homemade sample apart. Choosing a different joining method is a useful conclusion, not a failed experiment.
Check that the selected gun and adhesive actually permit the materials before making the trial. Do not use a test to override an explicit exclusion. The Bosch GluePen, for example, excludes certain plastics and Styrofoam in its instructions; a quick apparently successful blob does not cancel that limit.
Reproduce the surfaces and the joint
Use offcuts from the actual material where possible. Include the same coating, printed face, textile backing or cardboard surface that the finished bond will touch. Mark which face is which while the pieces are cold. If you cannot obtain a representative sample without damaging a valuable object, a reversible nonadhesive design may be the better choice.
Prepare the surfaces according to the material and adhesive instructions. They need to be clean and dry; loose dust or grease can prevent a useful bond. Do not introduce flammable solvent residue before applying heat. Avoid abrasive preparation that damages a finish you intend to preserve, and do not assume that an unknown coating can safely be heated or roughened.
Copy the joint shape, not merely the material pair. A folded cardboard foot should be tested as a folded foot. A flat decoration should be tested with the same overlap and visible edge. Thick adhesive used to bridge a large gap changes the construction, so improve the fit rather than treating a gap-filled sample as equivalent.
Set up a controlled first application
Place the scraps on a suitable heat-resistant, protected work surface. Keep fingers out from behind thin or heat-conductive materials. Arrange a cool support or pressing aid if the joint needs one, and rehearse placement before heating the gun.
Identify the exact stick and match its diameter and temperature requirements to the gun. Let the tool reach its prescribed operating condition before feeding gently. For a GluePen, use the proper ready indication; for a Dremel 930, select the appropriate low or high setting for the actual adhesive. Do not compare a cold first squeeze with a later normal one and call the difference an adhesive fault.
Apply a small, manageable amount to the planned contact area. Join the pieces promptly and hold the alignment safely while the glue begins to set. Keep the application sequence consistent enough that a second trial can answer whether a changed amount or placement actually helped. Changing the material, glue, quantity and shape all at once makes the result difficult to interpret.
Inspect after cooling, not while correcting hot glue
Leave the sample supported until it has cooled according to the selected system’s instructions. Do not pick at a warm edge with a fingernail or press a soft bead flat with a fingertip. Initial grip and complete readiness for handling are different stages; there is no universal cooling interval for every adhesive and joint.
Look first. Check for distortion, melting, discoloration, a visible lump, an open edge or an area that never contacted the other piece. These can reject a sample before any handling test is needed. An attractive glue surface is not enough if the material underneath has curled or weakened.
Then handle the cool sample in the gentle way the finished craft will normally be handled. A paper decoration should tolerate ordinary placement without its corner immediately lifting. A cork lining should remain flat when a light item is placed on it. Do not invent a weight test, hang from the joint or treat a hard pull as proof of structural safety. Keep brittle or sharp materials out of aggressive testing.
Change one thing or stop
If the appearance is poor but the materials remain intact, change one controllable feature, such as using a smaller adhesive quantity or a better-supported overlap, and repeat on fresh scraps. If a surface melts, an explicit compatibility limit applies or the bond separates easily despite correct preparation, stop using that system for the project.
Record the gun, identified adhesive, material faces, joint shape and the reason for acceptance or rejection. A photograph of the cool sample and its packaging can be more useful than a vague note saying “strong glue.” Apply the successful method to the finished piece without enlarging the job or changing its intended conditions, and retain the same limits: a dry decorative trial does not establish waterproofing, heat resistance, food safety or a load rating.
Models referenced