
The soap tip opens a different route
Upright washer with a tank branch feeding the soap-mode outlet, distinct from a high-pressure rinse path.
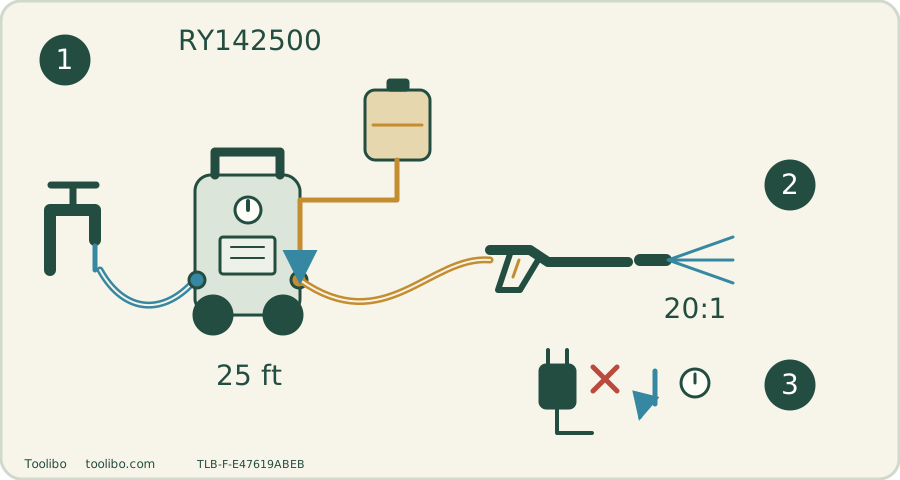
Water first
Purge with no nozzle until water is steady.
Soap mode
Tank detergent is drawn with the specified soap tip.
Rinse mode
Isolate and depressurize before changing tips.
Diagram explains operating mode, not internal pump construction or an interchangeable accessory standard.
Confirm the upright machine and its kit
The US RY142500 is a brushless corded washer. The matched documentation gives nominal 120 V AC, 60 Hz, 13 A, 2500 PSI maximum pressure and 1.2 GPM maximum flow. Those maximum labels matter: this guide does not claim an independently measured rated pressure or a cleaning-speed advantage.
The verified package has a 25 ft high-pressure hose, trigger handle, metal wand and 15°, turbo and soap nozzles. Its 12-inch flat-free wheels help transport the upright assembly. An onboard soap tank feeds a low-pressure detergent route; this differs from compact Ryobi packages whose soap bottle replaces the wand.
Before the first lift or move, check that the handle, wheels and retainers are fully assembled as shown in the matching manual. A wheel that is only slipped over its axle is not ready for transport. Keep the machine stable and use the handle rather than dragging it by the hose.
Put reach and electricity on the plan
Lay out the 25 ft hose route around the object to be cleaned. The straight-line distance from machine to car is not enough: corners, obstructions and slack at the fittings all consume hose. If the gun reaches only with the hose taut, stop and choose another stable machine position before starting.
The quick guide does not recommend an extension lead. If one is used within that guide’s scope, the only listed allowance is 25 ft of 12 AWG; 50 ft is prohibited. Do not import the more permissive compact RY141803 table. Start by finding a suitable dry outlet within the normal cord arrangement, and never use a damaged connection or remove GFCI protection to obtain reach.
Assemble, feed and purge before the motor runs
- With the switch OFF and plug disconnected, connect the wand to the trigger handle and the high-pressure hose to the handle and pump. Align threads without force and uncoil the hose fully.
- Uncoil the garden hose, connect the water supply and open the tap fully. Look for loose joints or kinks before pressurizing.
- Leave the spray nozzle off. Aim safely and squeeze the trigger until a steady stream of water appears. This is the observable acceptance check: air-filled bursts are not a ready condition.
- To install a nozzle, keep the motor off, disconnect power, shut water and discharge residual pressure. Lock the trigger, pull the quick-connect collar back, insert the nozzle and release the collar. Tug the tip to confirm it is retained.
- Restore the water supply and follow the GFCI test/reset procedure for the actual plug before powering the machine. Keep two hands on the spray assembly and begin with a cautious test on an inconspicuous area.
If the stream is weak even during the motor-off supply check, inspect the tap, inlet hose and connection first. Running a starved pump harder is not a remedy. If the protection test fails, or an electrical fault repeats, stop using the machine and arrange service rather than repeatedly resetting it.
Choose the jet for the surface
The 15° nozzle produces a concentrated fan; the turbo nozzle adds a rotating concentrated action. Neither is a gentle default for every painted or delicate surface. Start with the surface owner’s cleaning restrictions, then select an appropriate nozzle and test distance. If the kit lacks a suitable gentle option, do not pretend the soap nozzle turns the whole kit into a guaranteed safe automotive setup.
For a paved walkway, work in manageable sections, keep the spray moving and inspect the first pass before continuing. A lighter patch may be cleaned dirt—or surface damage. Stop if joints erode or the surface texture changes. More repeated passes with a turbo nozzle can worsen damage rather than finish the job.
Use the tank’s low-pressure route deliberately
Before opening or filling the detergent tank, switch off, unplug, close the water supply and discharge residual pressure. Fill the tank with suitable pressure-washer detergent prepared according to the chemical label. With the machine isolated and depressurized, install the blue or black soap nozzle specified by the guide. The nozzle activates the injector; the quick guide gives a 20:1 injector ratio and approximately 5 seconds before detergent arrives.
Do not confuse that injector ratio with instructions to mix every concentrate 20:1 in the tank. The chemical’s dilution, material compatibility and dwell instructions still apply. Never use bleach or solvent-based detergent. Apply only as much as can be rinsed before it dries.
If no detergent appears, stop and verify that the soap nozzle—not a high-pressure tip—is fitted, and check the tank contents. Changing concentration will not fix the wrong nozzle. To return to high-pressure rinsing, turn off, disconnect electricity, close water, release pressure and lock the trigger before changing the tip.
Shut down and protect the pump
Switch off and unplug, close the water supply and release pressure safely before disconnecting the hoses. Empty the tank and drain the detached accessories so dirty solution is not left inside them. Keep the electrical cord separate from wet fittings while packing up.
The matched quick guide recommends pump protector after use and before storing. Follow the protector manufacturer’s application directions; this is not permission to use automotive antifreeze or another improvised fluid. Protect the entire machine and accessories from freezing.
Do not guess a draining tilt, internal service interval or replacement seal from a different RY14-series machine. Match the manufacturing identifier and supplied manual when a revision-specific procedure is needed. External inspection, correct supply and nozzle cleaning are owner checks; oil leakage, a damaged hose, unreliable trigger lock or persistent pump trouble requires service rather than internal experimentation.
Models referenced