
Different controls, separate adapter evidence
A shows 2626-20 positions 1–12 and 11,000–18,000 OPM with I/0. B shows 2836-20 positions 1–10 plus A, 10,000–20,000 OPM and moving A from 15,000 to 20,000. C uses two separate document outlines, a star and adapter identifier with question marks and a not-equal symbol.
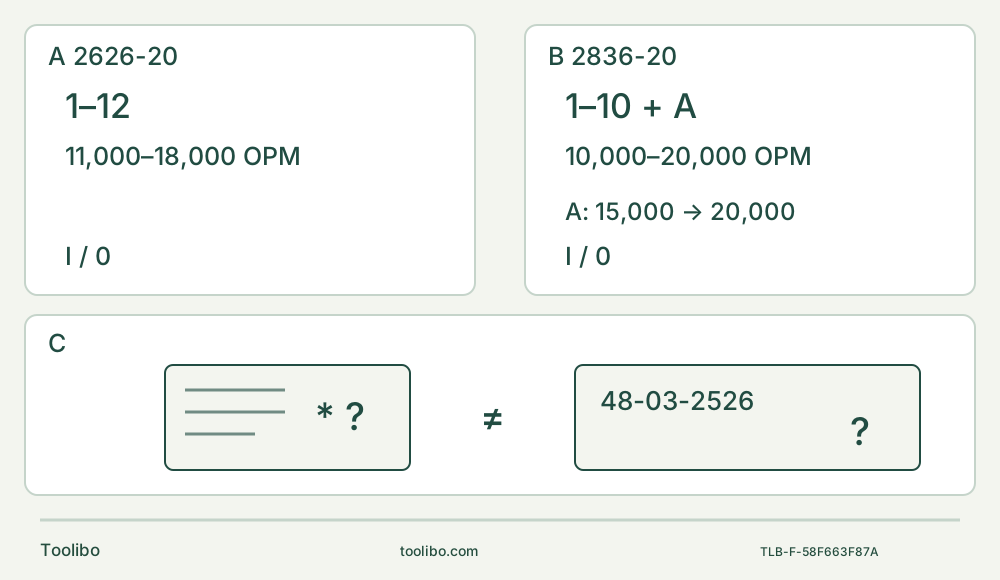
A · Manual-only 2626
1–12 spans the documented 11,000–18,000 OPM endpoints. Forward I runs; rear 0 stops. No A mode is transferred.
B · Deliberate 2836 mode
Choose 1–10 or understand that A already starts moving at 15,000 OPM and ramps under load to 20,000. It is not standby.
C · Hold unresolved adapter evidence
Keep each body’s chart and parts separate. Missing exact starred kit guard, bolt or instructions holds the 2626 route; do not substitute the other body’s adapter.
Original schematic. A and B show manual endpoints and control states, not equal numbered speeds or performance. C is an evidence check, not a hardware stack: the 2626 starred routes need their exact kit guard, bolt and instructions; 2836 adapter 48-03-2526 applies only to its two illustrated profiles. Neither document symbol approves a missing kit.
Decide what the existing inventory actually permits
This is an existing-system choice between the US Milwaukee 2626-20 and 2836-20, not a test of which cuts faster. Use the 2626 manual 58-14-2622d4, dated October 2021, and the 2836 manual 58-14-0217d1, dated June 2020, with matching actual bodies and owner instructions. Both are 18 V DC M18 tools, but that does not make their accessory hardware or controls interchangeable.
The output is a short decision record: which body, which positively identified recommended wood blade, which documented mounting route, which qualified power system and which deliberate control mode can complete your sample. An unresolved adapter kit is a reason to hold that route, not a reason to try a bolt from the other body.
The assembly and operation instructions are on printed pages 4–5 of both manuals. The 2626’s entire arbor chart and its starred footnote on page 4 matter together. Do not replace that chart with an online “universal fit” label or assign unnamed silhouettes to a brand or interface tier.
Sort the blades before choosing the body
Switch OFF, wait for complete stop and remove the battery. Handle cooled sharp accessories with protective gloves; do not reach near moving edges. Read each accessory’s actual identity, material approval and recommendation for the particular tool. Inspect for dullness, cracks, bending or other damage. A damaged or unidentified accessory is not a fit-test specimen.
For the 2626, the chart shows four particular arbor profiles with “adapter not needed,” followed by five profiles requiring the illustrated adapter orientation. A positive match means the actual mounting geometry and recommendation are established, not that a hole looks roughly round. The drawing does not prove every similarly shaped blade suitable for the work.
The five starred rows also require the installation guard and accessory bolt supplied with the kit. Adapters are sold separately. This guide does not establish an exact adapter-kit identity or its separate instructions, so those starred routes remain on hold. Do not substitute the native bolt, add loose washers, leave out the guard or reverse an adapter experimentally. Obtain the exact kit and instructions through qualified manufacturer support before reconsidering such a route.
The 2836 manual names adapter 48-03-2526 for its two pictured arbor types. That is a bounded statement about those profiles, not approval of all five 2626 starred rows. Nor does the shared appearance of a bolt establish interchangeability. Keep the two bodies’ hardware and evidence separate.
For the worked cut below, select only a sound, specifically recommended wood blade with a positively established no-adapter fit on the chosen body. Neither manual supplies a universal wood-blade SKU for this comparison. If your blade’s identity or approval is missing, stop and obtain it rather than borrowing an accessory number from another model guide.
Make the control choice explicitly
The 2626 dial has positions 1–12. Its manual gives 11,000 OPM at 1 and 18,000 OPM at 12; it does not give a full table for intermediate numbers. There is no Auto-Load position in this documented system.
The 2836 offers positions 1–10 across 10,000–20,000 OPM and a separate A position. A starts at 15,000 OPM and ramps to 20,000 OPM under load. It is already moving before contact, not a stopped standby or a safety interlock. The same dial number on the two bodies is not an equivalent speed, and the higher maximum is not evidence of better finish or faster work.
Both use a maintained slide switch: forward to I runs, backward to 0 stops. The 2626 assembly page includes generic “lock the trigger” wording, but its actual illustrated control and starting instructions are a slide switch. Do not invent a trigger lock; remove the battery for setup and non-use.
For a short wood-cut trial, both manuals call for a high cutting speed, full speed before contact and moderate pressure to avoid scorching. They do not give a universal numbered setting for every wood and blade. Use the documented manual-speed route deliberately for this sample. Choosing A later requires understanding its moving initial state; it does not cure a poor mount or unsupported workpiece.
Two inventory decisions, not a platform ranking
A complete native 2626 setup. You already have the matched 2626, a specifically recommended wood blade positively matching a no-adapter row, original correct hardware and a commissioned approved M18 system. The full cut path and insulated grip are accessible. Retaining this setup is reasonable for the sample; the existence of A on another body is not a missing prerequisite. If the blade or hardware cannot be identified, this outcome changes to hold.
An older mixed blade box. Your preferred blade falls in a starred 2626 row, but the exact installation guard, kit bolt or instructions are absent. Do not assemble it. The options are to qualify the exact complete kit, choose a documented recommended no-adapter wood blade, or reject the intended route. Buying a 2836 does not automatically rescue the blade box: its two-profile adapter rule and actual accessory recommendation must independently close. Retain the 2836 only if its own complete native system is already qualified and its controls suit the task.
If neither body has an identified approved blade, correct hardware, safe access and a qualified power system, choose neither yet. Record the missing items rather than convert uncertainty into a powered experiment.
Assemble only the selected no-adapter route
Keep the switch OFF and battery removed. Lift the quick-release lever and push it firmly forward over its detent. Invert the tool; the 2626 specifically calls for a flat surface. Unscrew the accessory bolt, remove the accessory and any adapter, then clean dirt and debris from the bolt, flange and accessory. On the 2626, also clean any removed adapter before setting it aside.
Place the verified no-adapter accessory and that body’s correct original bolt on the tool. Establish proper engagement and hand-tighten securely, then press the lever back into place. Both a threaded bolt and lever closure are required. There is no numerical tightening torque here. Check seating while isolated; do not force the lever, add spacers or run the blade to see whether it wobbles. If correct parts will not secure properly, keep the system out of use and seek qualified service.
Complete a visible loose-stock sample
Use a manageable loose piece of known, uncoated solid softwood with a short marked straight cut and visible underside. Inspect for nails, screws and other foreign material; exclude unknown or installed stock. Identify the retained side and waste. Clamp the retained work to a stable platform and support the waste without closing the kerf or intersecting the blade path.
With power removed, verify the whole blade sweep, cutting reach, underside clearance, actual body and eventual battery envelope. Maintain a normal insulated grip and access to OFF throughout. Do not hold the stock in a hand, reach underneath the cut, twist the blade or remove needed supports to make the tool fit. If the actual blade cannot complete the thickness and approach safely, choose another verified method rather than infer reach from a picture.
Both bodies require an already commissioned specifically designated M18 battery and approved charger under their complete actual instructions. An M18 label alone does not establish every possible pairing, condition or charging procedure. This comparison does not commission a new pack or describe charge lights. Inspect the actual power system and do not use damaged or modified components. With OFF confirmed and the accessory clear, slide the qualified pack into the body until it latches securely.
Wear ANSI Z87.1 eye protection and appropriate hearing protection. For dusty work, use suitable respiratory protection OR the manual’s OSHA-compliant extraction solution under the actual equipment instructions; that alternative does not replace eye protection. Keep bystanders clear and use stable footing. Start clear of the stock, allow full speed and guide the marked cut with controlled moderate pressure and a secure insulated grip, hands away from the cutting edge and underside.
If the work shifts, the blade binds, abnormal behavior occurs or the route loses clearance, switch OFF, wait for complete stop and remove the pack before investigation. Do not perform powered seating tests or repeated fault reproduction. For ordinary completion, switch backward to 0, wait for standstill before setting down and remove the battery before inspecting or changing the accessory. Pack removal uses its release buttons and withdrawal from the body.
Check the intended line and size, full separation, stable support and absence of uncontrolled tear-out or scorching. A poor result is a reason to correct a documented setup issue or seek service, not proof that a higher OPM model is needed. Record the body, exact blade and no-adapter evidence, correct hardware, power qualification, selected mode and sample result. That record—not the number of old blades in the box—supports retaining one complete system or holding both.
Models referenced