
A is a speed mode, not an OFF position
Three panels identify 2836-20 M18 with manual dial 1–10 and A, show Auto-Load rising from 15,000 to 20,000 opm, and distinguish switch 0 from removing the M18 battery.
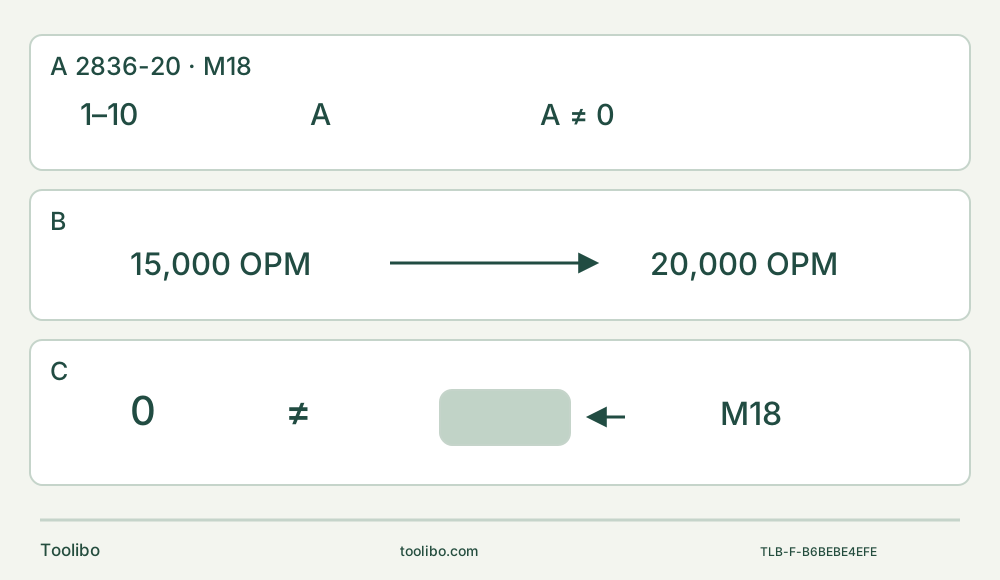
A · Select a mode consciously
Dial 1–10 selects manual speed; A selects Auto-Load. Neither setting isolates the tool.
B · Anticipate the increase
Auto-Load starts at 15,000 opm and rises to 20,000 under load; it is not a stationary standby state or safety cutoff.
C · Remove power for setup
Slide backward to 0, wait for standstill and remove the battery before touching the accessory bolt or release lever.
Recovered original speed-and-isolation schematic freshly checked against the manual. Panel C means OFF is not equivalent to battery removal; it does not show an installation sequence.
Auto-Load changes speed; it does not remove power
On the US Milwaukee 2836-20, A is a running mode, not a standby or safe-change setting. Auto-Load starts at 15,000 oscillations per minute and increases to 20,000 when load is applied. An accessory that is clear of the wood is still moving. To stop, slide the separate switch backward to 0, wait for standstill, and remove the battery before touching the attachment.
This guide follows the current exact 2836-20 product page and its linked operator manual 58-14-0217d1, marked June 2020. Match the actual catalog number, controls and owner documents. Kit photographs and a compatible battery mentioned in marketing are not proof of what a particular purchase includes. The outcome here is a short, clean cut in a clamped, known untreated softwood offcut, followed by inspection and safe storage—not demolition, a concealed wall opening or a runtime test.
Resolve the existing power system before starting
The tool is 18 V DC and uses the M18 battery and charger system. Proceed only with a specifically approved, undamaged battery and compatible charger that the owner has already put into service correctly under their complete instructions. Have those exact instructions available. A family name or voltage alone is not a charging procedure, and this article does not prescribe charge time, indicator colours or a new charger’s first-use sequence.
If the actual combination, its condition or charging requirements cannot be established, leave the powered cut pending. Do the identification and unpowered setup checks first. The tool manual’s recommended operating ambient range is 0–125°F; it is not a substitute for the pack’s charging limits. Do not use a modified, leaking or damaged pack, and keep loose metal away from exposed terminals.
Start with the switch at 0. Press the battery release buttons and pull the pack away from the tool. Check that it is completely removed before opening the accessory mechanism. A stopped motor with a pack still installed is not the isolation needed for blade changes, adjustments, cleaning or storage.
Choose a blade whose approval is known
Use only an accessory specifically recommended for this tool and for cutting the actual wood. For this first sample, choose an identified, original approved wood-cutting blade that fits the flange directly; confirm its instructions and condition rather than treating an unlabelled loose blade as equivalent. If its identity or approval is missing, resolve that before cutting. Reject a dull, cracked, bent or damaged blade: extra friction can cause binding, kickback and scorched wood.
The manual depicts adapter 48-03-2526 for two particular arbor shapes. That is not a promise that every brand, flat opening or cupped Starlock-style interface can be fitted. This bounded direct-fit setup does not use the adapter. An accessory that does not sit snugly is a reason to stop and establish the exact approved combination, not to add a washer, tighten harder or improvise an adapter stack.
The tool-free change still has a threaded bolt
With the battery out and a hot blade allowed to cool, lift the quick-release lever and push it firmly forward over its detent. Turn the tool over, unscrew the accessory bolt and remove the old accessory. Keep the bolt safe; the lever does not turn this mechanism into a Bosch-style snap-in holder.
Clean dirt and debris from the bolt, inner flange and accessory. Place the approved blade at an angle that permits controlled access and keeps the tool and hands clear of the sample support. Fit the bolt and hand-tighten it securely, then press the quick-release lever back into place. The manual gives no numeric torque, so do not invent one or use extra leverage as a substitute for correct seating.
Before inserting power, check that the accessory fits snugly, the bolt is secure and the lever is returned fully. If any part will not seat or close as intended, disassemble with the battery still out, find the cause and replace an incorrect or damaged component through the proper service route. Do not try a powered wobble test to settle a questionable assembly.
Arrange a cut with a visible underside
Mark a short cut on the removed wood sample. Inspect both faces and the whole path for fasteners and other hard objects. Clamp the retained piece to a stable platform and support the waste so it cannot fall onto a hand or close the kerf. Leave clearance under and beyond the blade for its full path, with clamps outside the moving accessory’s area. Never use a hand or your body as the work support, and do not reach underneath while cutting.
Wear eye protection marked to ANSI Z87.1, hearing protection and suitable respiratory protection for the dust. Work with ventilation and appropriate dust controls; the manual requires suitable respiratory protection or an OSHA-compliant extraction solution in dusty conditions. No exact extraction-port or hose arrangement has been established for this setup, so do not invent one or assume that the LED or reduced vibration removes dust risk. Unknown coatings, treated wood and masonry are outside this exercise.
Stand securely with dry, clean grip surfaces and a clear route to the switch. Hold the tool by its insulated gripping surfaces and keep control throughout entry and withdrawal. Keep bystanders away, clothing clear of moving parts and the vents unobstructed. The blade’s permitted angle should make the task easier without requiring a reach beyond a balanced stance.
Choose a deliberate speed mode
The manual mode offers dial positions 1–10 across the tool’s 10,000–20,000 opm range. Do not assign an invented exact speed to each number. For sawing and cutting, the manual calls for a high speed, reaching full speed before contact and controlling pressure to avoid burning. Start the first sample in a suitable high manual setting, subject to the actual accessory’s instructions, so the control sequence is straightforward.
Auto-Load is an additional choice, not an instruction to use A for everything. Its documented 15,000-to-20,000 opm response means the speed can increase as cutting load appears. If using it for a later suitable cut, deliberately select A with the tool stopped and isolated, anticipate that increase and let the tool reach its initial running speed before contact. Do not press the blade against the sample to discover whether the motor is armed, and do not mistake a load-related change in sound for automatic stopping.
Insert power, cut and stop in that order
After assembly, support and mode checks, verify the switch remains at 0. Slide the qualified charged M18 pack into the body until it latches securely. Keep the accessory clear of the work and your hands away from its edges. Grasp the handle, slide the switch forward to I and allow the tool to reach its running speed before beginning the cut.
Guide the blade along the mark with controlled, moderate pressure and stable contact. Avoid forcing it, twisting it in the kerf or trying to recover a wandering line by levering sideways. If the cut is slow or begins to scorch, do not simply push harder. Stop and isolate, then check the blade condition, material suitability, support and selected mode. Keep the offcut supported throughout the cut, rather than catching it with a free hand.
For an abnormal noise, looseness, binding, workpiece movement or unexpected stop, slide backward to 0, wait for motion to end and remove the pack before inspection. Auto-Load is not a diagnosis of a fault or a safety cutoff. Do not infer an undocumented thermal-restart sequence or repeatedly cycle the switch. Resolve the cause under the exact tool and power-system instructions; unresolved faults need service.
At the end, slide to 0 and wait for complete standstill before setting the tool down. Remove the battery, let the blade cool and inspect the finished sample and attachment. Accept the cut only when the intended line and retained wood are suitable, the support has held and no unexplained movement or damage remains. Improve the next trial through setup or accessory choice, not additional pressure.
Change jobs only after another isolated setup
Sanding and scraping are separate accessory setups. Remove the battery before changing to a recommended pad or scraper. For sanding, fit a correctly sized sheet, clamp the work and use light, long sweeping strokes, advancing through appropriate finer grits for the intended finish. For scraping, use a suitable blade at a low angle with light pressure to avoid gouging. These brief boundaries do not authorize stripping an unknown coating or using a metal-cutting accessory as a scraper.
Finish with the pack out and the charger unplugged before any maintenance involving it. Clear vents and keep handles dry, using mild soap and a damp cloth rather than aggressive solvents. Never immerse the tool, battery or charger or let liquid enter them. Do not dismantle the tool or power components. The manual calls for service inspection after six months to a year depending on use; abnormal noise, broken parts or continued poor operation need qualified attention sooner. If a fully charged approved pack does not restore proper operation, the manual allows cleaning its contacts, then requires service if the problem persists—not bypassing controls.
Store the isolated system securely, protect the sharp accessory and keep battery terminals away from conductors. The useful skill is the complete routine: release and threaded bolt, secure attachment, known power pair, intentional mode, controlled cut and battery-out inspection. A is only one part of that routine.
Models referenced