
Identity, disk choice, sample and separate dust gate
A shows 4465190/21025 and an 18 V power qualification cue. B contrasts closed-ring no disk 15 with an open slot requiring disk 15 camber toward the tool. C shows a triangular pad above a clamped surface patch with I to 0. D shows adapter 4465163 above a question-mark document, not an installed hose.
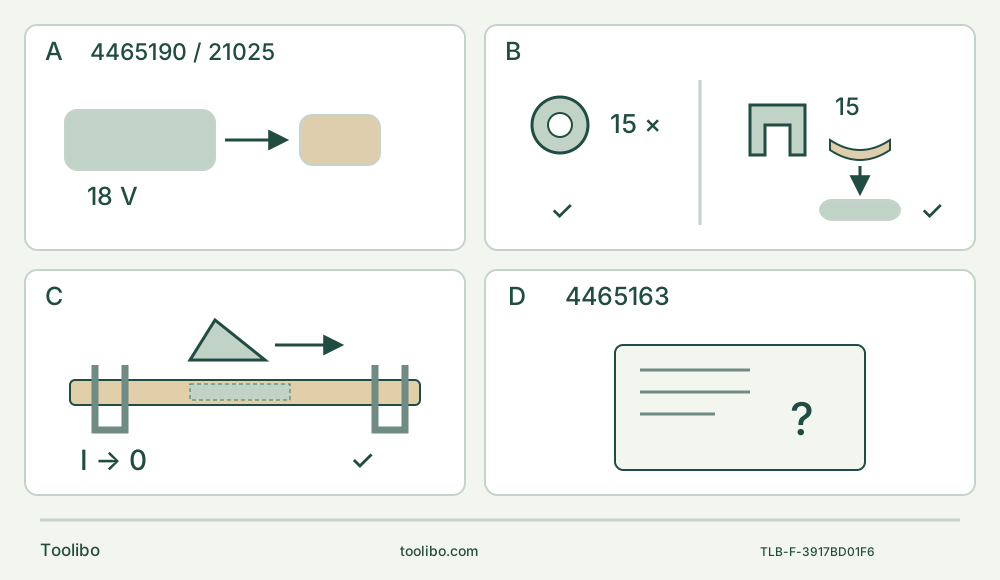
A · Match the complete starting system
Confirm 4465190/21025, supplied instructions and an already commissioned original PXC system. A bare 18 V label is not enough.
B · Choose the correct disk route
Battery out, switch down and chuck up: the native closed ring gets no disk 15. Only the separately documented open-slot route uses camber toward the tool.
C · Sand and inspect a bounded patch
Secure the known wood, keep the complete pad path clear, work away from the body and stop before isolated acceptance. Do not turn small area into a dust exemption.
D · Hold unresolved extraction
4465163 is a named accessory, not an established installation. Larger-area sanding or uncertain dust requirements remain pending exact instructions.
Original schematic, not to scale. A does not identify or approve a battery/charger pair. B shows mounting classes only; the selected original closed-ring pad uses no disk, and the separate open-slot illustration is not a universal accessory approval. C is dry surface sanding, not a cut; clamp positions and full pad travel require actual checks. D is an unresolved evidence gate: larger-area or uncertain dust-control tasks wait for exact accessory/extractor instructions.
Match the body before choosing a task
This guide is for the Einhell TP-MG 18 Li BL, article 4465190, identification number 21025, using the manual dated 19 May 2025 currently linked by Einhell Germany. Match those identifiers and the actual supplied instructions. A different identification number or a similarly named kit is not automatically covered.
The complete project is a small-area dry-sanding sample on loose, known, new uncoated solid wood: secure the work, install the native triangular pad, select matching abrasive paper, control a short pass, then inspect the isolated result. It does not approve sawing, scraping, old coatings or an installed building surface. The operating manual describes broader applications, but the current linked safety booklet restricts this tool to dry sanding. This project stays inside that narrower boundary.
Read the operating manual’s English pages 13–19 and the May 2025 safety booklet’s English pages 8–12, especially the assembly pictures on manual pages 2–3. The manual’s generic charger illustration and indicator table do not identify a particular battery/charger pair. This is an existing-owner workflow, not a new charging tutorial.
Establish a usable starting system
Use only an original, already commissioned Power X-Change lithium-ion battery with its approved Power-X charger under their complete actual instructions. Verify actual ratings, condition and correct use rather than relying on the family logo. This article does not select a named pack, infer a charger from a picture or promise current kit contents. If that qualification is incomplete, finish it through the actual instructions or qualified support before proceeding.
Do not use damaged, altered, overheated or moisture-exposed batteries or damaged chargers. The safety booklet also requires replacement after a battery drop exceeding one metre or a violent shock, even if the case looks intact. Suspected long neglect, freezing or abnormal charging behavior needs the actual battery instructions and qualified disposition, not a capacity-light experiment. Keep this a sound-system project; do not open, revive or ship a questionable battery using a recipe from this guide.
Work in dry conditions within the safety booklet’s 10–40°C tool-use range. Inspect the body, switch, holder, pad and abrasive for damage. A defective switch or damaged clamp is a service hold. Keep the work area clear and well lit, bystanders away and your footing stable. Wear safety goggles, hearing protection and suitable dust protection; the source explicitly requires a dust mask for sanding. Do not let gloves, clothing or hair approach moving parts.
Define the patch and its dust requirements
Choose a manageable loose wooden sample with a small accessible face needing light surface refinement, not thickness calibration or a structural fit. Exclude paint, preservative, glue contamination, embedded metal, unknown reclaimed wood and asbestos-containing material. Mark the intended patch and which edges must remain sharp. The goal is an even surface without unintended rounding, gouges or scorching, not a claimed tolerance or a particular finish grade.
Clamp the stock securely to a stable platform so that it cannot slip. Check that the entire planned pad path clears clamps and supports while allowing a controlled grip. Do not hold the sample in the other hand. Arrange the work so passes travel away from your body and your hands stay outside the immediate work zone.
The manual permits sanding small areas and requires extraction for larger areas. It gives no universal area threshold, so a small sample is a limited project—not proof that dust is harmless or that extraction is unnecessary. Use available extraction devices correctly under their actual instructions. If material, exposure, ventilation or the intended extent makes the dust controls uncertain, hold the project rather than simply call it “small.”
The manual names extraction adapter 4465163, but the selected documents do not establish its complete installation or a particular extractor system. Do not guess a hose connection or import another tool’s extraction assembly. Larger-area sanding and any task needing an unresolved extraction system remain pending until the exact accessory and equipment instructions close. Respiratory protection remains necessary; a named adapter alone does not establish effective capture.
Install the native closed-ring pad with the battery out
Slide the switch rearward to OFF, wait for complete stop and remove the battery before any adjustment, accessory change or cleaning. To remove the pack, press its release button downward and withdraw it from the handle as shown in Figure 6. OFF alone is not isolation. Allow recently used accessories to cool and handle their edges carefully.
Open quick-release lock 5 as in Figure 2. Hold the tool with the switch facing downward and the chuck facing upward. Use the actual original triangular sanding pad 9, with its closed mounting ring positively matching the supplied part and instructions. Place it so the chuck’s locating pins enter the pad’s corresponding recesses. The magnet only holds the accessory during clamping; magnetic attraction is not the completed lock.
For this closed-ring route, do not add disk 15. Figure 4 crosses that disk out for a closed-ring accessory. Figure 5 separately shows disk 15 for an open-slotted accessory, with its camber facing the tool. That distinction does not authorize arbitrary slotted accessories or turn this project into a second assembly route. Do not substitute a flat washer, borrow another model’s disk or invent a removable-pin or threaded-bolt procedure.
Close the quick-release lock while keeping the locating pins engaged in the accessory recesses. Check that the pad is secure while the battery remains out. If correct parts will not seat or the lock will not close correctly, stop and obtain qualified assistance. Do not force it or use a powered wobble test.
Fit wood-appropriate abrasive paper to the pad’s hook-and-loop surface and align the paper’s extraction holes with the pad holes. The manual gives a 90 × 90 × 90 mm sanding area; that is not approval of every similarly sized replacement. Verify the actual paper and pad compatibility. Select the abrasive according to the known wood and desired removal; do not present a single grit as universally correct. Worn, torn, contaminated or poorly attached paper requires correction while isolated.
Control one short pass
Recheck the stock, planned travel, secure pad, attached paper and dust controls. Keep handles dry and free from oil or grease. Confirm OFF before inserting the already qualified pack; slide it fully into the matching receiver and verify secure retention. Keep the pad clear of the stock during this check.
The switch slides forward to run and rearward to stop. The speed controller’s plus direction increases speed and minus direction reduces it. The technical table labels 11,000–20,000 min⁻¹ as idling speed; this guide does not convert that label into a different rate convention or invent an exact setting for each dial number. Choose a controllable setting suitable for the actual abrasive and work, and stop and isolate before changing the setup if the result is unsuitable.
With a secure controlled grip and hands outside the work zone, start clear of the surface and guide the pad over the intended patch away from your body. Keep pressure controlled rather than forcing material removal. Abrasive selection and applied pressure affect the amount removed. Do not lean on a corner to correct a deep defect: this sample aims to preserve the marked surface and edge geometry, not reshape them by uncontrolled pressure.
Stop if the work moves, the paper peels, the pad loosens, dust control proves inadequate or abnormal heat or behavior develops. Switch rearward to OFF, wait for complete standstill and remove the battery before investigating. If protective cutoff has operated, the safety booklet says not to keep pressing ON/OFF; repeated attempts may damage the pack. Do not override cutoff with an unloaded running or repeated-restart routine.
The three-LED battery indication is not the charger display or a condition certificate. In the matched manual, three lights indicate charged, one or two indicate remaining charge, one flashing light calls for recharge, and all flashing is a low-temperature/fault path. For all flashing, the manual specifies removing the pack and keeping it at room temperature for one day; recurrence means the battery must not be used or charged. Do not use that instruction to rehabilitate a damaged, wet or overheated pack, or transfer it to a different actual battery display. Follow the matched battery instructions and qualified support whenever identity or condition is uncertain.
Accept, correct or stop the sample
After the short pass, switch OFF, wait for the pad to stop and remove the battery before examining the work. The intended patch should be uniformly refined, with the required edge shape retained and no gouges, scorching, unwanted rounding or movement marks. There is no invented numerical tolerance. If the outcome is uneven, identify a documented correctable cause—paper choice, worn paper, pressure or workholding—and correct it while isolated before another short sample. An insecure holder or unexplained persistent abnormal behavior goes to service, not another trial.
Clean the isolated tool after use with a clean cloth; where needed, use a lightly moist cloth and soft soap without allowing water inside. Do not use solvents or open the housing for internal maintenance. Keep vents clear without directing sanding dust toward people. Record the model, article number, identification number, actual attachment and observed symptom for service; do not reproduce a fault under power.
Store the tool and accessories dry, dark and protected from freezing. The manual’s preferred 5–30°C tool-storage range and the safety booklet’s 10–40°C range overlap at 10–30°C; the booklet gives the battery its own 10–20°C dry storage guidance with at least 40% charge, subject to the actual pack instructions. Keep battery contacts away from loose metal. A completed sample confirms only this controlled surface outcome—it does not qualify an unknown accessory, a larger dust-producing job or another battery system.
Models referenced