
Follow the air path without bypassing isolation
Three panels show the aligned six-hole sheet and plate, a schematic collar/outlet clamp, and a generic hose/extractor requiring its own exact instructions and installed-performance evidence.
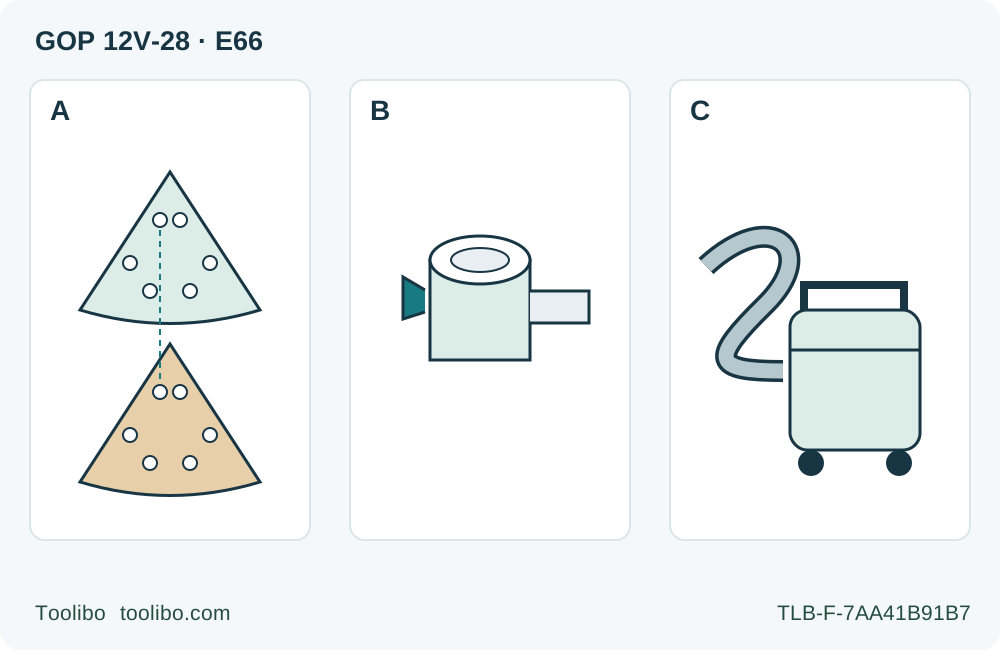
A · Align the sheet and plate
After isolating both machines, verify the correct sheet, intact fastening and all corresponding holes. Correct a documented alignment omission; do not punch new holes or run a bare pad.
B · Refit only the exact route
With the tool battery removed, remove accessory/depth stop as required, fully seat assembly (14), close its clamp, engage hose (21) in adapter (20), attach to outlet (19), and complete the original bolt-mounted plate assembly.
C · Require system evidence
The manual requires at least 230 mbar AND 36 L/s at the tool connection, with 35 mm hose and class M filtration recommended. Exact extractor instructions and suitable installed performance must be established before any return to sanding.
Original path schematic, not an extractor model, fitting specification or capacity test. A mirrors the six extraction holes illustrated for the matched sheet; actual sheet and plate must match. B is the selected assembly (14), not an interchangeable OSC005 or Click & Clean promise. C is an evidence/service boundary, not permission to open the motor, filter or container without the actual instructions.
Stop sanding; this is a tool-end diagnosis, not an extractor repair
When dust capture falls away, do not finish the corner first or compensate with a mask and more pressure. The matched Bosch GOP 12V-28 manual says to stop work when suction declines and eliminate the cause. This workflow ends with a corrected, documented tool-end assembly or a clear evidence/service handoff. It does not claim to restore an arbitrary extractor, test its electrical safety or authorize sanding because suction feels stronger.
The exact example is the admitted UK GOP 12V-28 matching manual E66, June 2026, with the illustrated original sanding plate (16), correctly sized Bosch Delta 93 mm sanding sheet, and extraction assembly (14) without Click & Clean. The Click & Clean version (15) has a separate connection route; do not assemble a hybrid from whichever fittings happen to fit. These figure numbers identify components in the matched manual, not retail accessory numbers or kit contents.
The scenario is known clean, untreated wood sanding with an already qualified system. Unknown dust, coatings, metal contamination, smoke, a hot dust container or damaged electrical equipment is outside ordinary owner cleaning. Stop and obtain the appropriate material/equipment guidance. The tool manual warns that collected sanding dust can ignite under unfavourable conditions, especially with heat, sparks or chemical residues. Source: E66 pages 16 and 21–23.
Isolate both machines before touching the air path
Move the tool switch backward to 0, wait for complete stop, and remove its battery. Stop and isolate the extractor according to its actual instructions: disconnect its mains supply and any applicable removable power source, and account for automatic-start connections. Turning off the oscillating tool alone does not isolate the extractor. If you cannot identify how the actual extractor is safely isolated, stop here and obtain its instructions; do not reach into it or detach dusty parts while it can start.
Allow hot parts to cool. Wear suitable eye and respiratory protection for the material and protective gloves for accessory changes. Keep bystanders away and avoid spreading dust into the room. Do not blow a hose or filter clean with compressed air, shake contamination into the air or probe an obstruction with a sharp object. This guide does not specify a filter-cleaning method, bag replacement, container opening or electrical repair: each belongs to the exact extractor’s instructions and permitted maintenance scope.
The tool manual also requires emptying the dust container before a work break because of the fire risk. Follow the actual extractor’s safe emptying and disposal instructions; if those are unavailable or the contents are unknown, obtain qualified guidance rather than opening it by guesswork or restarting.
Record what changed just before the loss: a new sheet, a disconnected hose, a repositioned tool-end collar, or an unexplained gradual decline. Those observations guide inspection; they do not prove a cause. Photograph the isolated external connections and record the extractor, hose, adapter, plate and sheet identities for a service handoff if needed.
A: Check the sheet-to-plate path
With both machines isolated, inspect the fitted sheet. It must be the correct size and type for the actual original Bosch sanding plate, properly attached and with its punched holes aligned with the plate’s holes. A sheet that covers the holes can obstruct this part of the path even though its abrasive face still touches the work.
If the only identified omission is sheet alignment, take the sheet by a corner and peel it off as the manual directs. Prepare the plate’s hook-and-loop fastening as instructed, align a correct sheet flush with one side, lay it onto the plate and press it firmly into place. Check every corresponding hole, not just one visible opening. Do not enlarge holes, trim an unsuitable sheet into a new pattern, operate a bare plate or reuse a damaged sheet to keep the job moving.
A worn hook-and-loop surface, a deformed plate or damaged fastening is not an alignment problem. Hold for the proper replacement or service. Do not scrape deposits into the tool or improvise solvent cleaning. Even a corrected sheet does not prove the downstream hose and extractor meet the required performance. Source: E66 page 21, continuing on page 22.
B: Check the exact collar and connection route
If inspecting or refitting the extraction assembly requires removal of the sanding plate, keep the battery out. Wear protective gloves, use the hex key to loosen the clamping bolt and remove the accessory. Remove the depth stop as required before fitting the extraction assembly. Do not confuse its clamp with the accessory’s bolt.
For the selected non-Click & Clean assembly (14), slide it fully over the accessory holder onto the tool collar and close its clamping lever (18) to lock it. Insert the matching extractor hose (21) into adapter (20) and let it engage; attach that adapter to the assembly’s outlet (19). This is the page 22 route for assembly (14). A loose push-on fit, improvised taped joint, forced reducer or part borrowed from assembly (15) does not establish a correct connection.
Refit the correct original sanding plate using the documented accessory mounting procedure. Its depressed centre faces downward, with accessory text readable from above; select a suitable one of the twelve 30-degree positions and engage the holder cams. Secure it with the original clamping bolt using the hex key until the rounded head lies flat against the accessory. Check secure seating and remove the hex key before any later power reconnection, then fit the aligned sheet. No invented bolt torque, extra washer or tool-free snap procedure applies to this holder.
Inspect the external hose route for visible separation, damage or a bend that obstructs it. Correct only an obvious external positioning problem when the actual equipment instructions permit it. A split hose or broken coupling requires the correct replacement. Internal obstruction, filter condition, bag/container status and extractor faults remain for its matched maintenance instructions or qualified service. Sources: E66 actual Figures 3–4 and pages 21–22.
C: Establish the missing evidence before any return to sanding
This tool-side extraction assembly is for the sanding plate only. It is not a saw-blade dust hood. The manual requires extraction for sanding and specifies both at least 230 mbar vacuum pressure and at least 36 litres per second flow at the power tool’s extractor connection. It recommends a 35 mm nominal hose diameter and dust class M filter efficiency. The extractor must also suit the actual material; especially hazardous dry dust requires appropriate special extraction.
Both performance values matter at the stated installed location. A vacuum’s motor wattage, a free-air catalogue figure, a loud motor, a hand placed over a hose or an apparently dust-free patch does not verify them. Do not invent a home measurement protocol. If the actual installed system’s suitability and performance have not been established through applicable equipment information or qualified verification, the result is an evidence hold—not permission to resume.
The handoff should identify the exact tool manual, assembly (14), adapter/hose route, plate and sheet, the extractor model and its supplied instructions, what changed, what was found and what was corrected while isolated. Ask for the correct permitted maintenance or verification route. Do not erase the original symptom by reporting merely “cleaned and working.”
A documented assembly correction can close the tool-end omission, but reopening the sanding task requires all the separate conditions: the cause of reduced capture resolved, exact extractor instructions satisfied, required installed performance established, suitable material protection, secure workpiece and a complete approved tool/power system. The matched sanding limit remains maximum level 4, with any lower accessory limit respected. If those gates are not closed, keep sanding stopped. This is a complete diagnosis-and-handoff outcome even when the safe answer is not to restart.
Models referenced