
Closed hole and open slot need different stacks
Three panels show VARRITO 4465160 / 21043, disk 14 excluded for a closed hole, disk 14 required with its camber toward the tool for an open slot, and the speed range and triangular pad size.
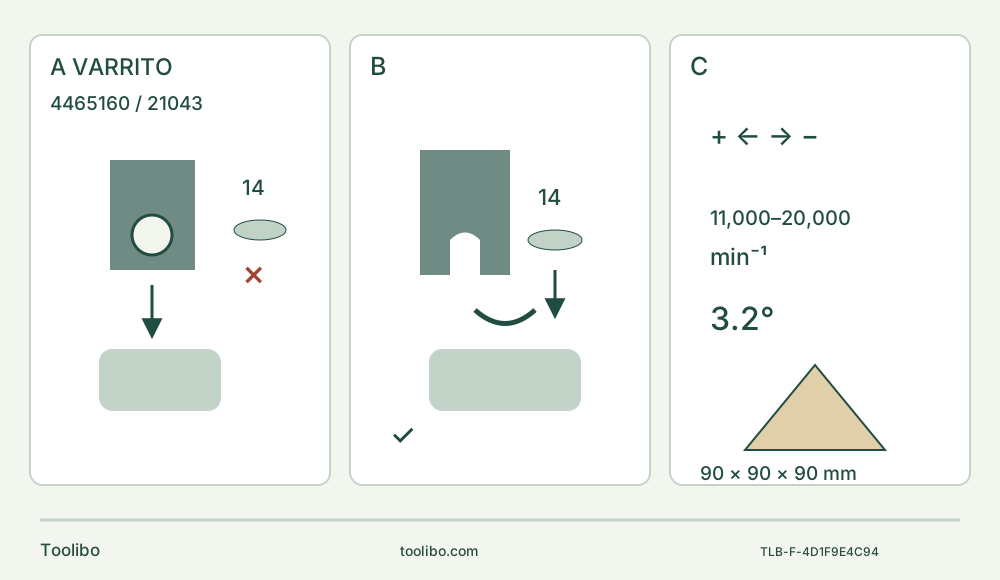
A · Closed hole: no disk 14
With the battery removed and chuck upward, seat the approved closed-hole accessory directly; actual Figure 4 excludes the disk.
B · Open slot: disk 14 required
Use the specified disk with camber toward the tool. Keep locating pins engaged while closing the lever, then check secure attachment.
C · Separate controls from accessory limits
Plus increases and minus reduces speed within 11,000–20,000 per minute. The 3.2° angle and 90 mm triangular pad do not specify a wood-cut dial setting.
Freshly viewed schematic, not a pin-count or universal-fit drawing. The tool lies below the accessory in A and B; B shows the disk camber toward the tool. C describes specifications and a separate sanding accessory, not a completed sanding setup or prescribed cutting speed.
Match the body before choosing the washer
This project makes one short, visible cut through a clamped piece of untreated softwood. It is not an installed trim repair or a search for hidden services. Use the UK VARRITO article 4465160 only with an actual unit and supplied instructions matching I-Nr 21043 and the 11 September 2023 manual. The same product name is not enough to transfer a mounting procedure between revisions. This is a documentation-based owner workflow, not a hands-on performance test.
The matched body is 18 V DC, with an oscillation range of 11,000–20,000 per minute and a 3.2° oscillation angle. Its magnetic holder assists assembly but does not replace the closed quick-release clamp. The small disk numbered 14 is not a universal adapter: whether it belongs in the assembly depends on the accessory’s attachment opening.
Establish the power system without inventing a charger
Use an already commissioned, genuine Power-X-Change lithium-ion battery and its exact approved Power-X charger, with both actual instruction sets available. Confirm the pack is approved for this tool and the charger for that pack and local supply. A battery sliding into the rails is not that confirmation. The generic charger table printed in the tool manual does not identify a particular charger model; this article therefore does not convert it into a charging tutorial or promise that a charger is supplied.
Keep the tool switched OFF before inserting a sound, correctly charged pack. Remove the pack before fitting accessories, adjusting the setup, cleaning or putting the tool away. Press the pack release and withdraw the pack as shown in the matched instructions; do not pull on contacts or force a jammed latch. Charging and any charger indication must be handled under the actual charger manual, away from this cutting setup.
Do not use a cracked, altered, wet, overheated or otherwise suspect pack. The 2025 safety instructions require replacement after serious impact or a fall of more than one metre even if damage is not visible. Do not open a battery, bridge terminals or repeatedly operate the switch after protective shutdown. Keep loose metal away from separated terminals and seek the manufacturer’s service advice for a suspect power system.
Prepare a cut that remains visible throughout
Select a small, sound piece of untreated softwood and an intact blade explicitly suitable for this material and this VARRITO mounting arrangement. The manual identifies a wood plunge blade separately from a metal blade and a segment blade; ownership of one does not approve all materials or all mounting openings. Examine both faces and the intended path for nails, screws and other foreign bodies. Unknown coatings, glued assemblies, masonry and embedded-metal cutting are outside this project.
Mark a short line from an accessible edge. Clamp the retained stock firmly to a stable bench, with the blade’s complete approach and below-face travel clear of the bench, clamps, hands and cables. Arrange the waste so it cannot close the cut on the blade or fall dangerously. Do not hold the stock in your hand or balance it on a knee. A plunge would require separately checking the entire entry and exit envelope; this first cut deliberately starts at an open edge.
Wear suitable eye and hearing protection and respiratory protection appropriate to the dust. Keep the work area ventilated, exclude bystanders and manage dust rather than letting it accumulate. Use the tool only in dry conditions within the safety supplement’s 10–40°C operating range and any narrower limits of the actual battery. Keep handles dry and clean. Position yourself to work away from your body, with hands outside the cutting area.
Fit the accessory: two different disk routes
With the switch OFF and the battery removed, open the quick-release lever. Hold the tool with the switch facing downward and the chuck upward. Keep fingers clear of the closing mechanism and sharp teeth. Place the accessory so the chuck’s locating pins enter the matching recesses; the magnetic attraction is only a temporary assembly aid.
Read the opening, not the blade’s colour:
- Closed attachment hole: actual Figure 4 crosses out disk 14. Fit the correctly seated accessory without that disk.
- Open-ended attachment slot: actual Figure 5 requires disk 14. Fit it with its camber facing the tool, following the actual illustrated stack. Do not invert it or substitute an arbitrary flat washer.
Close the quick-release lever while keeping the pins engaged in the accessory recesses. Then check that the accessory is held securely. Do not power the tool if it rocks because of incomplete seating, if the disk is missing on a route that requires it, or if the lever will not close normally. Reopen only with the battery still removed and correct the identified assembly error. Damaged or uncertain holder parts require service, not extra leverage or a powered wobble test.
The diagram simplifies the interface and washer profile; it does not specify a pin count or make every open-slot blade compatible. The actual approved accessory and matched manual decide the assembly.
Make the sample and decide whether it passes
Recheck clamps, clearance, dust controls and the secure accessory. Insert the approved pack only with the slide switch rearward in OFF. Hold the tool securely with hands away from the accessory and switch it on clear of the wood by sliding the switch forward. Turning the speed control toward plus increases speed and toward minus reduces it. The manual gives no numbered wood-cut recipe for this task: choose a controlled trial setting appropriate to the approved blade and sample rather than inventing a dial-to-frequency chart.
Bring the blade to the marked edge under control. Guide the cut away from your body, without forcing the accessory or pushing hands into the work zone. Maintain support as the cut approaches breakthrough. If the stock shifts, the blade binds, the clamp loosens, or unusual vibration, heat or smell appears, stop instead of trying more pressure or speed. Switch OFF, allow the accessory to stop and remove the battery before investigating. Never reach under the stock to check a moving blade.
At completion, switch OFF, wait for a complete stop and remove the pack before handling the blade, clearing waste or inspecting the cut. Allow hot accessories to cool. Accept the sample only if the intended line and size are achieved, the cut has fully separated where intended, and there is no uncontrolled tear-out, scorching or evidence that the stock or support moved. No numerical tolerance is invented here. If those conditions fail, correct the blade choice, support or technique on another sample before using the setup on valuable work.
Read the pack indication in its own context
The matched tool manual describes its illustrated three-LED battery display: three steady lights mean full; one or two steady lights mean remaining charge; one flashing light means empty and requires charging under the actual approved system instructions. These are battery indications, not a test of remaining capacity, authenticity or tool-holder condition.
All LEDs blinking is a different instruction in this manual: the pack is too cold. Remove it and keep it at room temperature for one day. If the fault recurs, the manual treats the pack as exhaustively discharged and defective: never use or charge it. Consult the actual pack instructions and service support if the pack or display differs; do not apply this code to every Power-X-Change generation. Do not use a heater, open the pack or bypass protection to hurry a recovery.
Keep sanding separate, then store the system
The 90 × 90 × 90 mm triangular pad is a different accessory setup, not part of this completed cut. For sanding, remove the battery, mount the correct pad and align the abrasive’s extraction holes with the actual pad holes. The matched operating manual requires extraction for larger sanding areas; the manual lists dust-extraction adapter 4465163. That listing does not demonstrate an installed cutting-dust hood or approve unknown paint removal. Do not start a larger sanding project until the actual extraction arrangement and abrasive/material suitability are complete.
After isolated cleanup, keep vents and housing clear with a cloth and mild soap as needed, preventing water ingress. Do not use solvents or open the housing; the manual specifies no additional internal user-maintenance items. Obtain repair through qualified service using the exact article and I-Nr identification.
Store dry, dark, frost-free and away from children. The tool manual’s ideal 5–30°C range and the supplement’s 10–40°C storage instruction overlap at 10–30°C for the tool; the supplement separately specifies 10–20°C for the battery. Follow any narrower actual pack or charger instruction rather than applying the tool range to everything. Maintain the prescribed storage charge, protect terminals and keep the battery separate from the cutting accessory. A stored complete system should be identifiable and ready for an isolated inspection, not left assembled with power available.
Models referenced