
Isolate, position, bolt and separate extraction uses
Four panels show PMF 220 CE E62 unplugged, magnetic positioning followed by hex-key bolt fastening, forward I and backward 0, and sanding-only extraction with a blade crossed out.
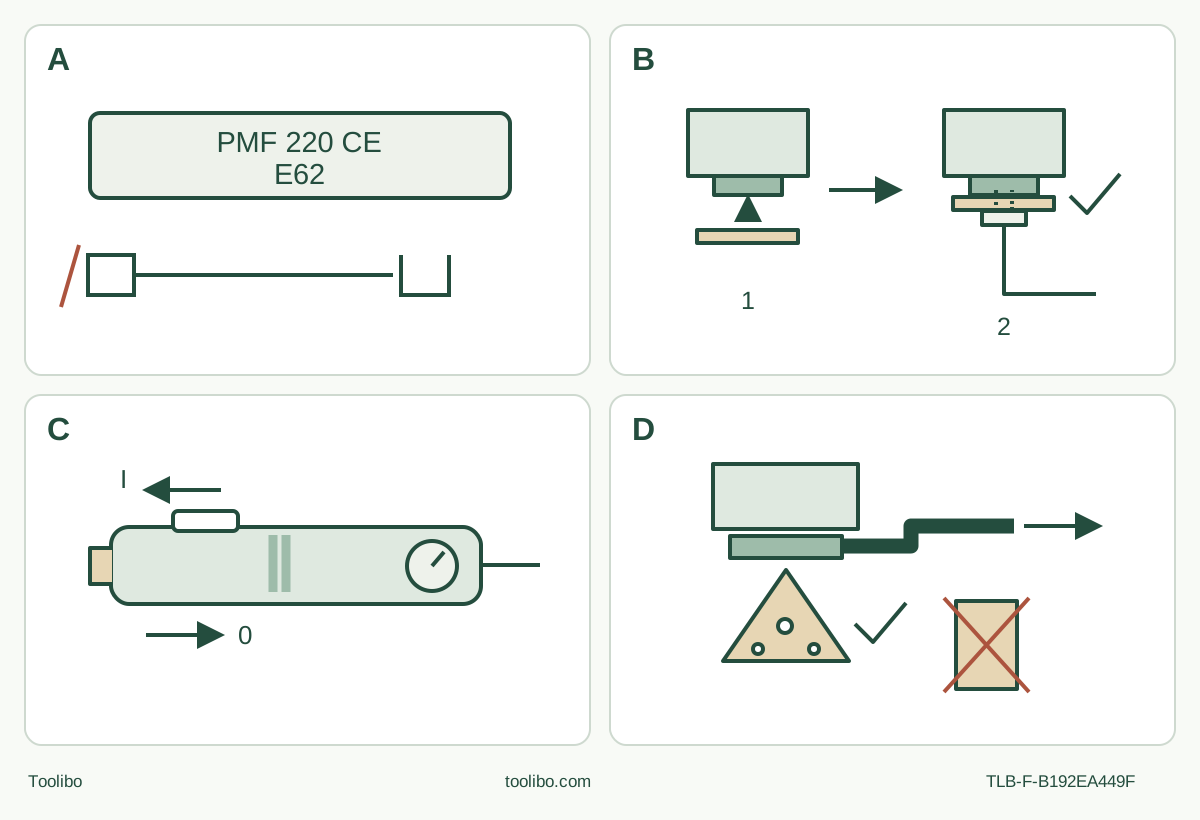
A · Match E62 and unplug
Confirm the actual UK body and nameplate; unplug before all assembly and adjustment.
B · Magnet first, bolt second
Seat the permitted Starlock accessory with its depressed centre down and cams engaged; tighten the original bolt with the hex key and check retention.
C · Deliberate switch and speed
Forward I runs, backward 0 stops. Wood sawing has a maximum recommended 6; sanding, plastic/metal and RIFF have maximum 4 or a lower accessory limit.
D · Sanding-only extraction
The dedicated hood is for the sanding plate, not blades. The connected extractor must meet both at least 220 mbar and 34 l/s at the tool connection.
Recovered original schematic freshly checked against E62. The two mounting stages mean temporary positioning then mechanical fastening; the extraction panel is a use boundary, not a hose-performance certification.
MagnetHold positions the blade; the bolt secures it
A blade held against the PMF 220 CE by its magnet is not ready for use. The magnet assists installation while the original clamping bolt and hex key provide the mechanical fastening. This is not the tool-free AutoClic system of another Bosch model, and a Starlock label does not mean StarlockPlus or StarlockMax is accepted.
This guide follows the UK PMF 220 CE Set, order 0603102071, and the currently linked shared PMF 220 CE/PMF 2000 CE manual 1 609 92A E62. Its cover is dated May 2026 and page footers 17 April 2026. The download filename names PMF 2000 CE, but the internal coverage explicitly includes PMF 220 CE, machine family 3 603 A02 0.. . Match the actual nameplate and supplied instructions. Different boxes or shared-document names are not additional mechanical models here.
The completed outcome is a short cut in known untreated softwood removed from a structure, using the identified AIZ 32 EPC HCS wood blade listed for this set. Both faces and the full blade path must be accessible. Sanding remains a separately qualified setup: possessing a pad or an extraction attachment is not enough to meet E62’s dust-system requirements.
Establish a dry, intact corded setup
The tool has 220 W rated input and is Class II. E62 specifications are based on 230 V, but the actual nameplate supply is the operating requirement, not an invitation to adapt a different regional machine. Inspect the cord, plug, switch and housing. Do not connect damaged equipment or modify the plug. For a GB plug replacement, the manual requires an authorised service agent and the original fuse rating; do not cut off and replace it as an owner improvisation.
Keep the switch backward with 0 visible and unplug before assembly, adjustments, cleaning or storage. Route the cord clear of the blade, support edges and waste, without a pull or trip hazard. Outdoor work needs an outdoor-suitable extension if one is necessary. A damp-location supply requires RCD protection, but dry work remains the scope here. The manual’s separate 30 mA clause is expressly for AUS/NZ products; it is not presented as a UK-specific instruction.
The holder’s magnet needs another check: keep it away from implants and medical devices such as pacemakers or insulin pumps, and from magnetic data carriers or sensitive equipment. Do not discover this constraint while holding an accessory against the tool.
Confirm Starlock and the actual wood blade
The body-specific chart approves Starlock only and crosses out StarlockPlus and StarlockMax. Choose the actual AIZ 32 EPC HCS wood plunge blade, not a similar-looking unlabelled attachment. Check the blade and its packaging for the material and speed limits and reject bending, cracks, dull teeth or other damage. For HCS wood cutting, inspect the sample for nails, screws and foreign objects; this exercise does not substitute a wood blade for a metal-cutting system.
The set page lists the blade, but that is not evidence that a used owner’s box still contains it or that all sets have identical contents. If its identity, compatibility or sound condition is missing, pause the powered task. Do not add an improvised adapter or substitute another Bosch model’s holder instructions.
Complete the unplugged magnet-and-bolt sequence
Let a used attachment cool and wear protective gloves. With the plug out, loosen the clamping bolt using the hex key and remove the existing accessory. Position the new blade on the holder with its depressed centre facing downwards and its text readable from above, as in the actual source illustration.
Select a convenient orientation and engage the holder’s cams fully. There are twelve possible positions, 30° apart. The chosen orientation must preserve clearance for the blade’s full path, the clamp and a two-hand grip. The magnet holds the blade in that position only to simplify fastening.
Refit the original clamping bolt and tighten it with the hex key until it is flush with the accessory, following the manual. There is no stated numeric torque to invent. Check secure seating before removing the key and connecting power. A magnetic hold, partial cam engagement or a bolt that will not seat correctly is a stop condition, not something to test under load. Repositioning and removal use the same unplugged bolt procedure.
Meet the dust gate before making dust
E62 says not to work without dust-reducing measures, to provide ventilation and always use suitable breathing protection. Use a material-suitable extraction system wherever possible, observe the applicable material rules and avoid dust accumulation. This applies to the wood cut as well as to later sanding; the absence of a compatible blade hood is not an exemption from dust control.
For an extractor used with the tool’s extraction connection, E62 requires at least 220 mbar vacuum pressure and at least 34 l/s airflow at that connection. Both values matter. A vacuum’s advertised motor wattage or unrestricted inlet rating does not establish that the installed hose and attachment deliver these figures. A 35 mm nominal hose and HEPA or dust class M filtration are recommendations in the table, distinct from the two required performance thresholds. Consult the extractor’s own complete instructions. Stop work and correct the cause if suction falls.
The dedicated extraction system is designed only for the sanding plate. The actual illustration explicitly excludes blades and other accessories. Do not put the set’s D57 attachment around the plunge blade and describe it as saw-dust capture. If effective dust-reducing measures cannot be arranged for the intended cut, leave that work pending rather than relying on the small size of the task.
Clamp a visible sample and keep the switch reachable
Mark a short line, inspect both faces and secure the wood to a stable platform. Support the waste, clear the entire below-surface and exit path, and position clamps outside the moving accessory’s area. Do not hold the work against your body, reach underneath or assume a shallow cut cannot contact something behind it. Plunge cutting is for soft materials such as the selected wood; unseen building cavities are excluded.
Wear eye, hearing and respiratory protection, keep bystanders away and work with a stable stance. Grip the insulated surfaces firmly with both hands without covering the vents. The ON/OFF switch must be reachable without releasing the handle. If the actual optional auxiliary handle is used, screw it into the appropriate left or right head thread; do not use or alter a damaged handle.
Keep the accessory away from your body and the cord behind the work. Organise pauses and maintain the tool and blade to limit vibration exposure. Soft start and electronic speed control do not replace workholding or make a damaged blade usable.
Select speed for this accessory, not for every future job
The wheel sets the oscillation rate within the documented 15,000–20,000 opm range. E62 recommends a maximum setting of 6 for sawing wood. It limits sanding, sawing plastic or metal, and sanding/RIFF accessories to a maximum of 4. Any lower limit on the actual accessory or packaging also applies. These are not interchangeable defaults, and a setting used for the wood cut must not be carried automatically into a sanding setup.
Determine the working setting by a practical scrap trial. With all checks complete, verify 0, connect the correct supply, hold the blade clear and slide forward until I appears. Let the selected speed establish, then enter with consistent light pressure. Move smoothly back and forth rather than forcing a full-depth plunge or twisting in the kerf. Excess pressure can reduce performance, heat the accessory and cause jamming.
If the sample shifts, the blade binds, suction deteriorates or the tool behaves abnormally, slide back until 0 appears. Wait for complete stop, unplug and investigate before correcting the setup. Do not touch the bolt or clear chips while powered. After a resolved interruption, check the complete assembly and start clear again, not trapped in the cut. There is no invented protection-bypass or cooling routine here.
At completion, stop fully before setting the tool down, unplug and allow the attachment to cool. Inspect the cut and retention. Accept the sample only when the retained wood and line are suitable and no unexplained looseness or damage remains. Otherwise improve the blade choice, support or technique on another sample.
The segment depth stop is not a plunge-blade accessory
The optional stop is for the specified segment blades, not the AIZ straight plunge blade. With power disconnected and the accessory removed, slide the stop fully onto the collar with its labelled side upward. ACZ 85-series, 85 mm segment blades use the larger unbracketed 8/10/12/14 mm markings. ACZ 100-series, 100 mm blades use the smaller bracketed 14/16/18/20 mm markings.
Fit the appropriate blade, pull the stop towards the accessory until it rotates freely, position the desired value over the segment that will cut and seat it fully back on the collar. Verify on scrap. Remove it for other depths or accessories, first removing the accessory. It cannot identify hidden services or validate a blind rear face.
Qualify sanding separately, including the whole extraction route
For later dry sanding, unplug and remove the accessory and depth stop. Slide the extraction system fully onto the collar, turn it to a suitable position—not directly beneath the tool—and close its clamp lever. Click the extraction adapter into the hose, connect it to the outlet and connect the hose to the suitable qualified extractor. Refit the proper sanding plate with the bolt sequence. Sanding always requires this connected extraction setup and the performance checks above.
Use original Bosch sanding accessories and a suitable Delta 93 mm sheet. Clean the hook-and-loop face, align the sheet and plate holes, and press the sheet firmly in place. Keep the speed at or below 4 and any lower accessory limit. Sand with light consistent pressure, avoid excessive point heating and allow the sheet to cool when needed. A sheet used on metal must not be reused on another material. Unplug before changing or rotating parts.
Empty the dust collector before a work break under its own safe instructions; hot dust and mixtures with paint or other residues can create a fire risk. Do not wet sand, scrape damp material or pretreat with solvent-containing fluids. None of these cautions turns the completed wood cut into permission for an unknown coating-removal job.
Finish unplugged, with the tool and vents clean and the blade protected. Cord replacement belongs to Bosch or an authorised service centre. Keep the ten-digit article number and matching E62 instructions for service. The essential distinction is maintained throughout: the magnet assists, the bolt secures, and each accessory has its own speed and dust-system boundaries.
Models referenced