
Identity, interface and three switch positions
Three schematic panels identify GOP18V-34N and its order and service numbers, accept OSL and OSP but reject OSM, and distinguish 0, light-only and motor-plus-light.
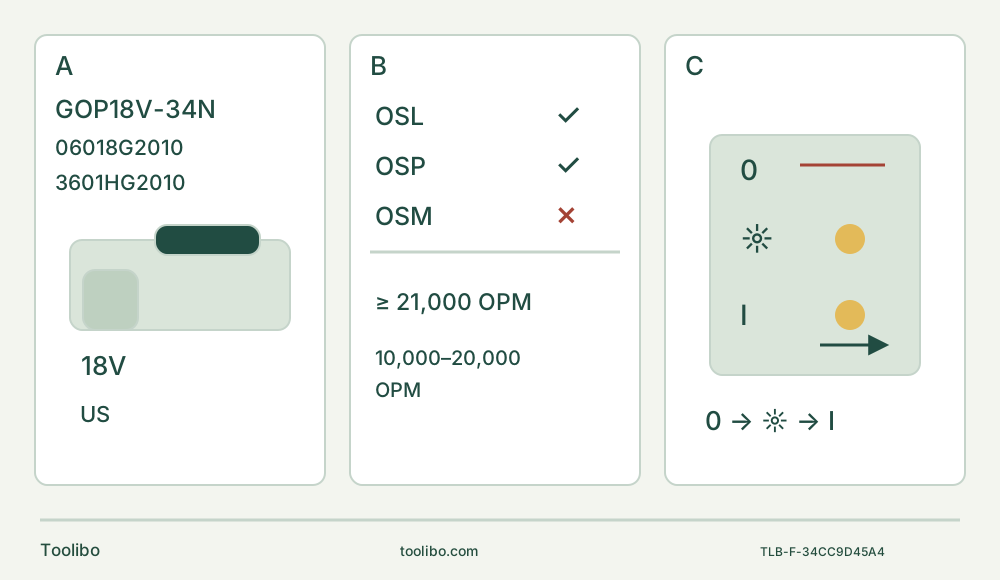
A · Match the US body
GOP18V-34N is the bare-tool SKU, 06018G2010 the order number and 3601HG2010 the service part number; these do not create three models.
B · Qualify the attachment
Use a suitable Bosch OSL or OSP accessory rated at least 21,000 opm. OSM is excluded even though the motor range is 10,000–20,000 opm.
C · Separate three positions
Fully back 0 is OFF, first forward lights only, and second forward I runs motor and light. Battery removal, not the light-only setting, isolates the holder.
Recovered original schematic freshly checked against the current product and March 2023 manual. The middle position is not electrical isolation; remove the battery completely before accessory work.
A light-only setting is not a safe accessory-change setting
The GOP18V-34 has three switch positions: fully back at 0 turns everything off, the first forward position lights the work area, and the second forward position at I runs the motor and light. The middle position can look reassuring because the blade is still, but the battery remains connected. Remove the pack before fitting, removing or repositioning an accessory; do not treat the worklight setting as isolation.
This guide follows the US GOP18V-34 and manual 16099221RZ dated March 2023. The current manufacturer page identifies bare-tool SKU GOP18V-34N, order 06018G2010 and service part number 3601HG2010, and links the manual plus its battery/charger list. Match the actual tool’s identification and supplied documents. The N listing is not another mechanical body or a promise that a particular battery and charger are included.
The owner outcome is an installed, secure OSP114F blade and an accepted short cut in a known untreated softwood offcut. The stock must be removed, supported and visible on both faces. Wall openings, concealed services, unknown coatings and cutting embedded metal are outside this exercise even though other applications appear in the manual.
Establish the power-system gate first
Proceed only with an already commissioned, undamaged Bosch or AMPShare 18 V system approved for this tool, whose exact battery and charger instructions are available and understood. The linked March 2023 list names BAT612, GBA18V40, GBA18V80 and GBA18V120 packs, and specific chargers including BC1880 and GAL18V-40. A shared voltage label alone is not approval. Confirm the actual pair against its own complete instructions; this guide does not commission a new charger, invent diagnostic colours or prescribe charging times.
If the owner cannot establish that approval and correct charging, the powered cut remains pending. Complete the unpowered identification and setup checks, then resolve the power pair before installing it. The tool manual lists a charging ambient range of 0–35°C and an operation/storage range of −20–50°C; those tool-level ranges do not replace the exact pack and charger requirements or make damaged equipment usable.
For removal, start at switch 0. Press the release and slide the battery forward to the secondary retention point, then press the release again and slide it completely out. Do not mistake the first release for full isolation. Keep the pack away from loose metal while inspecting the tool.
Check three accessory qualifications, not just the socket shape
Use a Bosch accessory rated for at least 21,000 oscillations per minute and suitable for the intended material and cut. The explicit compatibility chart admits OSL Starlock and OSP StarlockPlus, but rejects OSM StarlockMax. Some later generic accessory tables in the same manual include OSM examples; their presence does not override the machine-specific exclusion.
For this sample, identify the actual OSP114F bi-metal plunge blade, which the manufacturer listing includes and the manual identifies for wood and other specified materials. Its broader material table does not require this exercise to involve nails or metal. Check for cracks, bending, missing teeth and contamination. Reject a suspect blade rather than using low speed to compensate. If a different blade is proposed, requalify all three conditions: permitted interface, minimum rating, and material/cut suitability.
Snap in with the battery out; eject into a clear space
Let a previously used accessory cool and wear protective gloves for sharp edges. Clean the holder and accessory with a clean cloth so debris cannot prevent proper engagement. Position the blade with its model-number side facing the tool’s holder. Choose a straight-ahead or permitted angled orientation that leaves room for the full cut and both-hand grip.
Press the tool’s holder into the accessory until the clamping jaws snap into it. The release lever does not need to be opened to install the blade. Check seating and secure retention before fitting the battery; do not accept a partial engagement or add an improvised screw, washer or adapter. The presence of screw-related advice in generic scraping text is not an assembly instruction for this snap-in mount.
To remove or change the blade, return to 0, wait for all movement to stop and remove the battery completely. Opening the accessory-release lever ejects the blade. Keep hands out of the jaws and provide a clear, safe landing area rather than trying to catch the sharp accessory. Do not aim the ejection at a person or let a hot blade fall onto an unsuitable surface.
Prepare a short cut that can be inspected afterwards
Clamp the softwood sample to a stable platform. Check both faces and the entire intended blade path for fasteners or foreign material, with clearance below and beyond the blade. Support the waste so it cannot drop against a hand or close the cut onto the blade. Keep clamps outside the accessory’s swept area. Mark a short line that does not require reaching under the work or changing to a one-handed grip.
Wear eye and hearing protection, protective gloves and appropriate respiratory protection. Provide ventilation and suitable dust controls, and keep other people away. The tool’s oscillation and worklight do not eliminate inhalation risk. Hold the insulated grip surfaces with both hands, keep the ventilation slots uncovered and work away from your body. Take rest breaks to limit vibration exposure.
Use the light and motor as separate deliberate actions
Confirm the switch is fully at 0, then slide the qualified charged pack into the housing until it clicks into its locked position. Check that it is retained and cannot come free without operating the release. Keep hands clear of the accessory during installation.
The first forward switch position gives light only. Use it to see the intended line without staring into the light, but keep the same guarded grip: one more forward movement starts the motor. The second position I runs both. Select the intended speed before entering the wood. The six dial marks are approximate references across 10,000–20,000 opm, not six material guarantees.
For an initial plunge, the manual calls for medium speed to improve control; speed may be increased after the initial cut. Do not invent a precise numbered setting from that qualitative instruction. Practice on scrap, start with the blade clear, then guide it into the mark with light pressure. Use smooth repeated passes rather than forcing the full depth at once. Strong vibration can indicate excessive pressure: ease out and correct the cause. Never twist a blade while it is in the cut, because it can bind.
Recover from resistance without relying on electronics
If the sample moves, the attachment feels loose or cutting becomes abnormal, move the switch completely back to 0. Wait for standstill, remove the battery using both release stages and inspect before correcting anything. Do not remove chips near a moving blade or pull the lever under power.
The tool has soft start, electronic speed feedback and temperature-dependent overload protection. Under excessive load or an unsuitable battery temperature it may reduce speed or shut down. A speed-reduced tool may return to full speed when the load drops or temperature permits, so keep control rather than assuming it has stopped. After automatic shutdown, switch OFF, let the battery cool and restart intentionally only when the cause is resolved. Do not defeat the protection by repeated cycling or interpret it as a guarantee against damage.
After the cut, stop and isolate before inspecting the cooled blade, its seating and the sample. Accept the result only when the line and remaining material are suitable and there is no attachment movement or unexplained fault. Improve support, accessory choice or technique on another sample if needed; greater pressure is not the correction.
Keep optional attachments within their own jobs
The optional OSC004 depth stop can help limit a known cut, but it cannot identify hidden services or make an unseen rear face safe. With the battery out and accessory removed, fit its bracket with the clamp facing rearward, close the clamp, insert the appropriate guide, refit the blade and set depth with the red button. The narrow guide is for a straight plunge blade; the wide guide is used for round segment blades or the documented other guided cuts. Verify the setting on scrap. The first short cut here does not require buying or improvising this attachment.
The OSC005 hood is sanding-only: not for sawing, scraping or grinding, and never to be used without a vacuum. For a later qualified sanding setup, remove the battery and accessory, fit the hood and secure its cam lever, then install the proper backing pad and sheet. Connect a material-suitable vacuum using the documented hose route: direct 22/35 mm connection where specified, VX120 for Bosch VH-series hoses, or VAC024 for common 1¼/1½-inch hoses. Do not claim that a wood-blade cut was collected through this hood.
Sanding requires a correctly sized sheet, a secure backing pad, light continuous motion and broad flat contact rather than tipping onto the pad’s point. A pad that no longer grips the sheet needs replacement. Keep the sample clamped and both hands on the tool; generic large-panel handling advice does not change this bounded setup.
Finish with the battery out. Keep switch and vents free of debris, do not insert pointed objects into openings and avoid solvents that damage plastic. There are no owner-serviceable internal parts. Store the protected blade and isolated power system under their actual instructions, with terminals clear of conductors. Knowing the difference between snap-in retention, light-only operation and true isolation is the useful result to carry into the next job.
Models referenced