
From matched faces to a contained drying stack
A shows two 280 by 350 mm platens containing A4 with 35 and 26.5 mm margins. B separates clean dry cardboard, newspaper and plant-containing blotting layers. C uses a low stable book load without straps. D records the 2–4 week source interval with inspection, not guaranteed completion.
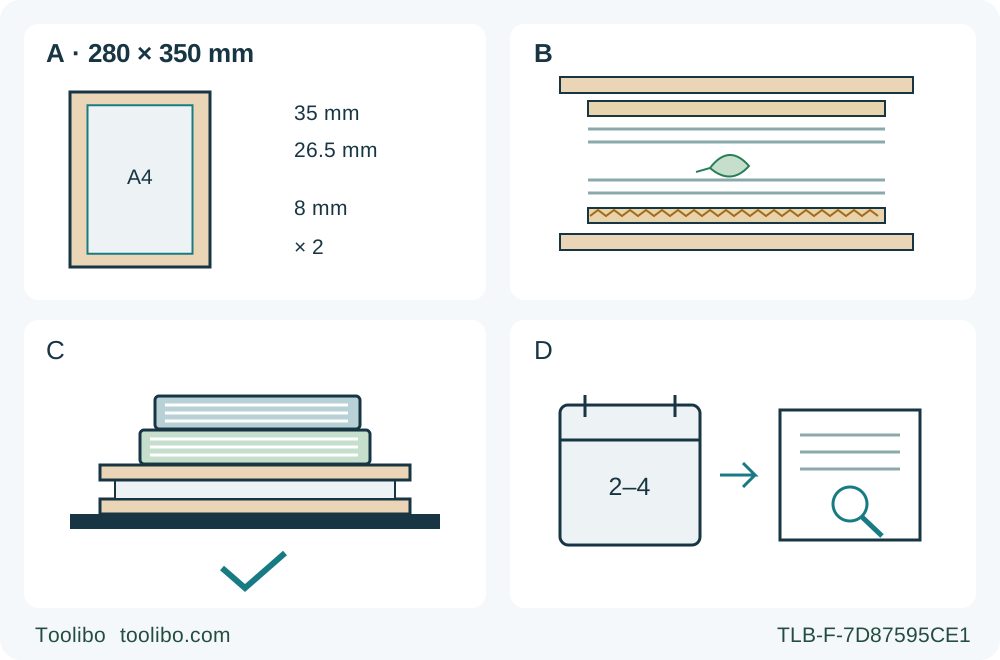
A · Accept the pair
Check both 280 × 350 mm rectangles, flat contact, smooth edges and complete A4 containment. The 35 mm and 26.5 mm margins are arithmetic, not tool clearance.
B · Keep the layers clean and dry
Use cardboard, newspaper, plant-containing blotting paper and newspaper; repeat as needed, then finish with cardboard and the upper platen.
C · Qualify stable book loading
Use a low flat stable location and books that do not overhang, slide or tip. No body weight, bricks, straps or numerical load is authorized.
D · Observe before later use
Label contents and date, keep warm and dry, and inspect before display or storage. The source interval is not a preservation guarantee.
These are conceptual acceptance diagrams, not cutting fixtures or pressure ratings. A uses an illustrative 8 mm selection within the RHS range; actual blade, thickness and support still need qualification. B represents the stated layer order and final cardboard, not exact layer thickness. C selects the source-explicit books alternative; it does not depict hidden bolts or ropes. D means observe the result over the source’s 2–4 week interval, not certify dryness by date.
This project finishes a matched pair of wooden platens and a complete, clean, dry A4 plant-press stack weighted with books. It does not finish a bolted press, teach drilling or certify a load-bearing assembly. The Royal Horticultural Society gives 280 × 350 mm wood pieces around 5–10 mm thick and explicitly permits heavy books to weight the wooden press instead of screws and bolts. That alternative—not the bolts visible in its photograph—is the method selected here.
The cutting scope is the documented US Makita 5007MG with its original, correctly installed blade already approved for the actual plywood. Its exact manufacturer product page includes plywood ripping, but that does not approve every coating, panel construction or blade. Unknown material, an uncertain blade or a thin sheet that cannot be safely supported means obtain suitably prepared pieces or hold the project. A nominal 8 mm panel is only an example within the RHS range, not automatic cutting authorization.
The finished outcome differs from making a single rectangular shelf blank. Two contact faces must match, remain flat together and contain the complete paper stack without rocking or exposed layers. Cutting acceptance and stack acceptance are separate: passing the ruler checks does not prove the press is ready to load.
Define the pair and qualify the material
Measure the actual plywood thickness, inspect both faces and edges, and choose clean, dry, flat, sound stock with a verified straight edge and square end. Reject delamination, embedded nails or other foreign material, coatings of unknown identity and panels that need force to flatten. The wood must ultimately be smooth and splinter-free; this guide supplies no sanding, chemical-cleaning or replacement-blade procedure.
Write two finished rectangles, each 280 × 350 mm. Check the actual A4 papers and cardboard rather than trusting a package label. A nominal 210 × 297 mm sheet centered on that platen leaves 35 mm at each side and 26.5 mm at each end. These are containment margins, not bolt positions, clamp clearances or guaranteed safe base-bearing widths. Keep every paper layer and plant within the wood footprint.
Use the established measured straightedge-offset and complete supported-cut procedures as prerequisites. The actual blade, zero-bevel setting and guide contact side must match the qualified sample. Do not transfer a square-cut offset from another saw or invent a universal distance from the base edge.
Plan long stock, kerf and the remainder before cutting
The proposed sequence is one long rip to the 280 mm width, followed by two separately measured 350 mm end cuts. It is not a stacked cut through both platens. Each end cut keeps the saw’s broad base on the larger, secured remainder; the finished piece is independently supported and free to separate without closing the kerf. Do not first make small rough rectangles and then try to trim them while holding them by hand.
For arithmetic only, suppose sound stock actually measures 400 × 1400 mm, already has a qualified square starting end, and a matching sample establishes a 3 mm kerf. The rip leaves 400 − 280 − 3 = 117 mm of solid waste. The first end cut leaves 1400 − 350 − 3 = 1047 mm of long remainder. Measuring the second blank from that actual newly cut edge leaves 1047 − 350 − 3 = 694 mm. Two finished lengths consume 700 + 2k, or 706 mm in this example.
Those numbers are not minimum stock dimensions, allowable overhangs or proof of a safe fixture. Initial end squaring needs its own material allowance and safe setup if the starting end is not already qualified. The remaining length must also accommodate the actual clamps, guide, entire base-bearing path, grips and independent waste support. A smaller actual panel may not permit this sequence. Do not rescue it with a loose-piece recut.
For the rip, keep the complete kerf on the waste side of the wanted 280 mm. For each end cut, place the complete kerf on the long-remainder side of the wanted 350 mm finished blank. Mark both the desired boundary and the waste side. After the first cut, measure again from the real edge; do not reuse an earlier tick that ignored the first kerf.
Prove the actual thin-stock arrangement
A flat-looking thin sheet can flex, sag or lift when a strip separates. Support both sides near the cut and near the outer edges as required by the saw instructions, while leaving the entire blade corridor clear. Inspect below the material; no support, bench member or clamp may enter the blade’s path. This guide does not authorize foam, a sacrificial backing material or an improvised cutting grid.
Secure the retained portion against shifting without distorting it. Independently support the offcut or finished platen so it cannot fall, twist into the blade or pinch the closing cut. Do not clamp across the separating kerf, rely on a helper to catch the piece, or put a hand beneath the work. In the end cuts, the finished platen may be the smaller free portion, but it still needs stable, nonpinching support through separation.
With the saw unplugged, check entry, middle and exit reach, guide contact, broad-base bearing, clamp clearance, cord routing and the lower guard’s free path. Perform this planning check beside or safely above the intended path with the blade guarded and no tooth contact; do not push an unpowered projected blade into stock or force the guard open. No climbing, grip change across the blade or unsupported final reach is acceptable. Rebuild and recheck for each end cut rather than assuming the rip layout still works.
If the actual sheet cannot remain stable while all these requirements are met, stop cutting. Obtain correctly prepared platens from a qualified supplier or arrange a separately qualified process. The RHS dimensions do not override the saw’s workholding requirements.
Prepare the sound saw and qualify the surface result
Use eye and hearing protection, appropriate respiratory and dust precautions, ventilation and the actual documented electrical supply and extension arrangement. Keep other people clear. With the plug removed, inspect the original blade and accessible tool condition; damage, uncertain assembly, binding or an abnormal switch requires qualified correction, not a powered diagnostic trial.
Check the lower guard moves freely, closes instantly and touches neither blade nor other parts at all angles and depths of cut. Confirm the trigger actuates correctly and returns OFF. Remove the setup wrench. Set zero bevel and a depth exposing less than a full tooth beneath the actual material, then secure the adjustments. This conservative project setting remains within the manual’s no-more-than-one-tooth instruction; a nominal panel thickness or scale reading alone is insufficient.
Use a safely supported matching scrap sample before the final stock. After normal stopping and unplugging, inspect both faces and the cut edge for splinters, delamination, heat marks and unacceptable breakout. This project needs clean contact surfaces, not merely correct dimensions. If the original qualified assembly cannot meet that requirement, hold rather than add an unsupported scoring, tape, sharpening or finishing recipe.
Cut one strip and then each platen separately
Before every reconnection, verify the trigger is OFF and the setup wrench is removed. Use both the front grip and rear handle, including the insulated gripping surfaces, with the body out of the blade line. Set the front base flat on supported retained stock with the blade clear, pull and hold the switch trigger and wait for full speed before contact. The lower guard operates automatically for these ordinary edge-entry cuts; do not hold it open manually. Advance straight along the qualified guide without forcing or steering sideways.
Keep hands away from the cutting area and underneath the work. Do not catch the separated strip or platen. If support shifts, the guide moves, the cord catches or the blade binds, release the trigger and hold the saw motionless until the blade stops. Isolate it and reassess; no in-kerf restart or moving-blade withdrawal is taught here.
After a normal completed cut, release the trigger, wait for complete standstill and guard coverage, then set down and unplug before inspection or rearrangement. Accept the strip’s width at entry, middle and exit and its straight edge before laying out the first platen. Rebuild the supported end-cut setup, complete and accept the first 350 mm blank, then measure the second from the actual new remainder edge and repeat only if the full fixture still qualifies.
Accept the pair before building the stack
Measure both lengths and widths, check each end square to its reference edge, and inspect all faces and edges. Place the two platens together on a flat surface: their footprints should correspond and the contact faces should not rock, twist or leave a bowed gap. Do not use book weight to conceal warped wood. Reject an undersize, splintered or damaged piece rather than quietly accepting a smaller press or recutting it loose.
Lay out the actual A4 cardboard and paper within the pair. Check every layer fits, including the intended plant arrangement, without protruding beyond the wooden footprint. This is a dry fit without load. Record which two pieces form the accepted pair; a replacement platen needs the same dimensional, surface and contact checks.
Complete the book-weighted drying stack
Use a low, flat, stable surface where the assembly cannot be knocked off or reached by children during loading. All non-plant materials must be clean and completely dry. The RHS recommends collecting on a dry day after morning dew has gone; do not enclose wet, dripping specimens and expect a fixed drying time to solve the problem.
Place the lower platen, then an A4 corrugated-cardboard layer and newspaper folded to A4. Arrange the plants between folded A3 blotting paper or two A4 blotting sheets, then cover with more newspaper. Repeat the cardboard, newspaper, plant-containing blotting paper and newspaper sequence as needed. Finish with cardboard and the matching upper platen. Keep the layers aligned and contained; an uneven bulky arrangement that makes the top rock needs correction before weighting.
Use the RHS’s explicit heavy-book alternative, placing books so the load is stable and does not overhang, slide or tip the stack. The source gives no numeric load rating; this guide supplies none. Do not stand or climb on the press, add bricks, tie it with rope, or imitate the photographed bolts. If the available books or surface cannot form a low stable arrangement, hold the pressing stage rather than increase the load.
Keep the press in a warm, dry place. The RHS gives a 2–4 week drying interval, not a guarantee for every specimen or room. Label the contents and date, keep the assembly stable, and inspect the result before any later display or storage use. Dampness or deterioration is not cured by declaring the interval complete. The delivered result is the accepted paired platens and properly arranged book-weighted stack, with drying and later specimen handling still subject to observation—not a certified pressure device or guaranteed preservation outcome.
Models referenced