
A full sheet includes two clamp allowances
Original dimensioned layout divides a 9 by 11 sheet into four 4-1/2 by 5-1/2 sheets, then shows folded clamp ends and a punch removed from the fitted paper.
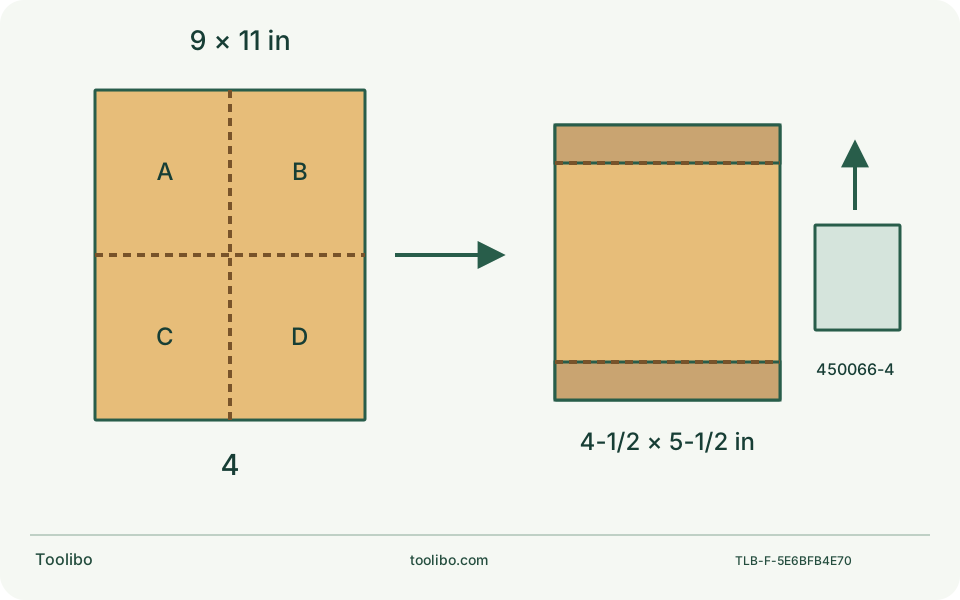
Measure
Confirm the actual full sheet before dividing.
Clamp
Preserve both end allowances and seat squarely.
Punch
Align, press while unplugged, then remove.
Cutting arithmetic applies only to the stated full-sheet size. The punch drawing is schematic and is not a drilling template.
Define the consumable before cutting anything
For the US BO4556, the product listing gives 4-1/2 × 5-1/2-inch abrasive paper and names punch plate 450066-4. Write down both dimensions and the fastening method when purchasing. The same listing gives a smaller pad outline, while the linked manual gives a slightly different pad-width description. Neither pad figure is a cutting instruction for the complete sheet.
A sheet covering only the flat underside lacks material for the clamps. Conversely, surplus material folded into an improvised bundle can stop a clamp closing properly. Start with an identified, suitable abrasive sheet rather than trying to rescue an unknown offcut by stretching, gluing or overlapping it.
Lay out a cutting plan as geometry, not a grit recommendation
A 9 × 11-inch full sheet divided in half in each direction yields four 4-1/2 × 5-1/2-inch rectangles. That is arithmetic for those stated dimensions, not a claim that every paper sold as a full sheet has that size. Measure the purchased sheet and preserve the printed abrasive identity before cutting. Do not substitute a metric sheet of merely similar overall dimensions without checking the resulting pieces.
Swipe or scroll horizontally to see all columns.
| Information to retain | Why it matters later |
|---|---|
| Brand, series and full grade marking | Reordering and matching the finishing system |
| Original sheet dimensions | Confirming that each cut piece has full clamp length |
| Permitted material and attachment | Avoiding unsuitable backing or coating use |
| Tool and punch identity | Keeping the hole pattern tied to the correct base |
Use a stable cutting surface and appropriate ordinary cutting tools, separate from the unplugged sander. This guide does not specify a universal starting grit: the wood or coating system and the next finish determine that choice. Unknown hazardous coatings are not a paper-selection exercise.
Fit both ends before making the holes
Switch off, unplug and inspect the base and clamp areas. Follow the matching manual illustrations to open one clamp, seat the end squarely and close the lever. Draw the paper across the base without skewing it, then secure the other end while maintaining tension. The paper should be flat, not stretched so hard that it tears or loose enough to flap.
Check the long edges for alignment. If one corner is pulled deeper into a clamp than the other, refit the sheet before continuing. Punching first and then sliding the paper to correct its position can leave the holes displaced from the extraction path. A folded, torn or slippery backing needs replacement, not extra clamping force.
Use the punch as a removable alignment aid
With power still disconnected, place the fitted tool upside down as shown in its instructions. Position the matching punch so its bent sides align with the paper edges, then press to perforate the abrasive. Remove the punch completely before turning the tool back for operation. Keep the sharp points away from hands and the finished work surface.
The plate is not an operating accessory underneath the abrasive. It is also not evidence that another machine’s hole pattern or base dimensions match. Do not use the sander’s motor to assist punching, drill through the pad, or enlarge holes freehand while the paper is attached. If the correctly identified punch cannot align, stop and resolve the tool, paper or accessory mismatch.
Inspect the entire dust path before the sample
Check that the perforations expose the intended pad openings and that paper debris has not obstructed them. Confirm the bag inlet is correctly seated on the outlet’s locating protrusion. A well-punched sheet will not compensate for a loose bag or an already restricted collector; a well-fitted bag will not compensate for unpunched paper blocking the path.
Make the first controlled pass on securely supported, identified scrap with appropriate collection and personal protection. Keep the base flat and do not press harder to overcome a poor-fitting sheet. After stopping and unplugging, inspect paper retention, hole alignment and any tearing before continuing on the actual workpiece.
Read repeat failures as evidence
Paper that slips immediately points first to length, squareness and clamp engagement. A tear repeatedly beginning at the same edge warrants inspection for a damaged clamp or interference. Persistently poor collection with correct paper requires checking the bag and the remaining permitted path, not adding random holes.
Keep one failed sheet, its packaging and a disconnected setup photograph. Stop using a cracked base, damaged lever, unreliable switch or damaged cable, and refer those faults to service. Correct paper preparation is an owner task; modifying the clamp or motor is not.
Models referenced