
Front button and two rear latches
Original sequence shows one front paper stop, a tensioned sheet, two independently secured rear levers and a detached eight-point punch.
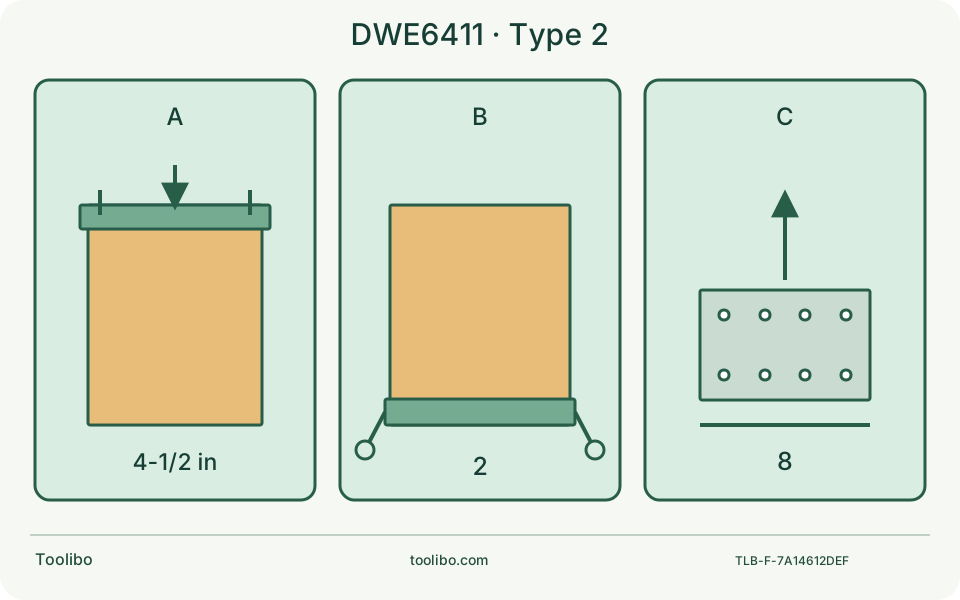
Front
Seat the sheet at the limiting ribs.
Rear
Secure both side levers, not just one.
Collect
Remove the punch and fit the approved collector.
The sequence distinguishes controls; it does not reproduce an OEM drawing or establish compatible spare-part dimensions.
Start with the Canadian Type 2 evidence
The Canadian product page lists DWE6411 and provides the Type 2 North American manual NA494662. The body model, type and country matter when ordering parts or interpreting numbered illustrations. This guide is not an electrical specification for a UK or European DWE6411 suffix, and an illustrated carrying bag does not prove the package contents of a particular retailer’s kit.
The listing specifies 2.3 A and 14,000 OPM, while another feature line also mentions 230 W. Do not convert those into a measured output or compare removal rates by multiplying supply values. Check your nameplate for supply compatibility. The listed package includes the sander, dust bag and paper punch; identify replacement consumables separately.
Understand the asymmetric paper clamps
This machine does not use identical levers at both ends. It has a front clamp button, paper-limiting ribs, a rear clamp and two side levers that latch behind holding tabs. Recognising that sequence avoids treating resistance at the front as a rear-latch fault. The paper size is 4-1/2 × 5-1/2 inches; the rectangular footprint alone is not the whole sheet.
Switch off and unplug. Prepare the sheet and soften the edges to be clamped as shown in the manual. Release the rear side levers, hold the front button to open the front clamp, and insert the 4-1/2-inch edge until it reaches the limiting ribs. Release the button to grip that end. Draw the paper flat over the base, pivot the rear clamp and secure both side levers behind their tabs. Check that neither side is left partly engaged.
Perforate and connect before the trial
Use the supplied matching punch on the fitted paper with power disconnected. Its eight points form the collection pattern; the guides must align before pressure is applied. Remove the punch afterwards. Do not drill a guessed hole layout through a mounted abrasive or leave the sharp tool under the machine as a stand.
The Type 2 manual describes an AirLock outlet and a dust bag secured by turning its collar clockwise. To empty, disconnect power, unlock the collar in the opposite direction and remove the bag. Refit it securely afterwards. The Canadian page names DWV010/DWV012 collectors and DWV9000 for certain other hose connections, but that does not establish every vacuum, hose or hazardous-dust application as compatible. Identify the whole arrangement before buying an adapter.
Make the first job a bounded finishing task
A known bare-wood panel on secure supports is a more useful first trial than an unidentified painted wall. The manual explicitly excludes drywall applications. A palm-sized body is not evidence that it is a convenient drywall sander, even if paper can remove joint compound.
Choose a grit from the material and next finish requirements. Keep the entire base supported, arrange the cable and collector to travel freely, and use long, controlled strokes without pressing down to accelerate removal. Inspect the scratch pattern and edges frequently. If a neighbouring rail or moulding prevents flat contact, change the method rather than forcing one corner into the gap.
Separate a paper fault from a service fault
Swipe or scroll horizontally to see all columns.
| Observation | Action after isolating power |
|---|---|
| Front end pulls out | Confirm insertion to the ribs and release of the front button |
| Rear paper loosens | Check both levers are fully behind their holding tabs |
| Poor dust pickup | Check punched holes, bag collar, bag loading and permitted hose path |
| A latch, cord or switch is damaged | Stop; do not defeat or modify it |
Correctly attached paper that repeatedly tears or slips deserves an inspection of the base and clamp rather than extra force. Retain the sheet packaging and photographs of both ends for service. Do not keep running a fault merely to make it easier to film.
End with dust and maintenance decisions
Empty collected dust frequently and follow the coating manufacturer’s disposal instructions. Dust from some coatings can self-heat or ignite; leaving a full bag attached in storage is not a safe default. This is not a removal procedure for lead paint, unknown coatings or hazardous materials.
Clean only within the external-care instructions. Keep liquids out of the tool, and leave brush inspection, cable replacement and internal repairs to qualified service. A temperature problem that returns under a correct setup is a reason to stop, not to add an unverified lubricant or continue with longer pauses.
Models referenced