
Check shape before changing technique
Compare the same straightedge positions; then correct tilted contact and repeated dwell.
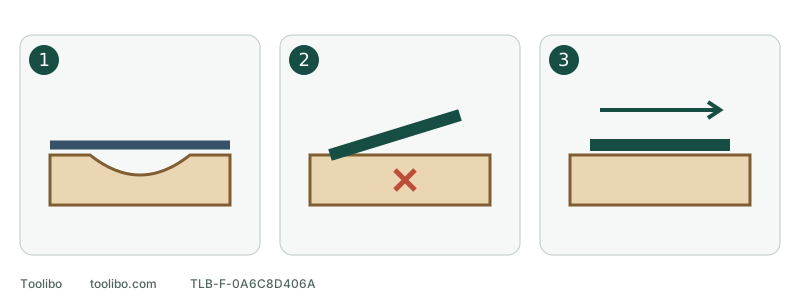
1. Observe a gap under a straightedge
A light gap helps record local shape without assigning a universal tolerance.
2. Do not tilt into one patch
Tipping the pad concentrates contact rather than flattening the whole board.
3. Keep support and even travel
Support the pad and use a travel pattern you can follow.
Compare the same straightedge positions; then correct tilted contact and repeated dwell.
Use this check on suitable solid wood
This is a way to observe changes on known, stable solid-wood surfaces with material available for further work. It is not a floor-levelling, structural-repair or precision acceptance procedure. Do not use trial sanding to investigate thin veneer, unknown coatings or loose joints.
Stop the tool, wait for movement to cease and disconnect power. Remove dust appropriately. Wobble, unusual noise or vibration means keep the tool out of use rather than trying to correct your technique around a fault.
Look at the whole surface
Use a suitable straightedge with an undamaged reference edge and raking light. Check that debris is not trapped under the board or supports, and that clamping does not visibly distort it. Remove the straightedge before operating the sander.
- Rest the straightedge lightly along the length and observe contact at the ends and middle. Do not press the board into agreement.
- Repeat at different positions across the width, then across and diagonally. Agreement in one direction does not establish an entire plane.
- Mark the observed light gaps on a photograph or sketch. An inaccurate straightedge or unstable support must be corrected before interpreting a gap.
- Compare the same positions and lighting after a short work stage. This distinguishes a change in shape from changing wood colour.
There is no universal acceptable gap here. Dimensions must meet the part’s design and assembly requirements; smoothness or even reflection is not dimensional acceptance.
Separate shape from appearance
Swipe or scroll horizontally to see all columns.
| Observation | First consideration | Next step |
|---|---|---|
| The same gap existed before sanding | Existing hollow or overall shape | Assess machining options and remaining material; do not chase the low area |
| A new local gap matches repeated dwell | Possible excessive local removal | Stop and review movement, support and allowance |
| Shape seems unchanged but colour differs | Grain, old surface or scratch pattern | Inspect the finish without treating colour as height |
| Joints move or shape changes with support | Workpiece stability | Correct the workpiece, not the appearance |
These are inspection routes, not diagnoses from a single gap. Lowering the rest of the board to match one hollow may sacrifice too much material.
Inspect contact and coverage
With power disconnected, remove the disc and compare its centre and perimeter for loading or uneven wear. Refit the correct abrasive centrally, with holes aligned and all edges flat. A distorted pad or lifted disc cannot be corrected by pushing harder.
On suitable scrap, keep the pad flat and use an orderly travel pattern whose coverage you can follow. Avoid repeated dwell in one patch and keep support through direction changes. Do not tilt the disc to work an edge or add body weight to accelerate removal.
Know when sanding should stop
After each short stage, remove dust and revisit the same inspection positions. Stop if a new hollow appears, remaining thickness is unknown or assembly dimensions may be compromised. Substantial flattening may need an appropriate woodworking process before sanding.
Record the original gap locations, straightedge directions, support, abrasive and areas covered, then the observed changes. That gives a reason for the next adjustment instead of repeatedly choosing coarser paper without a clear target.
Models referenced