
Identify the possible movement
Before connecting power, check whether the board slides, pivots or rocks when pressed at a corner. A wide board may be warped underneath; a thin piece clamped at one end may still flex at the other. Support carries the material, while restraints prevent movement. One does not replace the other.
The bench itself must be stable. More clamps do not repair a damaged fixing point or a rocking table. Assess unknown coatings and establish appropriate dust control before sanding.
Example: the face of a wide panel
- Put the panel on a stable clean support with the working area supported below. Remove screws or debris that could mark its underside.
- Plan a continuous accessible area and position clamps outside it. Use suitable protective pads where needed to avoid marking the work.
- Check that the arrangement prevents sliding and rotation, not merely that a jaw feels tight. Verify that the panel does not rock.
- With the sander disconnected, rehearse the start, middle, far end and return. Check housing, hands, bag and hose clearance as well as the abrasive outline.
- If a clamp blocks a corner, finish the accessible area, stop, wait for all motion and disconnect before moving the clamp for the remaining section. Never loosen it while sanding.
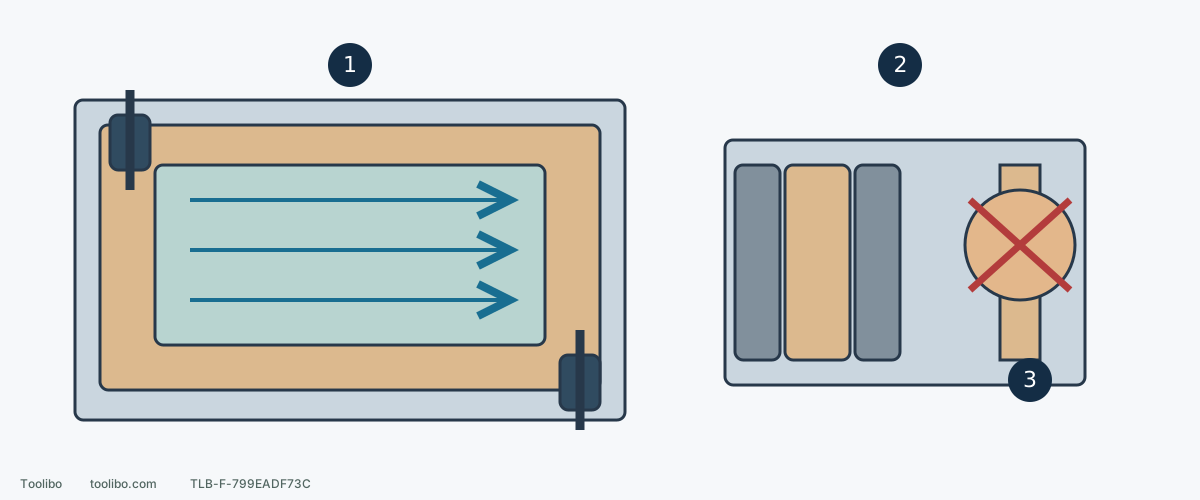
The shaded region in the diagram is the planned pass, not a universal clamp setback. Different housings and collectors need different clearance; the disconnected full-tool rehearsal is decisive.
Example: a narrow strip or small part
The problem may be pad support and housing clearance rather than clamp strength. Use an appropriate support or fixture to prevent sideways movement and rotation while exposing the required face. Do not hold a small part in the other hand against the abrasive or brace it against your body.
During the disconnected trial, check whether reaching the target requires tipping an unsupported pad, placing fingers near the abrasive or deforming the part under the clamp. If access depends on forcing the tool into that position, use an appropriate hand block or redesign the fixture. A pointed detail pad does not make every recess safe to reach.
Include leads and extraction in the layout
Keep the hose and cable out of the sanding area and clear of clamp handles. Check comfortable slack at the far end and ensure the return stroke cannot drop a loop beneath the pad. Rehearse turns and grip changes, not just a straight forward pass. Do not remove required dust collection merely to gain access; change work orientation or method instead.
Four checks before starting
The work does not slide, turn or rock; the planned area is supported; the complete tool and collector clear the clamps; and grip and stance remain comfortable. Then follow the model’s operating sequence.
Stop if the work shifts, a clamp loosens or the support vibrates unusually. Do not reach across a moving pad to catch the work. Wait for it to stop, disconnect and reset the arrangement. Repeat the checks after turning the piece, changing an extraction connector or reclamping.
Support, clamp and reserve the full tool path
A wide panel has clamps outside a shaded sanding area. A narrow strip sits between supports; a crossed-out unsupported round pad shows a poor access choice.
1. A clear working zone
Support the panel underneath and put clamps outside the planned pass, including housing and collector clearance.
2. Stabilize narrow work
Use an appropriate support or fixture to prevent sideways movement and rotation without distorting the part.
3. Do not force unsupported access
If the pad cannot remain supported with hands clear, change the fixture or use a suitable hand-sanding method.
Example layouts, not clamp-force or clearance specifications. Rehearse with the actual disconnected tool and collector.
Models referenced