
Isolation, observation, record and unresolved-fault hold
A shows a disconnected connector; B shows a conceptual guard and retracting lever; C is an observation record; D marks an unresolved guard fault and service document.
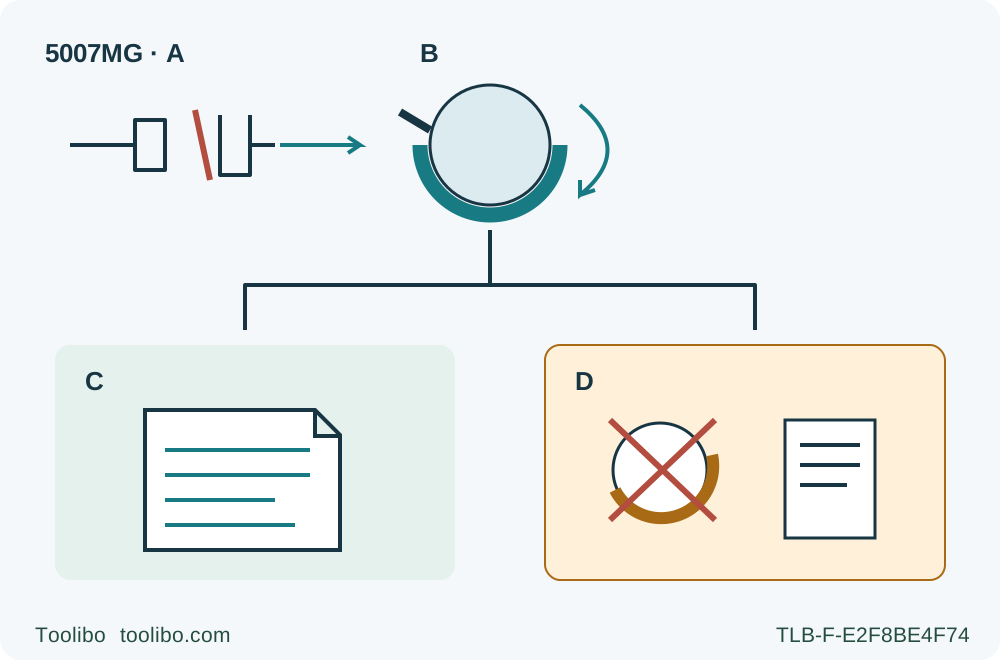
A · Establish actual disconnection
After complete blade stop and safe withdrawal, physically unplug the tool before examining or changing any setting. A lamp or released trigger is not isolation.
B · Observe the specified guard action
Use the designated retracting lever while unplugged, release and observe free movement and instant closure. Keep fingers clear; check the specified range without forcing or dismantling.
C · Record, do not guess the repair
Note delay, contact, affected settings, drop history and uncertain assembly. Deposits are a possible observation, not proof that only cleaning is needed.
D · Retain the unresolved-fault hold
Improper guard or spring action requires service before use. After proper correction, repeat the unpowered checks and complete the separate owner preparation; do not use a cut as a guard test.
All four panels describe an unpowered assessment. B represents the designated-lever release check, not a powered guard test or spring adjustment. C records symptoms and possible visible deposits without claiming that cleaning fixes the cause. D keeps a sluggish, contacting or unresolved intermittent guard out of use. An apparently normal later closure does not explain an earlier fault; the body identifies that continued hold as this workflow’s conservative choice. No panel teaches cleaning or repair.
A lower guard that closes slowly is not a nuisance to work around. On the documented Makita 5007MG, the guard must move freely and close instantly before use. A closure that needs a nudge, leaves part of the blade exposed or changes with the depth setting fails that requirement even if the motor still runs normally.
This guide produces a complete isolated assessment and a clear use-or-service hold. It uses the 5007MG instructions 884671-946, not a universal repair method for every circular saw. It does not teach spring replacement, guard bending, blade removal, lubrication or a powered test. Match the actual model, original assembly and supplied instructions before using the checks. If that identity is uncertain, the result is already a hold for proper documentation and assessment.
The important distinction is between observing a guard’s behavior and repairing its cause. You can describe where it hesitates without proving whether the spring, pivot, blade assembly or housing is responsible. Do not turn an observation into an unsupported diagnosis.
Stop the job and establish physical isolation
If the problem is noticed while the blade is moving, keep control of the saw and release the trigger. If it is in a cut, hold the tool motionless in the material until the blade stops; do not pull a moving blade backward or lift it out to inspect the guard. Once movement has ceased and the tool can be safely withdrawn and supported, physically unplug it before any examination.
The 5007MG lamp illuminates when the tool is plugged in. A lamp state is not the isolation test: confirm the actual plug is disconnected and remains under your control. Do not reconnect the saw simply to see whether vibration or a faster blade helps the guard close. The entire assessment below is unpowered.
Place the stopped, disconnected tool securely so that the blade cannot contact a person, cord or work surface. Keep others away and do not set an exposed blade on the bench. If the guard cannot cover the blade, treat that exposed edge as an ongoing handling hazard while arranging service; do not carry or store it casually among other tools.
Record the symptom before changing anything
Write down what happened: slow return after an ordinary edge-start cut, failure to close at one setting, contact or scraping, a recent drop, or a guard that only returns when the saw is tilted. Include the model, the manual identity and the blade assembly’s known history. These observations help a repairer reproduce the condition without a live cutting demonstration.
The manual identifies damaged parts, gummy deposits and debris buildup as possible causes of sluggish operation. It also warns that a dropped saw may have a bent guard. These are possible mechanisms, not permission to assume that a visibly dirty tool only needs cleaning. Dirt and physical damage can coexist, and a bent part may look acceptable from one angle.
Retain the original qualified blade and fastening assembly. An unknown replacement, incorrect washer or contact between blade and guard is not resolved by moving the guard farther out of the way. If the saw’s assembly has been altered or cannot be established, add that uncertainty to the hold rather than dismantling it during this check.
Perform the documented unpowered movement check
With the saw switched off and unplugged, use the designated retracting lever to raise the lower guard, keeping fingers away from the blade and the guard’s closing path. Release the lever and observe the closure. The source requires free movement and instant closing; do not substitute a stopwatch threshold, a number of successful cycles or “almost closed.”
Check that the guard does not touch the blade or another part, and that the retracting lever does not touch the housing. The manual requires this freedom across the saw’s angle and depth settings. Any setting change must itself be made while unplugged, using the actual controls, with the base supported and the adjustments secured. This is a clearance check, not permission to perform a bevel cut or defeat a stop. If you cannot safely inspect the specified range or do not understand those controls, retain the hold and ask for qualified assessment.
Observe the condition and action of the spring without opening its housing or manipulating its attachment. If the guard and spring are not operating properly, the manual requires service before use. Do not pull the guard harder to “exercise” the spring, stretch it, add a stronger substitute or treat hand pressure as an acceptable closing aid.
For ordinary sawing, the guard must operate automatically. The manual’s separate special-cut provisions are not an exception for a sticky guard. Never tie or clamp it open, and never have another person hold it out of the way.
Decide whether the original defect remains unresolved
A slow return that occurred during the job is a failed pre-use condition, even if a later check looks better. In this conservative workflow, an intermittent fault remains on hold until its cause is assessed and corrected under the complete instructions. That referral is this guide’s cautious handling of an unresolved intermittent symptom, not a claim that the manufacturer prohibits every owner maintenance action.
Record any visible debris or deposits, but do not spray lubricant or solvent into the guard mechanism to make the symptom disappear. This guide does not provide a chemical, compressed-air or disassembly cleaning recipe. The manual discusses removing accumulated sawdust during blade service, while explicitly stating that cleaning does not replace the guard check before each use. A shortened cleaning tip would not establish correct reassembly or explain a damaged spring.
Send a concise report to a Makita authorized or factory service center: exact model and document, when the fault appeared, whether the saw was dropped, which settings showed interference, and any uncertainty about the blade assembly. Ask for assessment of the guard’s free movement, spring action, lever clearance and any damaged parts. Do not request only a new spring on the strength of a guess.
Define the return-to-use boundary
The useful completion of this guide may be a clearly isolated tool awaiting service. That is a complete safety outcome; a trial cut is not needed to justify the hold. Keep the fault report with the tool and prevent someone else from assuming it is ready because it has been put back in its case.
After qualified correction, use the complete model instructions to confirm the original assembly and repeat the unpowered guard checks before considering ordinary work. The guard must move freely, close instantly, avoid the blade and other parts, and cover the blade at rest. Depth and bevel settings must be secure. If any point remains uncertain, the tool stays out of use.
A satisfactory guard check is only one prerequisite for a future cut. It does not establish blade sharpness, electrical condition, support, guide alignment or operator readiness. Complete the separate owner preparation before an ordinary supported sample; this article deliberately does not use cutting as a guard test.
Finally, keep stopping and guarding separate. The 5007MG is not granted the shared manual’s 5007MGA-only electric brake. Even on a brake-equipped model, braking would not replace a working lower guard. Before setting any saw down, require actual complete standstill and guard coverage, rather than choosing one of those conditions as a substitute for the other.
Models referenced