
Observation, isolated checks and a conditional sample decision
A shows a darkened cut edge; B1 checks blade qualification, B2 support, and B3 guide and cord layout; C is the sample-admission gate; D1 is a sample and D2 an unresolved hold.
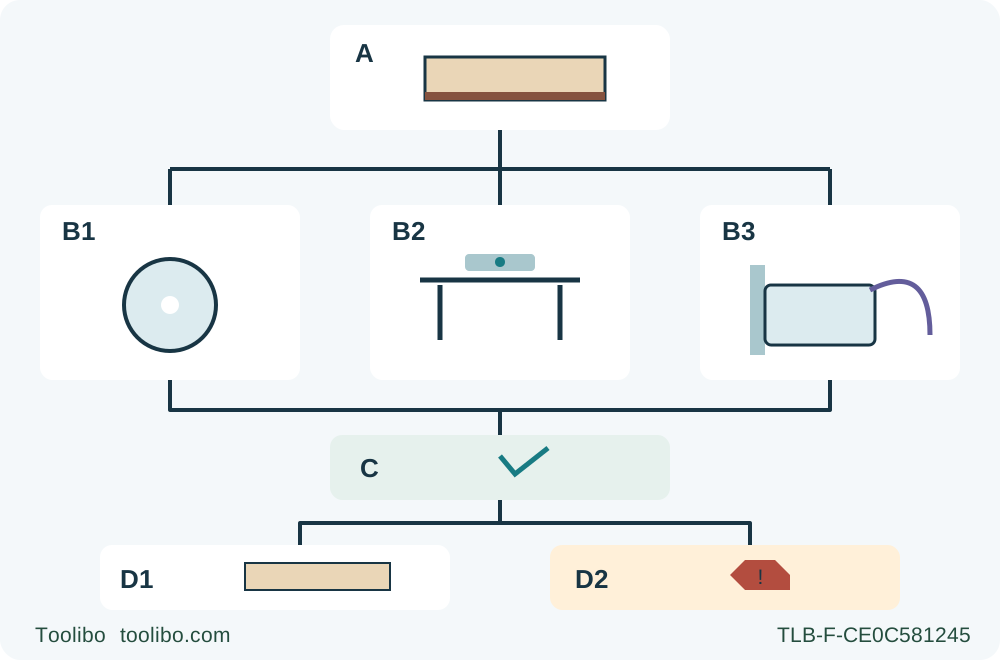
A · Stop and record the observation
If binding or abnormal slowing occurs, release and hold motionless until stop, then safely withdraw and unplug. Record the mark and the sequence without guessing a failed part.
B · Check three isolated groups
B1 is original blade and tool qualification; B2 is support through separation; B3 is guide contact, clamp clearance and the full cord route. Repair needs exclude the sample.
C · Apply the sample-admission gate
Proceed only with a qualified tool and blade, no unresolved malfunction, and an identified setup issue safely corrected under the exact instructions. Otherwise hold.
D · Accept the process or refer
After a controlled ordinary sample, require safe steady travel, straightness, dimensions and acceptable edge condition. Persistent marks or abnormal behavior mean stop further trials and seek qualified assessment.
This is a decision map, not a diagnostic chart assigning every dark mark to a cause. B1–B3 are isolated checks of documented mechanisms and layout, not repair procedures. C permits an ordinary sample only when tool and original blade are already qualified and an identified setup issue has been safely corrected; a check mark does not waive that condition. D1 requires acceptable process and dimensions, while D2 retains unresolved symptoms for competent assessment. No panel prescribes faster feed, chemicals or a live fault test.
A dark cut edge is an observation, not a diagnosis of a worn motor or a reason to push the saw faster. Before trying to improve the finish, determine whether the cut involved binding, loss of support, a suspect blade or a tool fault. A cosmetic complaint can arrive with a condition that makes another cut inappropriate.
This workflow uses the documented Makita 5007MG with its original correctly qualified wood-cutting assembly and instructions 884671-946. It ends in either a controlled ordinary sample after identified setup problems have been corrected, or an isolated tool and a specific service or blade-assessment referral. It is not a sharpening, chemical cleaning, electrical diagnosis, blade replacement or in-kerf restart tutorial.
The manual does not provide a chart mapping every brown mark to one failed part. It does explain that dull or improperly set blades increase friction and binding, hardened deposits slow the saw, and forcing or twisting can overheat the motor and cause kickback. The investigation below uses those documented mechanisms to organize observations; it does not claim that edge color alone proves any of them.
Stop safely and preserve useful evidence
If a cut begins to bind, slow abnormally or leave its line, release the trigger and keep the saw motionless in the material until the blade stops. Do not steer a moving blade back onto the line, pull it backward or lift it out for a look. After full stop, withdraw only when safe, then unplug before inspecting the saw or changing the setup.
Do not immediately recut the damaged edge to make it look better. Record whether the mark ran along the entire cut or appeared near a hesitation, whether the tool slowed, whether the guide or stock moved, and whether the offcut sagged or trapped the blade. A photograph of the stopped, isolated arrangement and a note of the sequence are more useful than a guessed diagnosis.
Visible damage, guard failure, a faulty trigger, damaged cord, persistent abnormal operation or an unresolved binding event rules out a diagnostic sample. Do not run the saw unloaded to listen for a fault or keep repeating cuts until a symptom becomes obvious. Retain the hold and use qualified assessment. Edge marks cannot establish that an electrical system is sound.
Check the original blade boundary without a repair experiment
With the tool unplugged and safely supported, assess the known history and visible condition of the installed approved blade without touching its teeth or entering the guard’s closing path. Confirm that the existing assembly is the exact qualified one, not an unknown replacement. The saw’s diameter rating alone cannot prove that a blade suits the material or matches the mounting hardware.
A dull or damaged blade is not permitted by the manual. Teeth that are visibly damaged, a suspect plate, an uncertain fit or deposits that need blade service keep the tool out of this sample workflow. Refer the blade and assembly for the complete matched instructions and competent correction. Do not try sharpening teeth, altering their set, tightening an unknown fastening system or changing to a speculative tooth count as an experiment.
The manual discusses blade cleaning with removal as part of that work. This guide deliberately does not extract a solvent recipe from it or tell you to clean an installed blade. Chemical compatibility, removal and correct reassembly are separate requirements, and visible cleanliness would not prove sharpness or correct tooth setting. A cleaning or replacement need must be resolved before, not during, a comparison cut.
Inspect support, guide contact and the entire path
Next examine the arrangement that produced the mark. The manual requires stable support and clamping and places the wider part of the base on the solidly supported retained piece. For a panel, support both sides near the line and near the edges so that sag does not close the kerf. The supports themselves must remain outside the full blade path, including the underside projection and the exit.
Ask what happens at separation, not just at entry. An offcut that tips, twists or pinches the blade is not cured by a sharper-looking finish at the beginning. Rebuild the support if the pieces cannot remain controlled without someone grabbing the waste. Never use a free hand to support the work while operating this two-hand saw.
For a rip, the manual requires a rip fence or straightedge guide. Check that the reference is actually straight, its contact face is continuous and the saw base can follow it without rocking or encountering clamps. A guide set at an angle to the intended path can make the saw fight the setup; do not force the blade sideways to compensate. Requalify the actual offset on isolated measurements after a safe sample rather than guessing from the base edge.
Rehearse the complete travel while unplugged. The front grip and rear handle must remain usable, the cord must not snag, and the operator must not need to reach across the cutting line. A pause caused by a caught cord is a layout problem to remove, not an instruction to rush past it next time.
Restore documented settings, not a faster-feed theory
With power disconnected, secure zero bevel for this sample and set depth to the actual stock. The manual permits no more than one tooth below the work; this sample uses less than a full tooth as a conservative setup choice. Lock the depth and bevel adjustments. If the base or locks cannot hold the setting, do not proceed.
The source calls for straight, gentle forward movement and uniform advance, without forcing the saw or allowing the blade to slow under the imposed feed. It does not supply a universal millimetres-per-second value. “Push faster to prevent burning” is therefore not an acceptable conclusion from a brown edge. Neither is deliberately lingering in one place to compare color.
Check the actual nameplate supply and the full extension-cord requirements. The manual notes that an undersized cord can cause voltage drop, loss of power and overheating, but a marked edge does not prove that this is the cause. An unsuitable cord can be corrected only to the documented requirements; damaged wiring, suspect supply or unexplained power loss belongs with a qualified person, not an improvised electrical test.
Admit one controlled sample only after the causes are addressed
A sample is appropriate only if the original blade and tool are already qualified, there is no unresolved damage or malfunction, and an identifiable support, guide, cord-route or setting problem has been corrected. Write down that correction. If you cannot identify and safely resolve a relevant problem, retain the hold rather than treating repeated cuts as a diagnosis method.
Choose known clean loose wood suitable for the installed approved blade, with enough area for stable clamps, broad-base support and safe runout. Avoid a tiny strip or the damaged original piece merely to save material. Use eye and hearing protection and appropriate dust and respiratory precautions. Check the lower guard’s free movement and instant closure while unplugged, with no guard contact against the blade or other parts at all angles and depths of cut, and check the trigger returns OFF before reconnecting.
Hold the front grip and rear handle firmly, with the body out of the blade line. Set the base flat with the blade clear of the work, start and wait for full speed, then advance straight and uniformly without forcing. If the saw slows, binds, drifts or the work moves, release the trigger and hold it motionless until complete stop. Do not correct the line under power or make a second attempt without reassessment.
After normal completion, release the trigger and wait for full standstill and lower-guard coverage before setdown. Unplug before measuring or examining the sample. The 5007MG does not acquire the shared manual’s MGA-only electric brake; do not assume an immediate stop.
Accept the process as well as the edge
Check the sample for a straight cut, the intended dimensions, an acceptable square edge and face condition, and absence of the earlier abnormal slowing, binding or layout interruption. A cleaner edge alone is insufficient if the saw was forced, the guard hesitated or the offcut moved dangerously. Reject that process even if the mark is less visible.
If the dark marking or abnormal behavior persists after the documented correction, stop further trials and refer the tool, blade and recorded observations for qualified assessment. Do not infer a motor failure, prescribe brush replacement or hide the symptom by sanding the edge before the cause is understood.
Keep the result specific: what was observed, what safe correction was made, whether the controlled sample met both process and dimensional requirements, and what remains unresolved. This produces a useful next action without promising that one finish change has diagnosed every part of the saw.
Models referenced