
Sharp, rounded and chipped edges
Three enlarged conceptual edge sections compare a sharp corner, rounded wear and a missing notch.
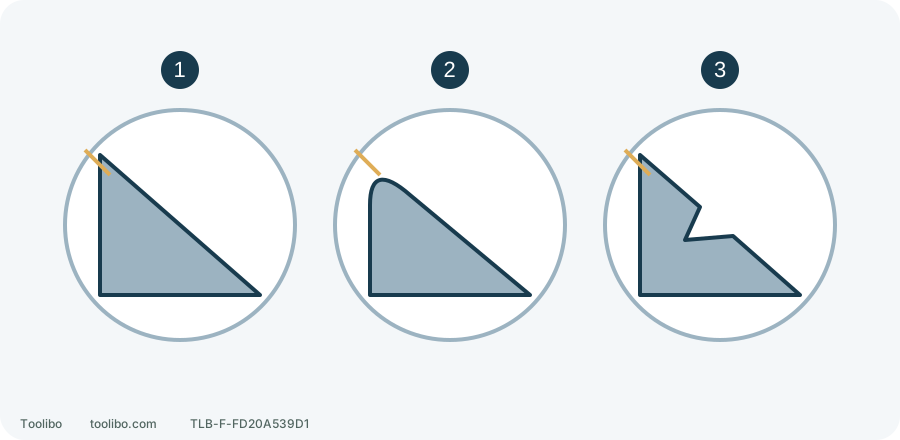
1. Defined edge
A distinct edge alone does not certify the whole bit is sound.
2. Rounded wear
Loss of the cutting corner can accompany rubbing instead of cutting.
3. Missing material
A chipped or cracked edge means stop using that bit.
Visual concepts, not a tolerance gauge or a universal bit profile. Inspect a cool, disconnected bit under good light; do not test sharpness with a finger.
Separate retirement from investigation
Bending, cracks, missing cutting corners, chipped edges or a badly crushed shank justify taking the accessory out of use. Do not run it fast to see whether it still works. If trapped, control tool and work and follow safe release procedures; do not lever the housing to straighten it.
Slower progress, rough walls or increased heat alone need context. Changed material, unsuitable type, blocked flutes, poor seating or incorrect speed/feed can produce similar symptoms. Age alone does not diagnose the drill, and coating colour alone does not establish retirement.
Inspect three zones stopped and isolated
An actively smoking, leaking or increasingly hot battery is a keep-away situation, not a removal checklist. Otherwise, only with stable equipment safe to handle, release, wait for standstill, remove the pack and let the bit become safe before taking it out.
Swipe or scroll horizontally to see all columns.
| Zone | Look for | Decision |
|---|---|---|
| Point and cutting edges | Chips, cracks, obvious asymmetry or rounded edges | Retire damage; suspected dullness calls for task review and suitable sharpening or replacement |
| Flutes and transition | Attached chips, cracks or distortion | Permitted surface cleaning for deposits; retire structural damage |
| Gripping shank | Bending, deep scoring, crushing or unreliable retention | No shims or hammer-straightening; replace appropriately |
Use good light rather than running a fingertip along an edge. Do not wipe sharp metal chips by hand. Use permitted external cleaning, not improvised acid, strong solvents or heating.
If undamaged, check four working conditions
First, confirm material suitability. Wood, metal and masonry cutters are not interchangeable solely because diameters match. A coating does not make every substrate and process compatible.
Second, check normal shank contact and obvious crooked seating. Misalignment can make a new bit perform poorly. Do not compensate with extra tightening tools or a powered sleeve grip.
Third, check chip removal and backing. Packed wood chips, vibrating sheet or rotating work need setup correction rather than merely a more expensive bit.
Fourth, use appropriate speed, mode and feed. Rubbing without cutting, sustained speed loss or repeated protection does not justify additional force. Stop to investigate; controls change stopped and accessories/cleaning require isolation.
Make a comparison meaningful
Choose a sound accessory of the same suitable type and intended diameter with a compatible shank. A shorter, smaller or different-purpose cutter producing a better result does not prove the original was the only cause. Record material, thickness, diameter and setup.
On matching noncritical scrap, complete fitting, restraint and protection again. Keep the finger off the trigger before installing and securing the compatible pack, then operate normally. Do not alternate a damaged bit and a good one; retired damage stays out. Persistent vibration, poor retention or failure to cut with a sound accessory means stop and review tool or setup rather than keep swapping bits.
Decide between sharpening, replacement and storage
Sharpenability depends on type, damage and restoring the correct geometry. Do not hand-grind every bit to one angle. Split points, specialised coatings, step bits and carbide constructions may require dedicated equipment or manufacturer treatment. Cracks, bending and severely damaged shanks are not repaired by this guide.
For replacement, record cutting diameter, shank shape/size, usable length, material application and cutting direction. A similar appearance is insufficient. Separate and identify retired accessories so they do not rejoin the usable ones.
Return clean dry cooled sound bits to divided storage that protects edges from collision. Inspect again before use; tidy storage reduces damage but does not replace checks.