
Grip the shank, not the flutes
Two side sections compare jaws on a plain shank with jaws on the fluted section.
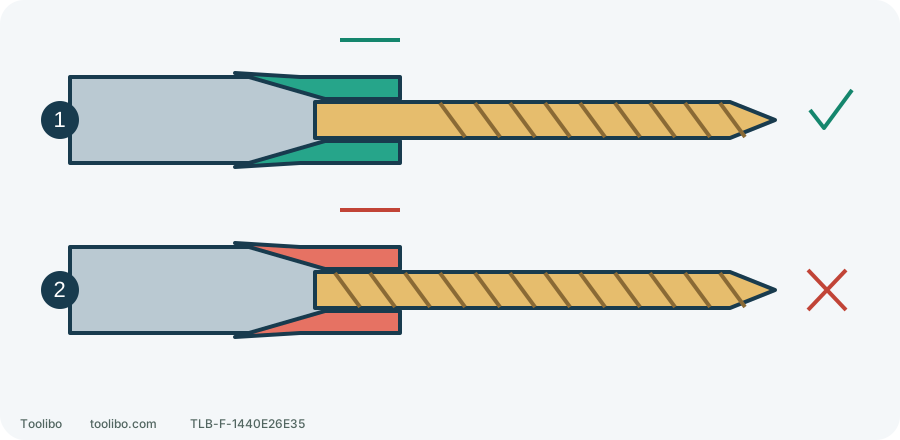
1. Sound gripping shank
Jaws meet the plain gripping area evenly.
2. Incorrect flute grip
Release and reseat; tighter clamping does not correct the wrong position.
Schematic gripping positions, not chuck dimensions. Inspect only with the battery removed.
Identify the moving interface
Do not recreate the slip to watch it closely. Use what you already noticed. A bit moving inside the chuck is a retention problem. A driver bit jumping out of a screw recess is a bit-and-fastener problem. A stationary bit with clutch chatter may mean the screwdriving clutch setting is low. Tightening the chuck does not fix all three.
Release the trigger, wait for rotation to stop, select the centre lock and remove the battery. Let a hot bit become safe to handle. If it is trapped in the workpiece, do not use the drill as a lever or twist the housing to pull it free.
Check where the jaws grip
Look from the side in good light. All three jaws must grip the intended shank, not a flute, cutting edge or rounded transition. A chuck tightened on flutes can feel secure before the accessory shifts under load.
With the bit removed, check for a bent shank, deep scoring, cracks or crushed areas. Retire a damaged bit rather than using it as your comparison accessory. Check the shank diameter against the chuck’s permitted range: cutting diameter and gripping diameter are not necessarily the same.
Visible debris or oil also deserves attention. Use only the tool’s permitted external cleaning method. Do not flood the chuck with solvent or oil the gripping surfaces to ease insertion. A cracked chuck or a jaw that does not move with the others is a reason to stop here.
Reseat a bit in the PSBDD02
Keep the battery removed and the drill stable. Follow the tightening and release arrows marked on the chuck, rather than guessing clockwise from a different viewpoint.
- Turn the sleeve by hand in the release direction until the jaws open slightly wider than the shank.
- Raise the nose slightly and insert the bit straight along the chuck axis. Align it before closing the jaws; do not use the jaws to force a tilted bit into line.
- Check that the three jaws surround the sound gripping section, then turn the sleeve by hand in the tightening direction.
- While still disconnected, inspect the alignment and gripping position from the side. Gently pull on the shank to check for looseness or obvious sliding.
Never hold the sleeve while powering the drill to tighten it. Do not add a wrench or pliers. Hand tightening is the normal method for this chuck.
Decide from the result
Swipe or scroll horizontally to see all columns.
| What you find | What to do |
|---|---|
| The bit was tilted or gripped on flutes; it is now properly seated | Recheck workholding and accessory suitability before normal use; do not deliberately provoke a slip |
| The shank was damaged and a sound, compatible accessory fits correctly | Retire the damaged accessory rather than compensating with pressure |
| The chuck will not tighten, its jaws are uneven, or slipping returns in normal use | Stop using it and arrange service |
Record the drill model, shank diameter and whether the problem occurs during assembly or after work begins. Do not add paper, tape or metal shims: they change the fit without repairing a worn or damaged chuck.