
Inspect the gripping area while isolated
Side sections show jaw contact on plain shank versus flutes.
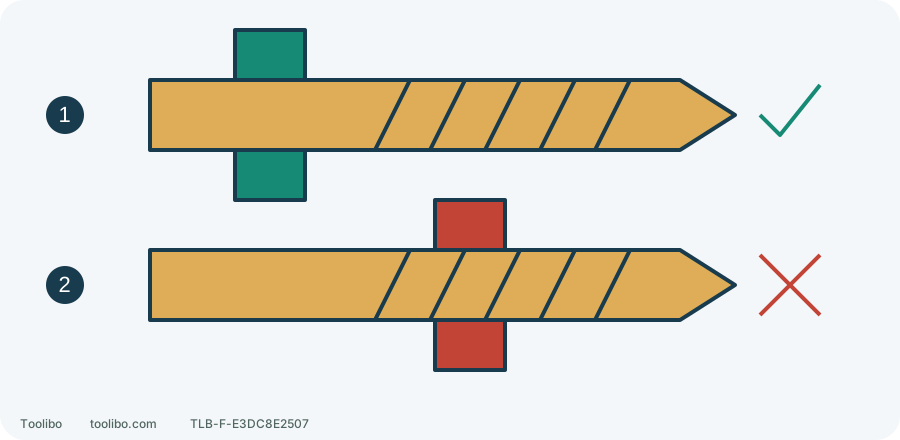
1. Intended shank
Centre and tighten using the exact chuck instructions.
2. Flute contact
Wrong contact is a seating problem; forcing it tighter is not correction.
Conceptual contact zones, not chuck dimensions or a runout gauge. Do not approach a rotating bit to compare it with the picture.
Stop and describe the observation
Smoke, leakage or worsening abnormal battery heat instead calls for keeping people away, not approaching to remove it.
Release when the tip moves abnormally, vibration increases or the hole enlarges unexpectedly. Wait for full standstill and remove the battery; let a hot accessory become safe to handle.
Write “tip appeared to circle,” not “failed bearing.” Distance from chuck can make an accessory or seating problem more visible, but length alone does not diagnose a part. Distinguish vibration during normal drilling from a visibly crooked accessory while stopped. Neither is a measured runout value.
Inspect the accessory without straightening it
Remove it in good light and inspect shank, transition and cutting portion. Visible bending, cracks, chipped edges or severe jaw scoring justify retirement without a powered demonstration. Do not hammer, heat or bend it straight for reuse.
Check the original gripping area. For an ordinary straight-shank drill bit the three jaws must surround its intended gripping section, not flutes or a rounded transition. Hex-shank accessories also need to meet this chuck’s requirements. Physical insertion alone does not establish suitable shape, length, diameter, type or speed rating.
Watch the jaws during normal reseating
Keep the battery removed and open the chuck by its normal manual procedure. Do not dismantle it or the housing. Look only at accessible surfaces for debris, damage and jaws moving normally with the sleeve. Use permitted external cleaning only, without metal prying or solvent flooding.
- Insert a sound straight compatible accessory along the chuck axis, not leaning to one side.
- Follow this model’s insertion depth and tightening instructions. Do not transfer depth rules between chucks or grip the sleeve while pulling the trigger.
- Still isolated, inspect side-on for contact on the correct shank and obvious crooked seating, then verify retention as instructed.
- A visibly unsynchronised jaw, failure to lock or cracked housing ends the check without a running comparison.
Make a useful comparison record
Compare statically first: visible damage on the original, and normal centring and retention of the replacement. Do not deliberately free-spin a long bit to watch its path. Long bits have their own starting-contact and speed requirements; this guide does not authorize a universal no-load test.
Only when all preparation conditions are restored should normal suitable work resume under tool and accessory instructions. Keep your finger off the trigger before reinstalling and securing a compatible battery. Keep hands, rulers and probes away from rotation. Stop immediately at abnormal motion or vibration rather than drilling until it improves.
Swipe or scroll horizontally to see all columns.
| Record | Useful detail |
|---|---|
| Original accessory | Type, shank diameter, length, visible bending or wear |
| Reseating | Jaw contact area, normal tightening, obvious misalignment |
| Replacement | Type and dimensions, whether the same abnormality remains in normal preparation/use |
| Check limits | Visual and ordinary seating checks only, no measured runout |
Persistent abnormality needs service
Stop using the drill and provide that record if a sound correctly fitted accessory remains abnormal. Do not remove the chuck, adjust internal screws or add tightening tools. These checks identify obvious accessory and seating problems, not spindle, bearing or chuck precision compliance.
Temporary improvement is not measurement approval. Work with specified hole-position or size accuracy needs suitable inspection and equipment, not a visual tolerance certificate.