
Round a loose shelf corner with a supported curved cut · Diagram
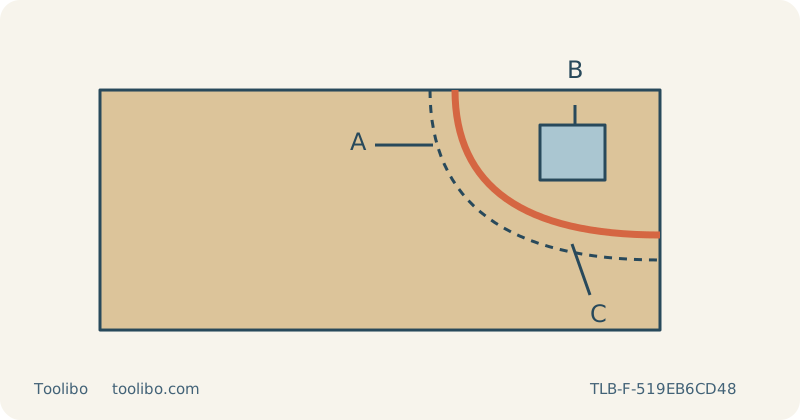
The dashed line is the finished corner. The solid orange cut is on its waste side, leaving material for hand finishing. The blue block supports the corner waste. Schematic, not to scale.
A
Dashed finished outline; test this curve on scrap.
B
Support the corner waste away from the blade path.
C
Cut on the waste side and hand-finish the remaining allowance.
The dashed line is the finished corner. The solid orange cut is on its waste side, leaving material for hand finishing. The blue block supports the corner waste. Schematic, not to scale.
Define a decorative corner, not a structural change
This project rounds an exposed corner on a loose, known, uncoated wood shelf blank before installation. It is not permission to cut an installed shelf, remove material near a concealed bracket or change a load-bearing design. Determine the intended outline from the room layout and the shelf’s approved support arrangement. A smooth curve does not establish that the remaining board or its fixings can carry a particular load.
Mark the finished curve and identify the outside portion as waste. A broad radius is easier to follow than a sharp turn, but no universal radius is promised here. Draw the same curve on matching scrap, using the same reference face and thickness as the shelf. Leave a modest allowance for hand finishing instead of assuming the saw will produce the final smooth edge in one pass.
Check the tightest turn before touching the blank
Select a compatible wood blade intended for the material and curved route. A narrow profile can turn more readily, but its suitability still depends on the thickness and required cut-face squareness. Switch off and remove the battery or unplug the corded saw before fitting it. Seat the blade fully through the correct clamp procedure, put the back in the guide roller where required and verify retention.
Secure the base at zero bevel and keep the guard intact. Rehearse the curve with power isolated, checking whether the tool body, base or your wrist will meet a clamp. Turn the loose workpiece to create a comfortable approach. If the desired curve requires forcing the blade sideways or losing base support, change the outline or choose a different method before cutting the shelf.
Arrange support for the small curved waste
Clamp the retained blank to a stable bench and support the waste independently at the appropriate height. A small curved offcut can still twist into the blade or tear away at the final fibres. Do not plan to catch it by hand below the board. Position supports outside the complete moving blade stroke through the entire curve, including the exit where the blade changes direction relative to the bench.
Keep clamps outside the base’s turning path, not merely away from the pencil line. Route a cable or extraction hose behind the saw with enough freedom to follow the turn. If the corner cannot be reached comfortably in one approach, plan separate cuts and re-clamping with full stops and power isolation. Do not move a clamp or support while the tool is operating.
Make the curved cut with a finishing allowance
Wear eye and hearing protection and suitable respiratory protection. Use compatible dust extraction or the permitted dust-control arrangement and provide ventilation. Begin with low or zero orbital action when examining the visible edge, then use the blade and tool instructions to select speed. The sample should prove both the surface finish and the ability to follow the curve without forcing.
Support the front of the base, keep the blade clear of the wood, start and establish speed before feeding. Follow just outside the finished line on the waste side. Turn gradually with the route while keeping the base flat; twisting the body to drag the blade back onto a missed line can spoil the lower edge. Stop if the blade resists the curve, the base lifts or the waste begins to pinch the kerf.
Finish and inspect before installation
Switch off and wait for a complete blade stop before withdrawing, setting down or removing the offcut. Isolate power before any adjustment. Inspect the upper line, lower edge and cut face. If the bottom has wandered into the retained shape, do not keep recutting the shelf smaller without reconsidering the dimensions. Resolve the cause on scrap before proceeding further.
With the blank secured and the saw disconnected, hand-finish the remaining allowance and remove sharp fibres from both faces. Check the curve against its template and the shelf’s planned location. Sanding can refine a sound decorative edge, but it does not repair a split or prove the shelf’s load capacity. Confirm the original support and fastening plan independently before installation. For a matching second corner, reuse the template but check the grain direction and workholding again rather than assuming the reversed approach behaves identically.
Models referenced