
Bosch GST 18V-125 B: prepare a controlled first wood cut · Diagram
A clamped retained board and separately supported waste leave a clear blade gap.
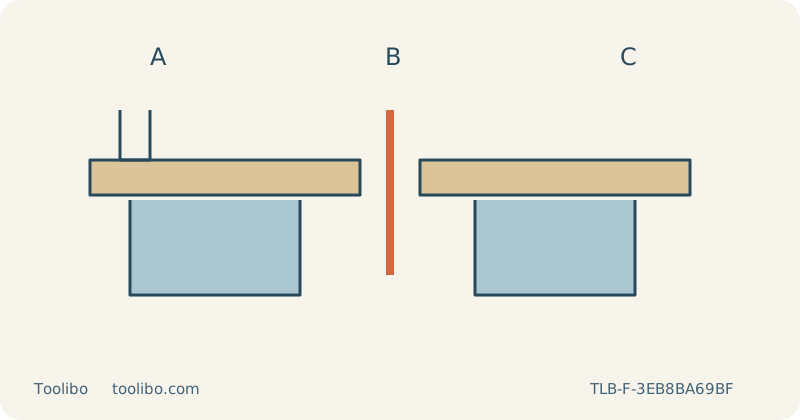
A
Clamp the retained part
B
Support the waste
C
Clear the full stroke
A clamped retained board and separately supported waste leave a clear blade gap.
Match the saw before setting it up
This guide concerns the UK GST 18V-125 B, with the bow handle, not the barrel-grip S version. The UK product listing uses order number 06015B3000, while the operating instructions identify the B machine family as 3 601 EB3 0… Record the complete nameplate before choosing accessories. A package order number and a machine type number serve different purposes.
Make the first cut deliberately simple
Choose a loose, clean, uncoated wood offcut with a straight line well away from its edge. Inspect both faces for screws or nails. Use a stable bench, clamp the retained piece, and support the waste so it cannot drop or pinch the kerf. Leave the entire moving blade clear below the board, including at its lowest stroke; neither a bench rail nor a clamp may enter that space.
Switch off and remove the battery before fitting the blade or changing the base. Fit an appropriate T-shank wood blade with its teeth forward, fully seated in the receptacle and its back in the guide roller. Release the SDS lever and check secure retention. Keep the guard intact and the base secured at zero bevel for this first sample. Do not use a blade that is bent, dull or too short for the board throughout the stroke.
Separate trigger speed from orbital action
The B has a lock-off and a trigger whose pressure changes stroke rate, as well as a preselection wheel. Identify the release action with the battery removed. Orbital action is a separate control: start with it off when evaluating an edge that will remain visible. Select an initial speed appropriate to the blade and wood, then refine it on scrap rather than treating the highest number as a quality setting.
Wear eye and hearing protection and suitable respiratory protection. Use a compatible extraction arrangement and ventilation. Route the hose behind the saw without pulling the base sideways; turn the blower off when extracting. With the front of the base supported and the blade clear of the wood, start, establish the selected speed, then advance steadily with the base flat. Do not steer by bending the blade.
Decide whether the sample is acceptable
Stop if the base lifts, the cut burns or the saw struggles. Switch off and wait for the blade to stop fully before withdrawing it, setting the saw down or inspecting underneath. Remove the battery before adjustments. Examine both the drawn line and the cut face with a square: a straight top line does not prove a perpendicular edge. Only move to the finished panel when the support plan and sample meet the actual fit requirement. Persistent blade retention, switch or base faults require service, not extra hand pressure.
Read the sample as a diagnosis
Give the sample a reference face and mark which edge was clamped. That makes it possible to distinguish a layout error from a cutting error. If the kerf stays beside the line but the bottom edge slopes, examine the stopped blade and the feeding method rather than moving the line on the next board. If the whole cut wanders away, check whether the base edge was catching a clamp or the hose was dragging.
A second sample is useful only if you know what changed. For example, replace a dull blade with a correct fresh one while keeping the support and layout the same. Do not simultaneously change blade, orbital action, speed and pressure and then conclude that one setting solved the problem. Let the blade cut at its own manageable rate; slowing the hand feed is different from selecting a very low stroke rate. Record a successful arrangement for this wood, but retest when the thickness, grain direction or blade changes.
Before transferring a successful setup to the shelf, compare the sample thickness with the actual blank. A thinner offcut can hide deflection that appears in the real board. Keep the same reference face and mark the waste side again, especially if the finished line lies close to a clamp. Recheck the blade length and the clearance under the thicker assembly rather than assuming the earlier test established both.
Models referenced