
Cut a rounded hand opening in a loose storage-box panel · Diagram
A rounded rectangular opening lies inside a board, with a starter hole in the waste and a separate centre-waste support marker.
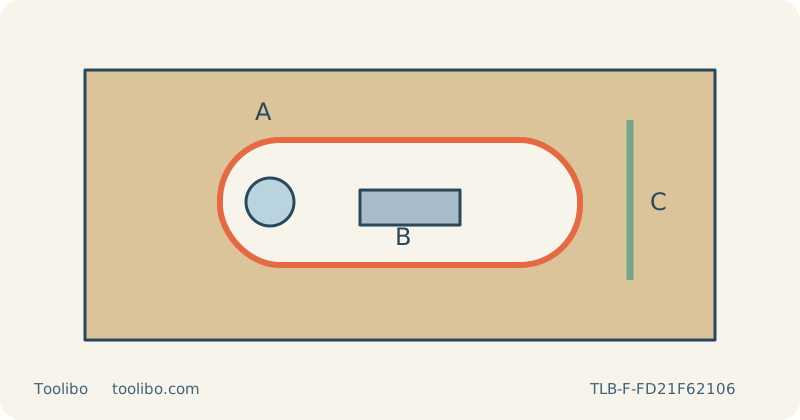
A
Drill the entry inside waste
B
Support the centre before separation
C
Finish the entire inner edge
Plan a drilled entry, supported centre waste and smooth hand-finished edges without claiming load capacity.
Keep the project within a loose non-structural panel
This project makes a rounded hand opening in a detached wood panel intended for a light household storage box. It is not a load-rated handle design, a modification to structural furniture or permission to cut an assembled box containing hidden fasteners. Decide the opening from the actual hand clearance and panel layout, then check that the remaining wood and the eventual assembly are appropriate for their intended use.
Draw a broad rounded rectangle on the blank and mark the interior as waste. Leave room around the opening for the planned assembly without assuming an arbitrary border dimension guarantees strength. Reproduce the narrowest end curve on matching scrap. If the selected blade cannot turn that curve without sideways force, enlarge the radius or choose another method before cutting the finished panel.
Plan a starter hole rather than an improvised plunge
An internal cut needs a safe way to introduce the blade. Use a drilled starter hole within the waste, sized and positioned so that the selected jigsaw blade can enter freely without contacting the hole edge during its full stroke. Follow the exact jigsaw instructions for any stated minimum starting-hole size. Do not substitute an unsupported plunge technique simply to avoid using a drill.
Drill only the loose, inspected panel with an appropriate bit and the drill’s prescribed procedure. Clamp the work securely over suitable backing, keep hands clear beneath the bit and check that the bit cannot reach the bench or a fastener. Stop and isolate the drill before changing bits or removing the work. Clear the drilled hole and remove the drill from the cutting area before setting up the jigsaw.
Support the centre waste before it becomes free
Clamp the retained panel to a stable bench and arrange independent support for the interior waste. The support must carry it near separation without blocking the jigsaw blade anywhere along the loop. Plan the route underneath as carefully as the drawn line above. Do not reach a hand beneath the panel to catch the centre, and do not let the final connecting fibres carry its unsupported weight.
If a continuous circuit would put the base or your hand against a clamp, divide the opening into planned approaches. Stop fully and isolate power before repositioning clamps or changing the panel orientation. Keep the retained panel supported at every stage. A small internal waste piece can still wedge against a blade when it turns, so do not dismiss its support merely because it looks light.
Cut the opening with a flat supported base
Switch off and remove the battery or unplug the saw before fitting a suitable curve blade or changing the base. Seat the compatible shank completely, locate the back in the guide roller where required and verify retention. Secure the base at zero bevel and retain the guard. Check that the blade is suitable for the wood thickness and remains clear below throughout its stroke.
Wear eye and hearing protection and suitable respiratory protection, with compatible extraction and ventilation. Place the stopped blade in the starter hole without tooth contact, keep the base flat, start and establish the appropriate speed before entering the marked route. Leave a small finishing allowance on the waste side. Follow the broad corners without twisting the blade; if it resists the turn, stop rather than forcing the body around it.
Finish the edge before judging the grip
Switch off and wait for the blade to stop fully before withdrawing it, setting down or removing waste. Isolate power before adjustments. After the centre is safely separated, secure the panel for hand finishing. Smooth both faces and the complete inner perimeter, removing sharp fibres and checking the underside for breakout. Do not test hand comfort while sharp splinters remain or while the tool is still powered nearby.
Check the opening with the intended grip and verify that the remaining panel has not split. Reassess the box assembly separately: a clean opening does not establish the capacity of its joints, material or fasteners. Do not use this decorative woodworking procedure as evidence that the box is safe for heavy carrying or for supporting a person. Keep the successful template and sample if making another panel, but repeat the setup check whenever material thickness changes.
Models referenced