
Identify the face you actually want to sand
The SR250801 pointed pad can approach corners, but it is not a finger sander for arbitrary narrow slots. Consider a secured bare-solid-wood inside corner, still open and visible before a back panel is fitted. The target is the horizontal floor, not both the floor and its adjoining vertical wall. Unknown old coatings, thin veneer and concealed cavities require a separate material and access assessment.
Identify the target area and the edge that must stay sharp. Success means an evenly scratched floor without a new hollow near the corner, not forcing the tip into the deepest point. A touching tip with the rear pad unsupported can remove too much from a tiny area.
First: check the actual outline while unplugged
- On normal, stable equipment select O, wait for all motion to stop and unplug. Check for a loose, distorted or damaged pad. O alone is not isolation.
- Fit matching hook-and-loop abrasive with aligned extraction holes and press it flat. Do not try another model’s finger accessory, triangular pad or homemade extension; compatibility for those modifications is not established here.
- Install the collection canister you will use. If a different collection arrangement has been confirmed compatible, rehearse that complete arrangement. Removing an obstructing component just for the fit check does not demonstrate usable operating access.
- You may trace the unplugged pad’s outline onto clean paper, then remove the machine. This records the footprint only: not housing height, rear canister, cord or gripping hand. Do not put this tracing beneath the abrasive during powered work.
Do not derive a minimum clearance in millimetres from a drawing. Equal-width openings with different wall heights can obstruct the housing differently. Your actual tool, collection setup and workpiece determine the result.
Second: rehearse the complete outward and return stroke
Secure the work with clamps outside the planned travel. Hold the unplugged tool normally, place the pad flat on the target floor, move the tip slowly towards the corner and return to the starting position.
Watch the tip and vertical wall first, then the housing and your knuckles, then the rear canister and cord during withdrawal. A photograph of the tip inside proves very little. A canister that traps the tool on the return makes the route unsuitable.
Keep the pad flat and controlled. Do not raise the handle, tilt the machine or support its weight on the tip to gain reach. When a wall obstructs the housing, withdraw until clear and make a light boundary mark on the work. This is an avoidance reminder, not permission to park the tip on the line while sanding.
Third: separate reachable areas from hand-work areas
Only a flat, controlled, unobstructed route with room for your hand qualifies for a short trial. Use a suitably sized hand block for the remaining strip or deepest corner, preserving the intended plane. A ball of loose abrasive rubbed into the corner can round both adjoining edges.
Suppose the housing hits the right wall before the tip reaches its target. Coarser paper and more pressure cannot fix missing clearance. Keep the powered boundary and finish the narrow remainder separately. If even a block cannot lie flat, change the clamping or assembly sequence instead of forcing in the powered tool.
Make a short trial only after the fit check passes
Use comparable corner scrap to check the abrasive and material response. With inspection finished and clamps secure, confirm O before reconnecting. For this SR250801, start clear of the work, allow full speed, then contact it. Lift clear before selecting O; wait until all motion stops and unplug before inspection. Do not transfer this sequence to a model requiring contact before starting.
Move lightly and steadily rather than dwelling on the tip. Look for a shiny low patch, hollow, deep new scratch, accidental wall abrasion or contact beyond the boundary. If any appears, reduce the powered area, improve support or finish by hand; longer sanding is not a remedy. Repeat the same successful setup on the real piece. Changing clamps or collection equipment requires another unplugged rehearsal.
SR250801: footprint and full-height clearance
A pointed pad in an inside corner has two travel arrows; a side view marks housing interference with a tall wall and withdrawal away from it.
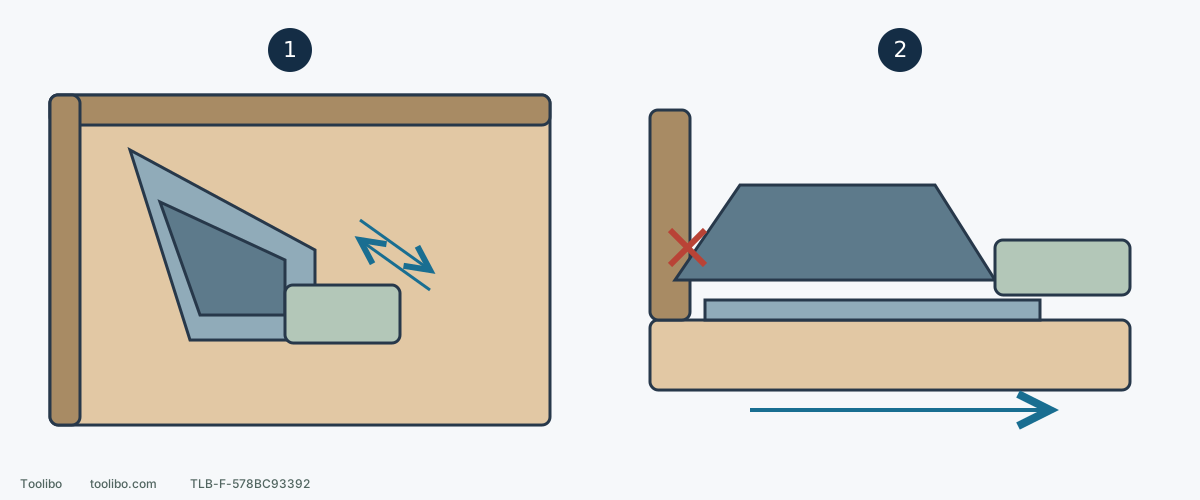
1. Rehearse both directions
Keep the full pad flat; include the rear canister, cord, clamps and gripping hand in the route check.
2. Housing contact rejects the route
Withdraw instead of tilting or forcing the tip; establish a powered-work boundary and finish the inaccessible strip with a suitable hand block.
Simplified pointed-pad and rear-canister relationships, not a measured outline or a minimum-clearance gauge. Test your actual unplugged tool and hand position.
Models referenced