
Separate machine coverage, square-edge work and deliberate easing
A board has a reserved handwork strip; two supported faces retain a square edge; a separate chamfer and a round disc missing an internal vertex show different geometries.
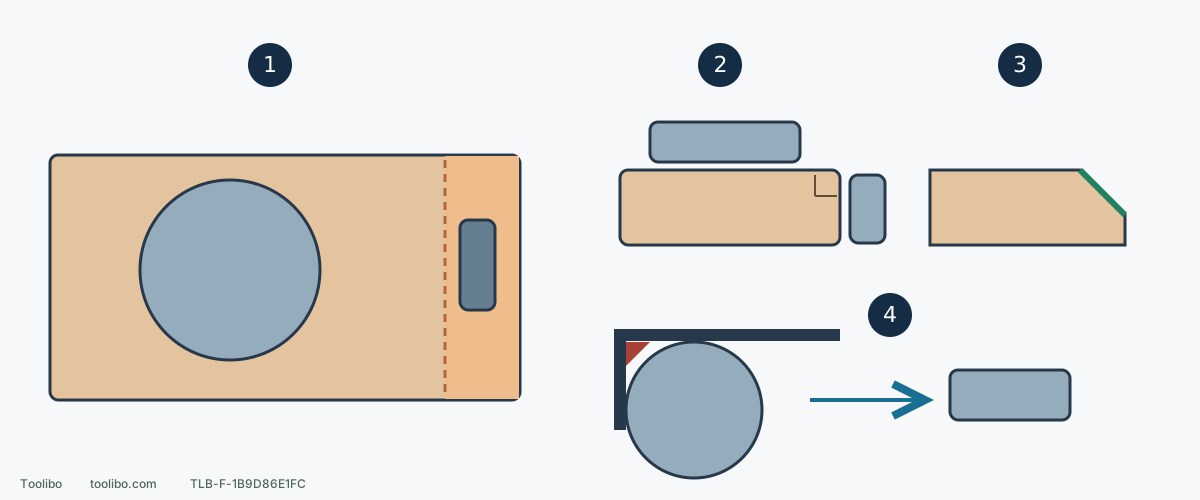
1. Reserve a handwork strip
Stop the machine route before support becomes inadequate; finish the strip with a suitably sized block.
2. Preserve two planes
Prepare each face separately; keep the original square intersection instead of wrapping paper around it.
3. Define easing separately
Use a sample or drawing to decide an intentional profile; it is not accidental edge loss.
4. Change support at an internal corner
The red vertex remains outside the round disc; a fitting hand block avoids tilting the powered pad to chase it.
The strip and chamfer are schematic, not prescribed widths. Side-face blocks represent separate setups, not simultaneous work.
Decide what the edge should become
Imagine a reasonably flat bare solid-wood shelf with adequate thickness. Its top and front face need finish preparation, but their square intersection must remain. Confirm that goal against the drawing, mating part or sample first. Another project may require easing; neither goal is adequately defined as merely not feeling sharp.
This guide concerns geometry and control. Keep the abrasive stage tied to the wood and finish plan rather than selecting a coarser edge paper at random. Veneer, edge banding, unknown coatings and stain that must remain have separate removal limits.
Find where the machine remains stable
With power disconnected, support and clamp the work, then rehearse placement along the boundary including pad, body, grip, collector and hose. The question is not whether paper can touch the spot but whether the pad stays flat, the tool stays controllable and clamps permit movement.
A round pad progressively loses support near an outside edge. There is no single allowable overhang for every pad and workpiece. Where this job would require tilting or balancing on the edge, designate a machine stop zone. A strip left for handwork is easier to resolve than an unintentionally rounded edge.
Prepare the top, then change method
- Confirm the abrasive stage and movement on matching scrap and finish the setup checks. Confirm the switch is off before reconnecting power or fitting the battery, then start according to the model. Keep the pad flat with light pressure and continuous movement; do not pursue an edge scratch with the disc rim.
- Near the planned stop zone, finish in the model’s order, switch off, wait for complete stillness and isolate power before changing support or tools.
- Use a flat hand block and the same abrasive stage on the remaining strip. Follow the top’s grain with the block level, without rolling your wrist toward the front face.
- Clean and inspect the machine-to-hand transition. Do not double the dwell at the join. Remaining old marks call for a stage check, not a local hollow.
Handwork still produces wood dust, so retain suitable collection and protection. Do not blow powder toward your face or hold a small workpiece against a running disc.
Support the front face separately
Set the stopped, isolated machine aside and reclamp so the front face is stable and accessible. If it is too narrow to support the powered pad, use a suitably sized flat hand block. Follow that face’s grain rather than wrapping paper from the top around the edge.
Inspect each plane separately and then sight along the edge for changing width or local rounding. A suitable straightedge or square can reveal departures from the original target. This is a shape check, not a claim of measurement-grade sanding accuracy. If a deep mark requires visibly changing the edge to remove it, stop and decide on repair or a design change.
Why a round disc cannot fill an inside corner
A round disc cannot occupy the vertex formed by two perpendicular walls. Tilting concentrates contact at the rim and the body, clamp or hose may hit first. Makita BO5041 guidance also cautions against edge contact that can damage the pad.
Inspect clearance with power isolated, then choose a suitable flat block, shaped support or separately verified detail tool. Work adjoining faces separately to avoid scratching one while preparing the other. A rectangular pad’s flush capability does not guarantee full movement in every enclosed corner. Do not sacrifice normal grip and support merely to reach the vertex.
Deliberate easing needs its own sample
If easing is intended, establish the chosen profile on scrap and agree its appearance, feel and fit. Treat the edge as a separate operation, inspecting short increments for consistency rather than casually rounding it during the final face pass. Without a drawing, there is no universal chamfer width or stroke count.
A preserved square edge passes when both faces are even and the line is continuous without unwanted rounding. An eased edge passes when it matches the sample consistently and still fits. Different endpoints, but neither permits uncontrolled extra removal to chase a scratch.
Models referenced