
Rebate geometry and whole-tool clearance
A rebate section marks width W, depth D, floor and shoulder; a larger housing collides despite pad fit; a slot has three measuring stations.
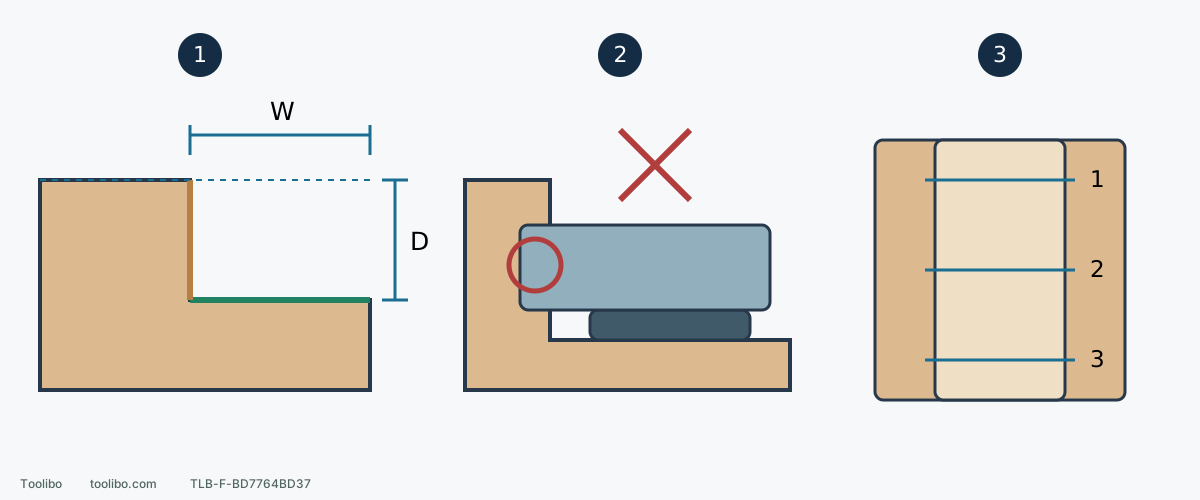
1. Separate the floor and shoulder
Green is the floor, brown the shoulder. Measure depth from the intact outside face and width from the chosen intact edge or design datum.
2. Check more than pad width
With power isolated, check housing, hands, collector and every entry/return/exit position. Do not tilt, remove required parts or run the tool to force clearance.
3. Repeat measurements at the same stations
Record before/after W and D plus actual mating fit. The numbered top view shows locations, not fabricated readings or universal tolerances.
Illustrative references only, not specified dimensions, a machine drawing or a minimum slot width. The collision example must not be powered.
Identify what the recess must do
An edge rebate has a floor and shoulder; an enclosed slot also has an opposing wall. Another board or trim may depend on those surfaces. This is light preparation of known, suitable material, not joint redesign or correction of a wrong width, depth or structural defect.
Identify material and coating before making dust. Unknown old paint, suspect dust, hidden inserts or live components require assessment first. Thin veneer and finished overlays do not have solid-wood removal allowance. Remove only ordinary removable obstructions when safe, not protective parts or structural elements to gain room.
Checklist one: record geometry from repeatable references
Remove loose debris without sanding the measuring datum. Choose an intact outside face for depth and an intact edge or specified design datum for width. A warped, damaged or glue-covered reference needs another measuring method, not an assumption that it is straight.
- Mark three repeatable stations near the entry, middle and far end, numbered 1, 2 and 3, without contaminating finishing areas. Photograph them.
- At each station record opening width W and depth D from the same outside face to the floor. Use a suitable small straightedge or square to check obvious floor irregularity and shoulder shape. If the instrument cannot seat properly, change it rather than reading it tilted.
- Record the mating part’s dry-fit clearance, insertion resistance and shoulder contact. Do not force glass or fragile parts; follow their dedicated assembly requirements.
A useful record is “station 1: before W__/D__; after W__/D__; fit changed?” Fill in actual readings and units. Permissible change comes from the design and assembly requirements; there is no universal tolerance here. An already incorrect joint needs a rework decision, not repeated sanding and forced insertion.
Checklist two: rehearse the whole isolated tool
Switch off according to the tool instructions, wait for all movement to stop, then unplug. Keep required pad, handles and collection parts installed and include the real clamps, hose and cord. Removing the collector to make the body fit is not a normal operating plan.
Rehearse entry, forward travel, return and exit. Check supported pad contact, housing and hand clearance, collector outlet and sideways hose pull. Start and finish positions also need controlled space. If passage requires a tilted pad, unsafe grip or fingers beside the abrasive, reject the setup rather than testing it powered.
A round pad cannot occupy a square internal corner. Moving the BO5041 front grip changes hand clearance, not disc shape, and does not permit edge-running to reach a corner. GSS20-40 three-sided flush access does not prove slot access either: until its applicable start/stop instructions are clarified, this guide allows isolated checks only, not a powered trial. Other tools must also meet their complete instructions; a clearance pass is not permission to switch on.
For hand work, separate floor and shoulder
On known solid wood suitable for light preparation, try matching scrap first. Use a small firm block that seats flat on the target face, with abrasive only on the working face rather than wrapped around the corner onto its neighbor. Choose grit for the material and finish system, not the coarsest paper because access is narrow.
Secure the work with hand and dust-control space. Prepare the floor in controlled short strokes with its grain without leaning against the shoulder; clean, then separately prepare a shoulder that needs it. If even a block cannot seat or the deep recess cannot be seen, change method or seek suitable professional work instead of forcing folded paper into the gap.
Remove permitted roughness, not cracks, glue layers, deep machining grooves or loose facing. Hand sanding still needs material-appropriate collection, cleanup and protection. Stop for snagging, torn paper, moving work or a new rounded corner.
Recheck the same stations and the real fit
After cleaning, use the same three stations, instrument and datum to repeat W and D. Check floor, shoulder and entrance edge, then dry-fit the actual mating part in an allowed manner and compare the original photographs.
A smoother surface with looser fit, a deeper floor or rounded shoulder is a reason to stop and assess repair, not sand the other side to match. If geometry, roughness and fit all pass, proceed with the material/finish process. Record the block shape, abrasive and usable route for the next similar piece.
Models referenced