
Use a flat block with the grain, not loose paper around the edge
A top view shows a block moving along wood grain; side views compare supported flat paper with loose paper folding over an edge.
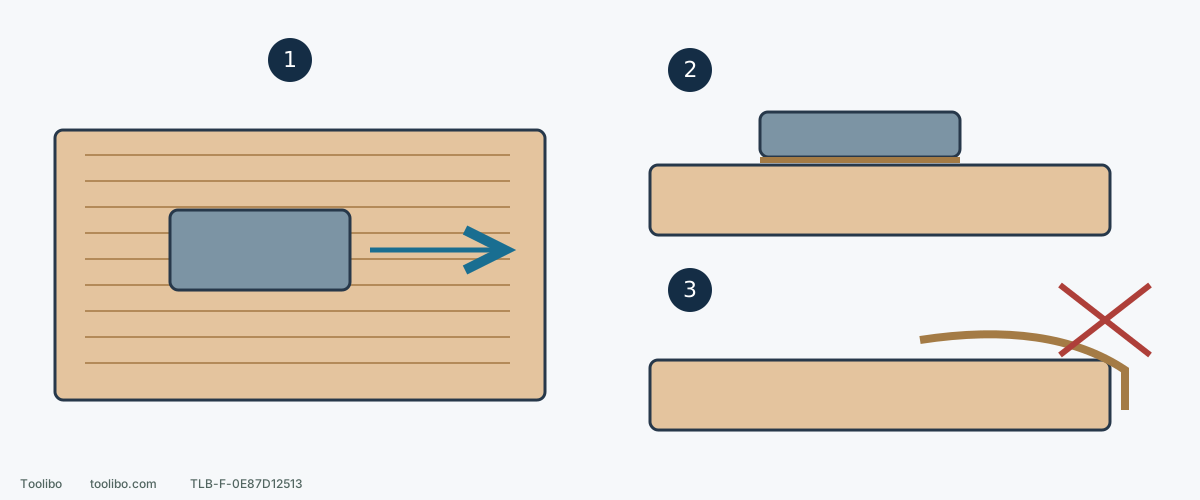
1. Cover with the grain
Use light even pressure and adjacent strokes; inspect after a coverage round.
2. Support the abrasive
Keep the block base flat and paper smooth; a flat face should not follow fingertip hollows.
3. Avoid wrapping a preserved edge
Loose paper around the corner can round it; treat adjacent faces separately with suitable support.
The arrow shows the grain direction, not a required stroke length. This example preserves a flat face and its edge.
Choose a specific handoff
The example is reasonably flat bare solid oak with adequate thickness before General Finishes Water-Based Wood Stain. Its raw-wood instructions permit 120 followed by 150 or 220. Here the powered 120 preparation is followed by hand sanding at 150. This is neither a universal finish endpoint nor a requirement to hand-sand every project.
Handwork removes the previous coarse pattern and makes boundaries that are awkward for the machine consistent with the face. Thin veneer, already-stained wood and coatings that must remain need their own process, not this bare-solid-wood route.
Accept the powered stage first
Finish according to the specific sander’s instructions, switch off, wait for complete stillness and unplug or remove the battery. Set the tool securely aside. Remove loose dust and examine the whole target face with overhead and side lighting.
Ready means shallow machining marks resolved, an even 120 pattern, no new local hollows and intact edges and joints. Broad untouched machining marks call for correcting the earlier work or replanning, not leaving them to fine paper. A single deep gouge also needs a remaining-thickness decision; handwork cannot promise to rescue it.
Fit a flat block, not paper over fingertips
Choose a hand block with a flat base that rests stably on the intended plane and suitable hand-sanding 150 paper from the same abrasive range. Fasten as the block requires. Keep folds, joints and trapped particles off the working face. Try matching scrap first to check that the block edge does not leave concentrated lines.
A flat surface needs support that preserves flatness, not loose paper following every hollow. Fingertips concentrate removal; wrapping abrasive over an edge can round it. Use a suitably smaller flat block on narrow strips. If stable support is impossible, change the support arrangement instead of forcing the block into the space.
Work along the grain, then inspect
- Secure the work and retain suitable dust collection and protection. Hand sanding still creates inhalable dust; do not blow it toward your face.
- Rest the block flat and move with the grain using light even pressure. Cover adjacent bands with controlled continuous strokes, not little circles over a mark.
- Keep the base supported and do not roll your wrist outward near an edge. Treat another face as a separate plane with renewed support.
- Stop after a coverage round, remove loose dust and compare under consistent lighting and viewing angles. Inspection, not a mandatory pass count, determines what comes next.
The 150 stage is not just for corners: bring the whole target face to the same preparation state. If another area was already machine-sanded at 150, inspect the handworked transition without repeatedly digging into its seam.
Read three possible results
Widespread earlier coarse scratches remain: the stage is incomplete. Check that 150 is fresh and not loaded. If it cannot deal with the residual depth, reconsider the earlier stage rather than adding fingertip pressure.
A new deep line suddenly appears: stop and inspect trapped grit, torn paper, the block and bench. Clean or replace the cause and check on scrap before returning to the work.
Old coarse marks are gone, side lighting shows an even surface and there are no new hollows, rounded edges or conspicuous shiny patches: this example’s hand stage is complete. Fine with-grain marks are less conspicuous than cross-grain marks, not permission to ignore obvious scratches.
Confirm the stain on a sample
Clean and complete a sample using the same wood batch, sanding and planned stain. Uneven color calls for checking missed areas, glue and preparation differences, not automatically moving to a finer grade. Do not use steel wool for water-based preparation because retained steel can rust. Record the abrasive range, endpoint and sample result so hand finishing remains a repeatable stage with a stopping criterion.