
Protect the face layer and check the edge separately
A layered panel section shows a white primer and outer veneer above alternating plies; the edge view shows a flat block, square reference and a void marked stop.
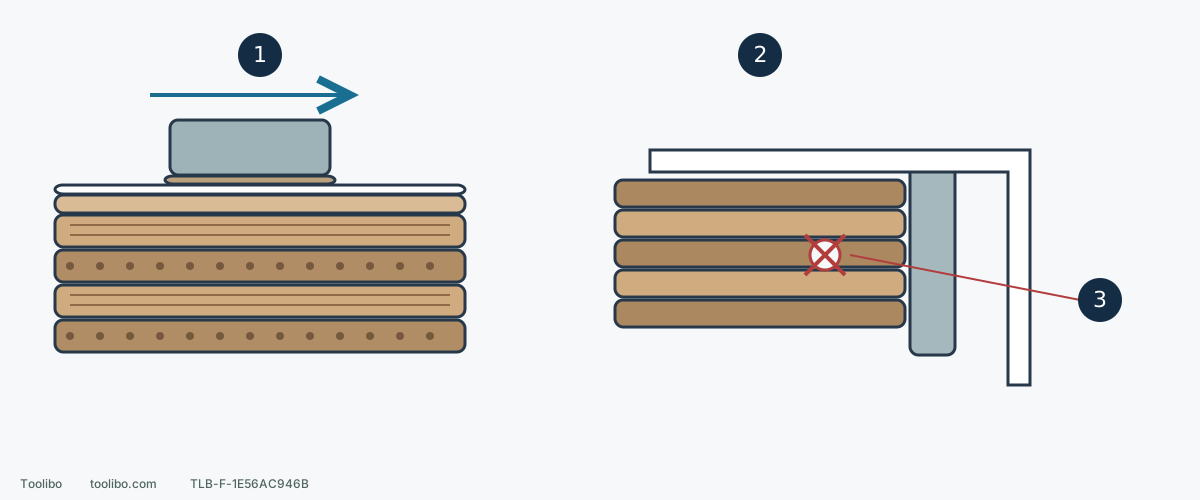
1. Keep the specified primer intact
For confirmed Traditional FirstStep before compatible water-based paint, lightly hand-prepare with 320. Do not remove the primer or transfer this to Ready-To-Paint, which requires no sanding.
2. Preserve straightness, squareness and fit
Inspect and hand-prepare a supported cut edge with its own suitable abrasive. Recheck the original square/straightedge and actual mating part; face grit is not an automatic edge setting.
3. Stop at voids or lifting layers
Do not sand surrounding plies thinner to hide the defect. Obtain a panel-specific repair or replacement decision before continuing.
Layer dimensions are exaggerated and give no removal allowance. The right view compares geometry, not a stroke across the plies. A void is a repair decision, not a sanding target.
Separate the face from the cut edge
Plywood is bonded cross-laminated veneer. Its face is an outer layer or another surface system; a cut edge can expose several plies and bond lines. It is not one solid piece with a single grain direction. Overall panel thickness is not spare face material.
Identify product, surface condition and next finish before starting. Assess unknown coatings, suspect hazardous dust or unidentified overlays first, not by exploratory sanding. This is limited hand preparation of cabinet components, not structural thinning, floor leveling or sanding through a facing.
The example is confirmed Columbia Traditional FirstStep white-primed material followed by compatible water-based paint. Its face requires light 320-grit sanding. FirstStep Ready-To-Paint clear UV material instead requires no sanding according to its manufacturer. Do not transfer this example to that product, or select paper before identity is established. The manufacturer presents this clear UV option for solvent-based coating workflows; no sanding does not mean unrestricted compatibility with water-based paint.
Record three references before assembly
Support the panel securely and identify face, back, exposed edges and future glue/banding areas. Put marks where preparation will not erase them, not randomly on the paint face.
Record length, width and critical mating edges; use a straightedge or square to find obvious bow, waves or loss of squareness. This preserves a reference, not a method of correcting cutting errors to precision with sandpaper. Trial-fit actual banding or mating parts as the design requires and note contact and gaps.
Missing corners, open glue lines, loose face veneer or significant voids require a panel-specific repair/replacement decision first. Lowering nearby material can disguise a defect while sacrificing dimensions and the face.
Face: prepare only this product’s primed surface
- Use a sample from the same product/batch and white-primed condition with the intended compatible water-based paint. Bare plywood is not an equivalent sample.
- Secure and support it, then lightly hand-sand with a flat block and 320 paper. The aim is the specified paint preparation, not removing primer or flattening panel undulations.
- Keep light, even coverage without dwelling or wrapping the block down over the edge. Inspect edges separately; greater force is not a way to make the whole face identically white.
- Stop, remove dust and inspect primer continuity, exposed different substrate, deep scratches or breakthrough. Clean by a method allowed by the coating system, not an unidentified solvent.
- Apply the planned finish to the sample. Wait for its required drying and inspection conditions, then judge appearance and compatibility before treating the real panel. Resolve abnormal results first.
If a spot exposes the substrate or changes color inexplicably, do not expand sanding to blend it. Raw veneer, HDO/MDO overlays and other precoated products need their own preparation, not this 320 example.
Edge: remove small burrs, preserve square geometry and bonds
The exposed cut edge is not the white primer face, so 320 does not automatically carry over. Nor must every ply become the same color. Decide whether the edge will be exposed and finished, banded or glued/mated. Select appropriate hand abrasive for the panel and operation, and verify on matching scrap with the actual cut-edge construction.
Support the edge and use a flat-preserving block for light, controlled work along it. Remove only small burrs or minor roughness that obstructs the next operation. Do not wrap paper over a fingertip to excavate a glue line or roll the block onto the face and create a rounded edge. A designed chamfer or radius requires its own defined dimensions and method.
After a small section, stop, remove dust and recheck using the original straightedge/square and mating part. Preserve designed straightness, squareness, width and fit, not just a smooth feel. Stop for voids, splits or lifting plies; do not chase a hole into another layer. Sanding does not restore bond strength.
Accept face and edge separately
For the face, record product, light-320 sample preparation, primer continuity and subsequent paint result. For the edge, record burr removal, retained straightness/squareness and banding or joint fit. Proceed only when both are suitable; a good-looking face does not excuse a damaged edge.
Before reclamping, turning or inspecting, shut down nearby power tools, wait for complete stop and isolate them so an accidental start cannot interfere. This workflow is hand work, not an exemption from dust control or workholding. Success preserves the supplied layers and dimensions rather than making all layers one color.