
Define the example first
The work is reasonably flat bare solid oak with adequate thickness, not veneer, old coating or a rough board needing major flattening. It has shallow machining marks and ordinary preparation unevenness. The intended product is General Finishes Water-Based Wood Stain, whose raw-wood instructions allow 120 followed by 150 or 220. This example selects 150 and checks color and appearance on matching scrap.
Keep the abrasive product’s actual grade marking. Prefer one product range and retain prefixes such as P rather than assuming equal numbers in different grading systems are identical. If the actual finish label or applicable instructions differ, plan for that system. This is not a universal wood-and-coating schedule.
Decide whether 120 is a useful starting point
Make a short trial with fresh compatible 120 paper on representative material. The target is gradual removal of shallow machining marks and a reasonably even current-stage pattern, not polished-looking wood. Remove loose dust before judging: packed dust can hide a groove.
If a deep gouge, step or broad waviness remains while surrounding material is being lost, stop chasing it. Flattening, defect repair or a different removal plan may be needed before this sequence. Local dwelling and heavy pressure do not make the 120→150 route appropriate. Preserve thickness near thin areas, joints and edges approaching final dimensions.
Stage one: cover the target face with 120
- Secure and support the work. Check metal fasteners, glue lumps and debris, and arrange wood-dust collection and protection. Stop, wait and isolate power before paper changes, pad checks or tool cleaning.
- Follow the specific tool’s starting and stopping sequence. Keep its pad flat and use continuous even overlapping passes, without dwelling over a defect.
- Finish the pass using the model’s instructions, switch off, wait and disconnect. Remove loose dust and inspect the whole face under overhead and side lighting.
- Move to 150 only when shallow machining marks are resolved, the 120 pattern is reasonably even and edges or joints show no new shape loss.
Stage two: remove the previous scratches with 150
Clear coarse particles from pad and work before fitting 150 from the same range. Bring the whole target face to this stage, not merely the center most often touched. Where handwork is needed at boundaries, use supported abrasive that preserves the profile rather than leaving a conspicuously different patch.
The purpose of 150 is to replace the coarser 120 scratches with an even finer preparation surface. If one deep mark remains while its surroundings grow smoother, do not endlessly polish around it. Check for an unfinished earlier stage or a hard particle trapped in the paper. Different causes need different corrections.
Three results, three decisions
Widespread old coarse scratches: return to the earlier effective stage, correct evenly and work back to the endpoint. Do not excavate a small hollow along every mark.
A new isolated deep line: stop and disconnect before checking tears, loading, hard particles and pad contamination. Correct the cause before rebuilding an even surface.
Even current-stage scratches, no old marks and preserved edge dimensions: finish this example at 150, clean and make the stain sample. There is no need to continue to the highest number in the drawer. Do not use steel wool for water-based preparation because retained steel particles can produce rust spots.
Confirm with a finished sample
Use the same wood batch, sanding process and intended stain for a complete sample. Uneven color or absorption calls for checking missed areas, glue contamination and surface differences, not assuming everything needs finer sanding. Record the abrasive range, stage inspections and final product so the next job repeats a checked process rather than two isolated numbers.
Replace the coarse pattern, then inspect for new damage
Three surface diagrams show a coarse 120 pattern, a finer 150 pattern, and a new isolated deep mark crossing the finer pattern.
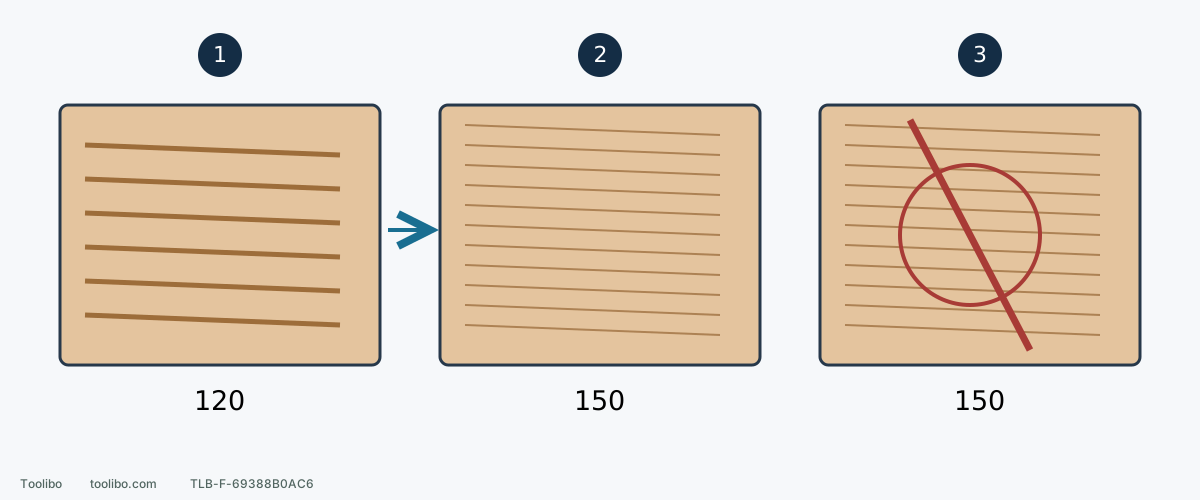
1. Complete the first stage
Shallow machining marks are gone and the current coarse pattern is even across the target face.
2. Accept the finer stage
Earlier coarse scratches have disappeared; stop at the selected product endpoint.
3. Investigate a new deep line
Stop and isolate power before checking trapped grit, tears or pad contamination; do not keep polishing around the line.
Scratch sizes are exaggerated. The 120→150 example applies to the named stain preparation, not every finish.
Models referenced