
Define what the current pass was meant to do
State the target, such as removing shallow machining marks from bare solid wood or replacing the previous abrasive’s coarse pattern. These are different acceptance tasks. Elapsed minutes do not prove completion. This guide does not impose one grit sequence on every material and coating; match the target and endpoint to the actual work and finish.
Unknown old coatings or newly exposed thin layers, glue or substrate require stopping ordinary sanding and identifying the material. A bare-wood inspection routine is not authorization for hazardous dust or thin veneer removal.
Stop and reveal the scratches
- Finish and switch off according to the exact model, wait for the pad or belt to stop completely, then unplug or remove the battery. Never wipe while it moves.
- Remove loose dust with collection appropriate to the material, including nearby coarse particles that could fall back onto the work. Do not blow dust with your mouth or scatter it through the room.
- If wiping is needed, use cleaning materials compatible with the intended finish. Not every rag, oily tack cloth or solvent is suitable. Additional wetting is not mandatory between grits.
- Inspect once the surface is in the condition needed for the finish and inspection. A groove hidden by packed dust has not necessarily disappeared.
Use overhead light for coverage and side light for depth
Look across the entire face under even overhead light for missed strips, glue spots and inconsistent preparation. Lower the light to one side and change your viewing direction. Include edges, reclamping transitions and areas formerly hidden by clamps, not just the pleasing center.
Touch can reveal a burr or step but cannot replace visual inspection. A smooth-feeling surface may retain deep lines. Local shine can follow dull abrasive or repeated dwelling and does not prove readiness for coating.
Case one: broad old coarse marks remain
Imagine earlier wide scratches still crossing several prepared bands after cleaning. Check whether the current paper is fresh, loaded or missing parts of the coverage. Replace ineffective paper with the correct same-stage product and resume an even route.
If the current fine paper makes no useful progress on the depth, revisit the earlier stage rather than choosing still finer paper. Correct the relevant plane evenly; do not dig along every line with the pad edge. Stop and reconsider repair when allowance is inadequate or shape starts changing.
Case two: a new isolated deep line appears
A fresh line across an otherwise even fine pattern differs from widespread old scratches. Keep power isolated while checking torn or folded paper, trapped hard particles and coarse debris from the pad or bench. Correct blocked hole alignment, lifted paper or dust buildup as well.
Clean or replace the visible cause. Restore power with the switch off as described below and follow the model-specific starting and stopping order, then confirm on scrap that the line is not recurring before returning to the work. Repeated deep lines or a damaged pad are not reasons for heavier trial pressure. Remove the cause before repairing the damage it creates.
Case three: an even pattern and preserved shape
Advance only when earlier coarse marks are gone, the target face is consistent and edges, joints and thickness remain acceptable. If the chosen finish endpoint is already reached, stop preparation instead of automatically going finer.
Before changing paper, clear pad and nearby surfaces of coarse particles. Recheck size, backing attachment and dust holes. Confirm the switch is off before reconnecting power or fitting the battery; then follow that model’s contact-start requirements, not habits borrowed from another sander.
Leave a useful short note
Record the current grit, remaining marks and next action. For example, an even current pattern with old coarse marks at the rear-right corner calls for checking missed coverage, not simply sanding longer. Recheck the final round under the lighting in which the work will be used and verify with a sample matching the planned finish. Inspection should decide when to stop or advance while material remains, not create an excuse for endless sanding.
Three scratch patterns, three different decisions
Several old coarse lines, one new deep line with a particle symbol, and an even fine pattern are shown side by side.
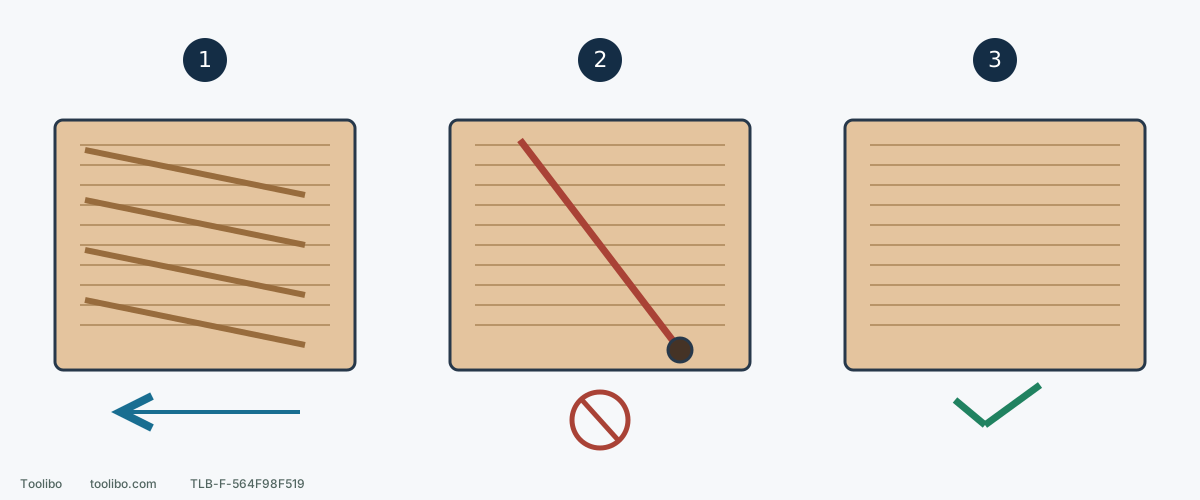
1. Revisit the unfinished stage
Check coverage and abrasive condition before changing to finer paper.
2. Stop and inspect the cause
Isolate power and inspect paper, pad and work for particles or damage before more sanding.
3. Advance or finish
An even pattern with preserved dimensions can advance only as the finish plan requires; the endpoint may already be reached.
The particle is a possible cause to investigate, not a diagnosis from a scratch alone. Line depth and width are exaggerated.
Models referenced