
Overlapping coverage and supported edge geometry
Left: adjacent bands A to D cover a supported board. Right: a level pad contrasts with a tilted pad hanging over an edge.
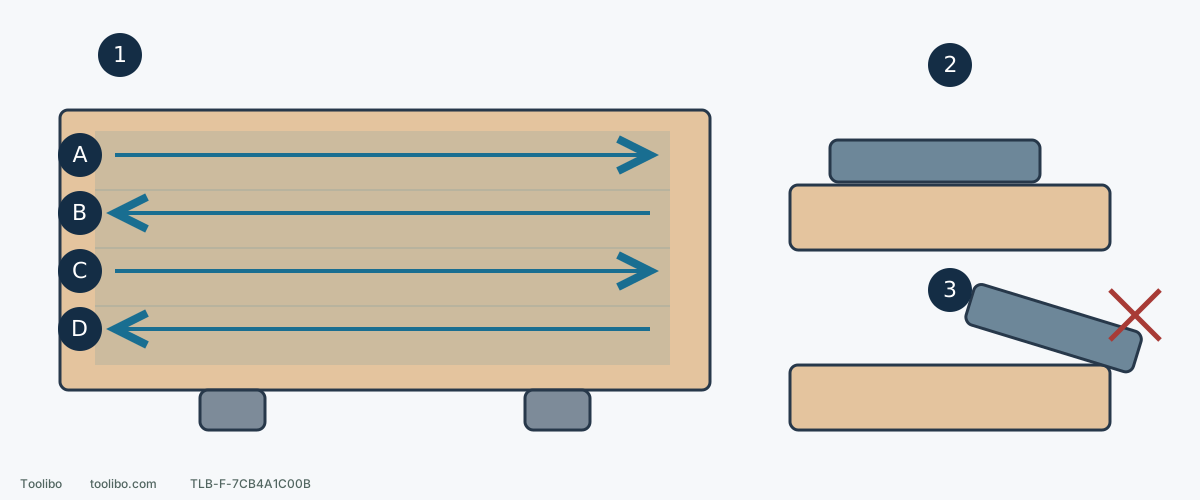
1. Cover without missed strips
Keep moving through adjacent overlapping bands; inspect before deciding another round is needed.
2. Keep the pad level
Use a stable contact area; the board supports the pad rather than an edge taking the load.
3. Do not tilt over the edge
Stop that route when support becomes inadequate; stop, wait and unplug before reclamping.
A to D indicate coverage order, not mandatory pass counts, speed or overlap percentage. Side views are simplified.
Define the surface you need
The example is reasonably flat bare solid oak with enough thickness and only shallow machining marks, destined for General Finishes Water-Based Wood Stain. Its raw-wood instructions allow 120 followed by 150 or 220. Here we select 120→150 and verify the stain on matching wood. Use one abrasive range and retain its actual grade markings.
This is not flattening a twisted rough board with a random-orbit sander or removing an arbitrarily deep gouge. If a straightedge reveals major height differences, the board is warped or removal would sacrifice needed thickness, address flattening or repair first. Veneer, old coatings and thin surface layers are outside this example.
Stabilize the work and the entire route
- Support the board on a stable bench without allowing its center to sag. Check nail heads, screws, glue lumps and grit.
- Clamp outside the pad route. If a clamp hides part of the face, plan a second clamping position. Never shift clamps while holding a powered tool against the work.
- With power disconnected, rehearse the whole outward and return route, including collector, hose, cord and your reach to the far end.
- Arrange collection suitable for wood dust and protection appropriate to the work. Check abrasive size, holes, attachment and pad condition; resolve damage first.
Cover the face in adjacent bands with 120
Try 120 on matching scrap first: it should gradually remove the shallow marks without quickly consuming required dimensions. Imagine adjacent long bands across the face. Start at an accessible side, keep the first pass moving and overlap the next band enough to avoid a missed strip. Continue across the whole face. There is no universal travel speed or overlap fraction; avoid gaps and long pauses at turns.
After each disconnected inspection or paper change, confirm the switch is off before reconnecting power. For this example’s Bosch ROS20VS, then place the disc flat on the work before starting. Maintain light pressure and a flat pad rather than tilting onto its edge to pursue a groove. At the end, follow this model’s instruction to lift gently clear before switching off, then wait for a complete stop. Unplug before inspecting or adjusting the abrasive. Do not transfer that contact-start order to another model without checking its instructions.
Preserve the edge geometry
Keep the tool level while the pad remains adequately supported. If a narrow edge, corner or clamp prevents stable contact, stop that machine route and use supported handwork or reclamp. Do not ride the pad across an edge merely to reach every square centimeter by machine.
Before reclamping, stop in the model’s specified order, wait for complete stillness and unplug. After reclamping, prepare the previously obstructed area and blend the coverage with the rest. The transition is not a place for twice the dwell. Judge the cleaned scratch pattern instead of adding passes for reassurance. Stop if the edge begins rounding or a joint develops a low spot; review support and movement.
Decide when to change to 150
Switch off, wait and disconnect before cleaning loose dust and inspecting under overhead and low side lighting. Shallow machining marks should be gone, the 120 pattern reasonably even across the face and dimensions intact. A stubborn deep groove does not justify stationary heavy pressure; decide whether it exceeds this preparation task.
Once ready, clear coarse particles from pad, work and nearby bench, then fit 150 from the same range. Restore power using the switch-off-before-connection sequence above, then repeat the whole-face route. This stage removes earlier coarse scratches; it does not substitute for an unfinished 120 area. Widespread old marks call for checking the previous stage. A suddenly appearing deep line calls for checking abrasive damage or contamination first.
Finish at the defined endpoint
When the 150 surface is even, old coarse marks are absent and no hollows or rounded edges have appeared, finish this example’s preparation. Clean and complete the intended stain process on matching sample wood. Uneven absorption calls for checking glue, missed bands and inconsistent preparation rather than automatically sanding finer. Record the abrasive product and result so the next job repeats a surface, not just a smooth feel.
Models referenced