
Where a flat pad touches a shaped surface
Cross-sections exaggerate limited contact on a crown, bridging over a hollow and contact with moulding peaks. They give no minimum-radius approval.
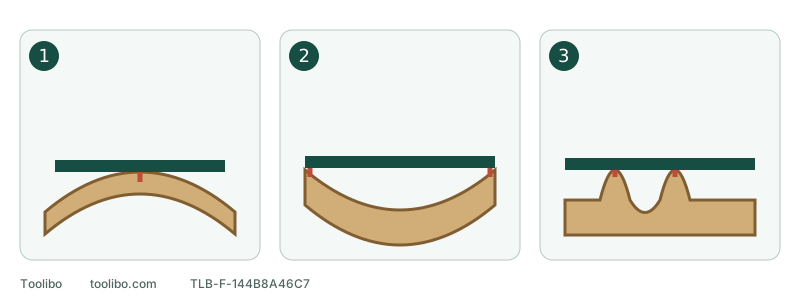
1. Convex crown
Concentrated contact can flatten the top.
2. Concave hollow
Bridging can lower the sides without reaching the bottom.
3. Narrow details
Several high points can be rounded while grooves remain untouched.
Cross-sections exaggerate limited contact on a crown, bridging over a hollow and contact with moulding peaks. They give no minimum-radius approval.
Identify the shape you need to preserve
Examples here are known ordinary solid-wood curved handrails, shallow concavities and decorative mouldings. Thin veneer, unknown finishes, loose structural parts or uncertain allowance are not ready for this ordinary finishing process. Decide whether you are removing light surface marks or reshaping the part; reshaping needs a separate woodworking plan that respects thickness and assembly requirements.
With power isolated, secure the work on stable support. Use raking light, photograph the end profile or a repeatable cross-section location, and mark arcs, flats, sharp ridges and groove bottoms to retain. An accurate non-scratching profile template can be compared gently; a flexible paper shape pressed into distortion is not a dimensional reference.
Three shapes produce different pad contact
Swipe or scroll horizontally to see all columns.
| Situation | Likely flat-pad contact | Better starting point |
|---|---|---|
| Broad gentle convexity, such as a handrail crown | Centre contacts first while sides may float, risking a flattened crown | Verify whether an approved flexible pad can maintain control; otherwise use matched hand support |
| Shallow concavity, such as a broad curved groove | Pad may bridge the sides without reaching the bottom, lowering the sides first | Use suitably shaped hand support or a confirmed specialist method, not a tilted rim |
| Narrow moulding with alternating hollows and ridges | A large disc touches several high points and erases boundaries | Work individual small faces by hand while retaining ridges, not one disc sweep |
These are contact geometries, not minimum-radius specifications. There is no universal curve size that makes any five-inch pad suitable. Material, pad firmness, thickness and changing shape affect control.
Broad convexity: softer does not mean press harder
If the tool and selected pad are confirmed for the use, first assess contact and control on similarly shaped scrap. Fit pad and abrasive by the exact model’s instructions and preserve dust paths. Do not add unapproved foam or multiple protectors to make it softer.
Work only with the tool’s pressure and start/stop requirements. Do not tilt the disc rim to chase the curve or concentrate force on its crown. A narrow contact strip, rocking or a need to force conformity means leave the powered route. A flexible pad can accommodate some change without automatically preserving the original arc.
Shallow concavity: does the bottom actually have support?
While disconnected, inspect whether a flat pad only bridges the sides. If so, sanding is more likely to alter those sides than evenly refine the bottom. Do not insert a tilted disc edge or hold abrasive against a running tool with your hand.
For hand work, choose support shaped to the hollow without sharp projections, suitable abrasive and stable contact. Harder is not automatically better, and fingertip pressure along one line is not shaped support. Check similarly shaped scrap for local hollows before using the actual part. Complex curvature, thin allowance or precise dimensional restoration needs a plan from someone experienced with that profile.
Narrow mouldings: treat each face as a separate region
Identify ridges, grooves and small flats, then choose appropriate hand support for each. Do not loosely wrap abrasive around the whole moulding and pull aggressively back and forth: that can remove sharp ridges before treating the groove bottom. Keep boundaries, rather than mistaking a lighter patch for uniformly completed work.
After a short stage, clear the surface and compare with the original record under the same light and direction. Check crown flattening, lowered groove sides and rounded ridges, not just smoothness. Stop when shape starts changing undesirably; do not grind the opposite side to make the mistake symmetrical.
Buying a Bosch pad: the word “soft” is not enough
Current US Bosch accessory listings and the ROS20VSC page label RS033 extra-soft, RS034 soft and RS035 hard. The earlier 2610051955, 08/18 manual’s accessory table reverses soft/extra-soft labels for RS033 and RS034. Match current part number, package firmness and exact tool-body version. Where an older manual conflicts with the seller’s label, obtain Bosch confirmation instead of ordering by an old firmness name alone.
ROS20VS instructions describe extra-soft pads for larger or curved surfaces and polishing, soft pads for general work and hard pads for heavier work on flat surfaces. These are selection directions, not approval for any concave groove or a universal minimum radius. Confirm the complete accessory relationship before buying by photograph or five-inch diameter.
Keep the same acceptance method from scrap to the actual part
Prepare and touch accessories only after switching off, waiting for a complete stop and isolating power. Confirm suitable material, restraint, abrasive and dust controls; confirm OFF before restoring power and use the model’s exact sequence for a short trial. Hand sanding needs suitable dust controls too; no motor does not mean no dust risk.
Switch off, wait for a complete stop and isolate before examining the profile at the same location, light and reference shape. Before continuing, repeat preparation checks and OFF-before-power restoration. Increasing pressure, local heat, growing sand-through risk or rounded ridges mean stop and change method. Success is not reaching everywhere with abrasive, but meeting the surface requirement while preserving the intended shape.
Models referenced