
Inside first, joints checked after assembly
A loose board has pale bare bonding strips; a box has highlighted joints; two joined faces are checked with a straightedge.
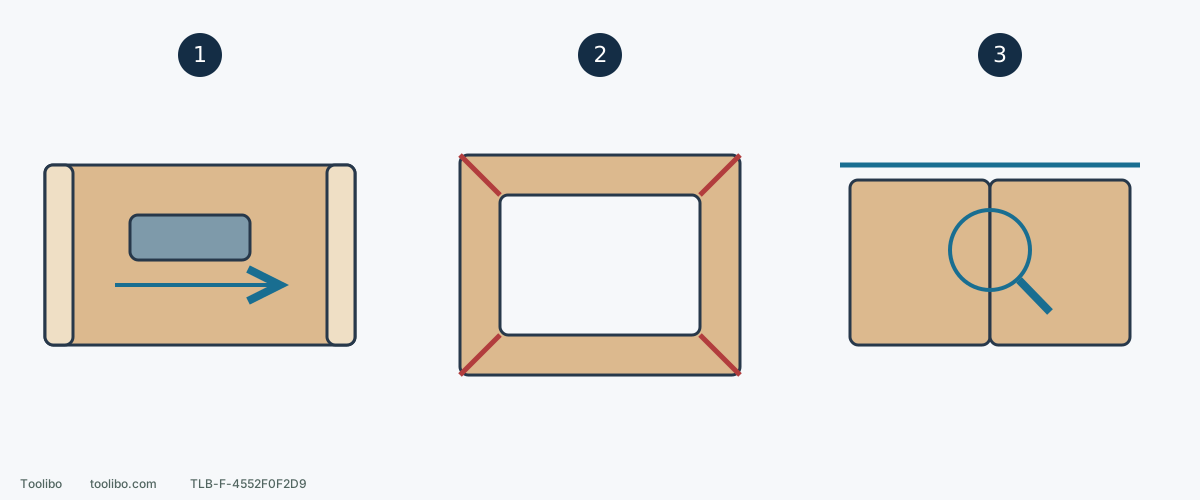
1. Prepare the inaccessible inside face
Dry-fit first. Hand-sand the visible inside while keeping bonding faces bare, clean and correctly fitted.
2. Follow the selected adhesive sequence
Check squeeze-out and leave the assembly supported for the adhesive-specific clamp and cure requirements; no universal waiting time is implied.
3. Inspect before sanding the outside
Look for glue residue, steps and clamp marks. Do not remove surrounding wood merely to hide a proud joint; verify the finish on matching scrap first.
Planning sketch, not joint construction or adhesive coverage instructions. Pale strips mark areas to preserve, not areas to round or finish.
Not an all-before or all-after choice
In a four-board solid-wood box, inside corners become hard to reach, while outside seam alignment can only be judged after assembly. Saving all sanding for last creates access problems; prefinishing every surface can contaminate bonding areas.
This plans sanding after structure, joints and adhesive are selected, not box dimensions or load capacity. Assess unknown coatings and suspect hazardous dust first. Veneer/overlays cannot accept solid-wood correction. The example uses controlled hand preparation; shut down nearby power tools, wait for complete stop and isolate.
Step one: dry-fit and map three surface types
Assemble the actual parts without glue to check identification, orientation, inside/outside and fit. Identify alignment edges, bonding faces and corners that will be difficult to clean later. Resolve major dimensional errors or open joints now, not by hoping final sanding will fix them.
Mark outside finishing areas and photograph the dry fit. Map inside visible faces to prepare first, bonding areas to keep bare/clean/dimensionally correct, and outside seams to inspect after assembly. One board can contain all three; a single “finished” label is not enough.
Titebond’s ordinary woodworking-glue guidance calls for substrates free of paint, stain and sealer. Confirm any different adhesive/material requirements. A polished surface does not make bonding through a coating equivalent to bare wood.
Step two: prepare inaccessible inside faces first
Disassemble, support each board and hand-block the inside visible faces with the grain. Keep the block flat; do not wrap over ends and round bonding edges. Do not casually sand tenons, grooves or other fits looser for easier assembly. They need the designed fit, not effortless looseness.
For bare solid wood selected for General Finishes Water Based Wood Stain, the specified preparation is 120 followed by 150 or 220. A matching sample can verify a 120→150 route. Remove previous scratches and dust before the next stage. This is not a sequence for every finish or existing coating.
This example sands inside faces before assembly but stains afterward, without sealing glue faces. Prefinishing requires a separate plan for clearly reserved bare bonding zones and compatible adjacent finishes/cleanup, not permission to coat every edge.
Step three: clean, refit and assemble to the adhesive instructions
Remove dust by a method allowed by wood, adhesive and finish. Dry-fit again and confirm angles, alignment and fit remain as recorded. Resolve sanding-created gaps or looseness before glue; extra adhesive is not a disguise.
Follow the actual adhesive’s surface, open-time, clamping and cure requirements. A half-hour clamp recommendation for one glue is not permission to apply sanding loads to every joint. Unclamping and handling depend on adhesive, stress and conditions.
Plan squeeze-out cleanup in advance. Titebond permits a damp cloth before drying for most water-based wood glues, but do not smear glue into an invisible contaminated film. Check that wood and intended finish allow the method. Dried residue may require scraping or sanding, but thin faces, fragile edges and unknown adhesives do not justify aggressive removal. No heat-gun or solvent disassembly method is provided here.
Step four: inspect only the new assembly issues
After the appropriate handling conditions, support the box securely. Inspect outside seams for steps, glue, clamp marks and changed edge lines. Separate slight roughness from misalignment needing rework or repair. Do not lower both faces into a hollow while chasing one high spot.
For permitted light hand preparation, use a flat-preserving block and follow each board’s grain separately. Different grain directions mean a pass across a joint can become cross-grain on the neighbor. Use a suitable small hand block for inside corners rather than forcing a disc or tilting a tool into them.
Stop, clean and compare with preassembly photographs, square/straightedge and intended fit, not only smooth touch. New gaps, looseness, face damage or glue still obstructing stain require a repair decision, not wider removal.
Step five: verify appearance on a sample before the whole box
Finish matching material/preparation samples with the intended product and inspect after its drying/assessment conditions. Compare grain, glue-related color differences and preparation consistency. Let the sample meet the drying and acceptance conditions before treating the box.
After a suitable sample, use the verified conditions on the assembly while preserving glue lines, dimensions and edges. Record which faces were completed before assembly, what was touched afterward, abrasive and finish system. That is more reusable than a slogan about before versus after.