
Reduce nibs while preserving the sealer film
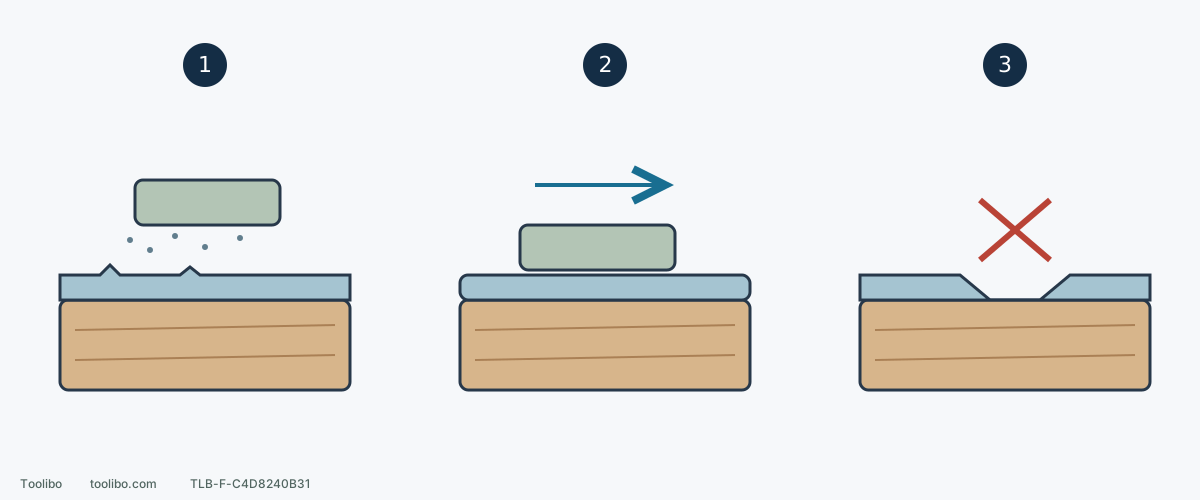
Three film cross-sections show powder after a light sponge test, flat light smoothing, and rejected breakthrough to the wood.
1. Test for powder, not gum
The ideal 1+ hour is not automatic approval; a gummy or smearing test means wait longer, not coarser abrasive or heat.
2. Light hand work on one plane
Use the product’s 220–320 sponge range; this example chooses 320. Clear dust frequently and treat adjacent faces separately at edges.
3. Stop at film breakthrough
Exposed wood or disrupted color is not corrected by enlarging the sanded patch. Remove dust and verify an intact compatible system before the next layer.
Film thickness and nibs are exaggerated, not removal allowances. This example is Enduro Water-Based Sanding Sealer; the sponge has been lifted in panel 1 to inspect powder.
Identify sealer, not an unprotected color layer
The example is a flat test board properly prepared and coated with General Finishes Enduro Water-Based Sanding Sealer, needing small surface nibs removed before a compatible topcoat. It is not a universal clearcoat recipe or aggressive leveling of runs and deep hollows.
Check product, application record and next coating. Newly stained wood is not a sealed film to sand: this sealer’s instructions call for applying directly to newly stained surfaces without sanding them. If you cannot confirm a film over the color, stop at identification. Unknown old finishes, peeling layers or moisture-damaged substrate are outside this light-sanding task.
Use a hand sponge, not an invented power-sander speed. Keep nearby powered tools isolated. Arrange material-appropriate dust protection, a stable surface and suitable collection.
First: establish sandability, not elapsed time alone
The product gives one hour or more between coats under ideal 70°F/21°C and 50% relative humidity. Cooler, humid, thick-coated or multilayer conditions require longer. Passing an hour is not automatic approval, and touch dryness is not full cure.
Lightly test the specified abrasive on a same-session sample or inconspicuous flat area. A sandable film produces powder. Sticky drag, gummy clumps or smeared film means stop and wait under suitable conditions. Do not use coarser paper, more pressure or an improvised heat gun to compensate.
Test an observable flat area before vulnerable edges. Record product, coating time, conditions and the sanding response rather than “waited an hour.” Sandability and complete cure are different stages; further coating still follows the system requirements.
Second: lightly reduce nibs with the chosen sponge
The intercoat instructions specify a 220–320-grit sanding sponge. This example uses 320 within that range on a dry, lightly rough film, not as a universal coating standard. Use a clean sponge without hard debris or old gummy residue, and secure the board.
- Lay the sponge flat near the middle rather than poking a nib with one corner. Move lightly across adjacent areas to reduce roughness, not remove the whole film.
- Stop after a small area and remove visible powder before inspecting with angled light. Compare with untreated neighboring film; do not keep pressing through an obscuring dust layer.
- If roughness decreases and film stays continuous, move on. Deepening scratches or a lowering spot means inspect abrasive and purpose, not keep sanding until every reflection looks identical.
Pressure cannot fix inadequate drying. New gumminess returns you to the first step. A hard particle caught in the sponge requires clean correct abrasive and inspection of any new mark before continuing.
Third: treat edges separately
Reduce the working area near an edge and keep the sponge on the current plane. Reposition and secure the board to work another face; do not wrap across a square corner and pull back and forth. Edges are easier to cut through, and matching their dullness to the face does not justify extra pressure.
Stop for exposed wood, a significant color change or loss of continuous film. If color lies underneath, suspected breakthrough is not blended away by enlarging the sanded patch. Deep runs, wrinkles, peeling and extensive defects need the appropriate coating-repair process instead.
Fourth: remove dust and verify the next layer
Vacuum removal is allowed for this product. Use dust-suitable equipment without dragging a hard nozzle over the film. Isolate the extractor before its filter maintenance. Do not introduce oily cloths or furniture polish as a shortcut to smoothness; incompatible residue can affect the next layer.
Accept only a clean surface without loose powder or gum, continuous film, no new deep scratch or breakthrough, and unchanged edge shape. A failed sample is not repeated on the real work. Verify the next product and timing: this sealer is not the final durable finish and needs a compatible topcoat. Its instructions permit compatible GF water-based topcoats but exclude original-formula Enduro-Var; a similar name is not sufficient.
The outcome is intact, smoother, clean sealer, not newly exposed wood fibers. A different product requires its own drying and abrasive decisions.