
Three reasons a straightedge may not sit flat
Cross-sections exaggerate the gaps: a narrow glue bead, a step between boards and broad curvature need different decisions.
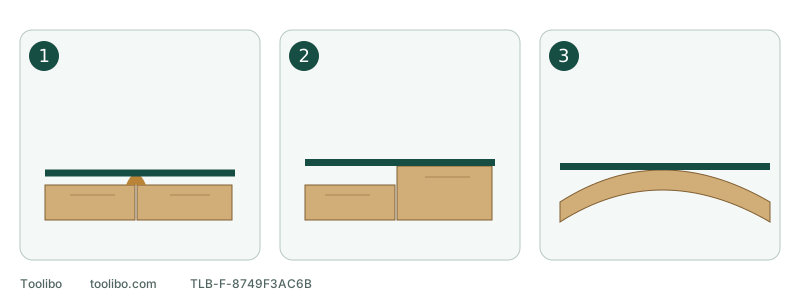
1. Glue ridge
Remove identified surface residue appropriately, then measure again.
2. Board step
Compare both faces at the ends and middle without pressing them flat.
3. Broad distortion
Check length and diagonals; seam sanding does not establish a flat reference.
Cross-sections exaggerate the gaps: a narrow glue bead, a step between boards and broad curvature need different decisions.
Define the panel you can work on
This example concerns an ordinary solid-wood panel supported on a bench, not stepped flooring, structural joints, veneer, laminate or unidentified old finishes. Establish the material, adhesive and required finished thickness first. Uncertain veneer allowance, concealed fasteners or an already loose joint excludes the panel from sanding.
Fresh glue no longer feeling sticky is not enough. Water-based woodworking glue can temporarily swell wood beside the glue line; sanding it flat too soon can leave a depression after the wood dries further. For this problem, Titebond advises letting the project dry for several days before sanding or planing. The actual adhesive, wood and conditions still matter: a universal number of hours is not a release criterion.
Prepare a straightedge, sidelight and a simple record
Use a reliable straightedge long enough to bridge both boards, a lamp for raking light, a clean stable support and notes or photographs. A suitable feeler gauge can help record gaps, but do not bend the straightedge or force a gauge into place to produce a reading.
Remove loose debris that could lift the panel or straightedge and check the bench support. Do not clamp a warped panel forcibly flat and treat that as its natural shape. It may spring back when released, invalidating the assessment.
First: is the joint moving?
Examine both ends and the middle for openings, cracks, failed glue or moisture-related changes. With normal support, use only gentle hand pressure to check whether the sides move relative to one another. Do not flex, pry open or perform a destructive load test.
Stop if the sides move, the gap changes under a light touch or joint integrity is uncertain. Sanding removes surface material; it cannot restore a failed bond. Resolve the glue-up or structural problem first rather than treating a smooth-feeling seam as proof of a sound joint.
Second: is the raised material glue or wood?
Look along the seam under raking light. A glue bead is often a narrow, irregular deposit that alone holds the straightedge up. A genuine step leaves the wood surface on one side consistently higher. Colour alone cannot settle this: glue residue and grain may look similar.
Remove identified surface glue by a method permitted for that adhesive, then measure again. Do not press a sander over a glue bead while grinding away adjacent wood. Titebond permits scraping or sanding dried residue from most water-based woodworking glues, but that does not authorize digging into the bond line. Ask someone skilled to scrape it if you cannot control the tool without tearing grain. Stop to identify an unknown hard lump or suspected metal.
Third: compare local and overall shape at repeatable points
- Rest the straightedge gently across the joint, spanning both boards, and inspect the nearby surfaces. Do not press the straightedge or panel flat.
- Repeat near both ends and the middle. Record which side is higher and where light or a gap appears, not just the worst-looking spot.
- Check along the panel length and both diagonals. Broad gaps or repeated rocking at several positions suggest overall bow, twist or a support problem, not merely a seam to sand.
- Mark the locations on a sketch or photograph. Recheck with the same support, directions and light. A feeler-gauge reading is a record, not an automatic safe-removal threshold.
Choose the next action from the result
Swipe or scroll horizontally to see all columns.
| What you find | Next action |
|---|---|
| Removing surface glue leaves aligned faces and acceptable overall shape | Continue ordinary surface preparation; stop chasing the seam |
| A sound joint has only a slight, understood local surface difference and adequate solid-wood allowance | Plan short correction stages with repeated checks at the original points |
| Broad bow or twist leaves several positions out of plane | Establish a reference through suitable planing, flattening or re-machining, not a handheld sander guided by feel |
| Movement, insufficient thickness, unknown material or an unexplained step | Stop and resolve the cause and repair plan |
There is no universal “under this many millimetres, sand freely” rule. Preserve finished thickness, fit with other components and edge shape. A smooth-looking surface alone does not prove those requirements are met.
If light correction is appropriate, avoid making a hollow
With the machine switched off, completely stopped and isolated from power, support and secure the work and prepare suitable abrasive and extraction. Confirm the switch is OFF before restoring power, then follow the sander’s own starting and stopping instructions. Keep the pad flat instead of tipping its edge onto a narrow line. Do not concentrate pressure on the joint or treat a handheld sander as a flat reference surface.
After each short controlled stage, switch off, wait for a complete stop and isolate power. Clear the surface and return to the same measuring points. If the difference does not improve as expected, a new hollow appears, grain tears noticeably or the allowance becomes uncertain, stop and change the plan rather than gambling on a coarser abrasive. If further correction is appropriate, repeat the preparation checks and confirm OFF before restoring power and restarting by the model-specific sequence.
Substantial flattening calls for someone competent to choose planing, scraping or appropriate machine work. A fast-cutting belt sander does not replace that decision. Preserve surfaces that still need gluing and keep later finishes off them. Success means the geometry and assembly requirements are met, not merely that a fingertip no longer catches the ridge.
Models referenced