
Set the layout first
Secure the work, then locate your stance, outlet and extractor. Include the farthest sanding point, not just the nearest bench edge. Check extractor stability, sharp corners, clamp screws and any cable crossing a walking route.
One possible bench layout puts the supply and collector to a clear side, allowing leads to follow from the side and rear of the work. This is an example, not a fixed direction: tool exits and room layouts differ. Never wrap a lead around your body or use it as a restraint.
Rehearse the whole stroke
- Switch off and unplug the tool, or remove its battery. Fit the correct extraction connection and leave work and clamps in their operating positions.
- Place the tool at the planned start. Check that no loop is beneath the abrasive and that the collector or connector clears the clamps.
- Move slowly through the middle to the far end. Do not hold up a troublesome lead to make it pass. Look for rearward pull or a tendency to lift the pad.
- Return and rehearse each intended turn. Watch where surplus loops land and whether the hose hooks a clamp handle or bench corner.
- Repeat with the real operating grip and check stance. If completion requires stepping over a cord, overreaching or using a hand to carry the hose, rearrange and try again.
The diagram separates the far-end reach check from the return-stroke snag check. Enough length does not guarantee a clear return.
Rearrange rather than pull harder
A taut lead calls for a different supply or work position, not pulling on the plug or strain relief. If a short or stiff hose drags sideways, use an appropriate tool–extractor connection or move the collector; do not force the connector into a sharp bend.
If the return catches a clamp, stop and change the clamp, route or work section. Do not yank a hose while sanding or remove required dust collection to gain access. Any hose support must be stable and suitable, without loose improvised parts falling into the work area.
Check electrical suitability separately
A clear route does not establish a suitable extension cable. Its rating, length, environment and protective requirements must match the exact tool. Do not chain unknown adapters or stretch a lead to compensate for a distant outlet. Stop for cuts, crushing, exposed conductors or plug damage rather than covering them with tape.
Keep leads away from the moving pad, abrasive, heat, oil and sharp edges. Do not carry the tool by its cord or pull the cord to unplug it. When storing DWE6423, avoid tightly bending the strain relief; leave a generous curve at the tool exit.
Recheck when the layout changes
Turning the work, moving clamps, changing a bag or hose and moving to another end all change the route. Stop, wait for motion to cease and disconnect before rearranging, then repeat start–far end–return.
If the tool suddenly feels heavier or pulls sideways in use, stop rather than pressing harder. Resolve lead drag, interference or a tool fault first. Routing supports control but does not replace suitable dust handling, material assessment or protective equipment.
Check reach and the return route separately
A bench, panel and extractor show a tool at the start and far end. A red loop catches a clamp on return; numbered markers identify reach, snag and supply position.
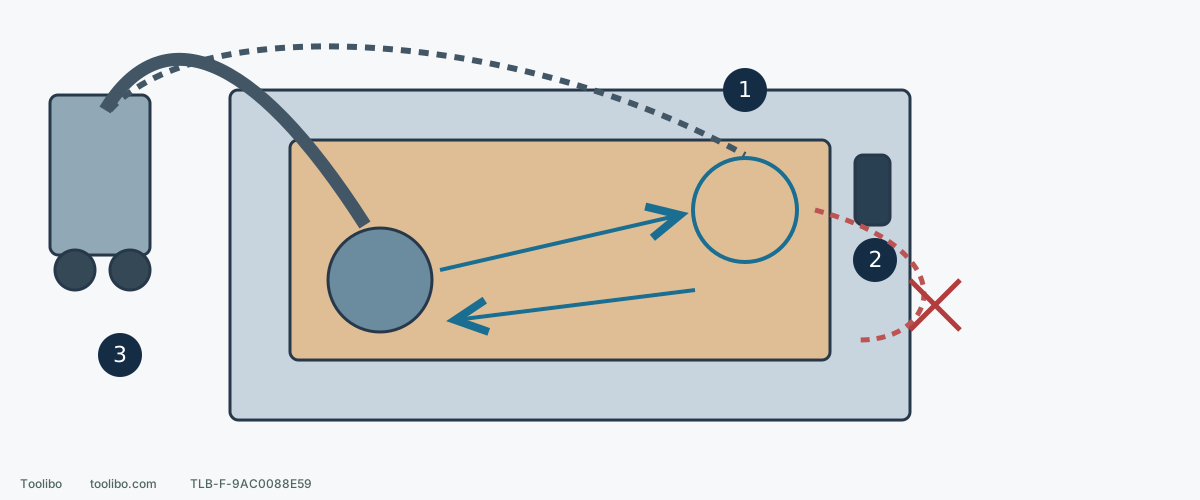
1. Test the farthest point
The tool must reach without pulling on the cord, strain relief or hose connector, and without lifting the pad.
2. Follow the surplus on return
A loop can catch a clamp even when forward reach is sufficient. Rearrange while stopped and disconnected.
3. Position the supply and collector
Keep the equipment stable and the route clear of sharp edges, heat and walking paths; electrical suitability is a separate check.
The route is an example, not a universal hose layout. Keep both cables and hoses out of the abrasive and walking paths.
Models referenced