
Two assemblies for cleaning and rinsing
A handle-mounted soap bottle replaces the spray wand; the normal rinse route runs through the assembled wand and tip.
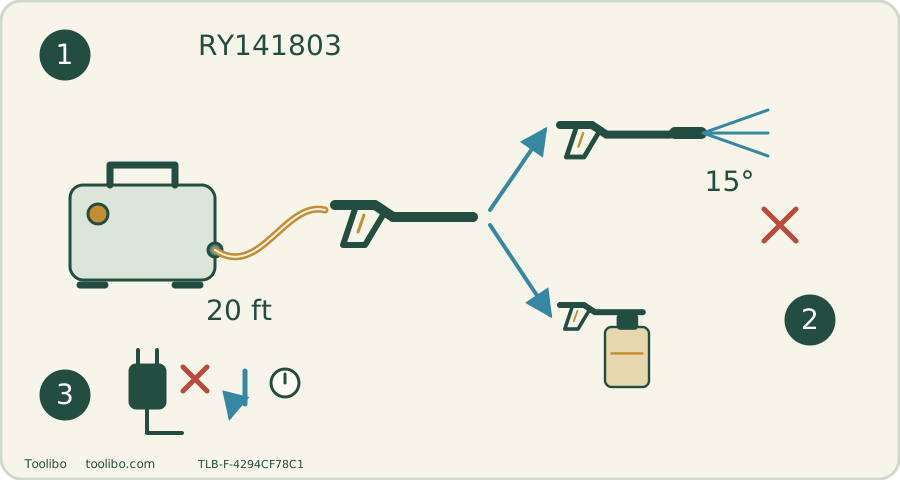
Rinse route
Washer → 20 ft hose → trigger → assembled wand → tip.
Soap route
Isolate and depressurize; replace wand with handle-mounted applicator.
Change back
Isolate again before reinstalling the wand for rinsing.
The supplied applicator is not an onboard tank or proof of an included optional foamer.
Identify the compact US configuration
RY141803 is a corded US washer rated for nominal 120 V AC, 60 Hz and 13 A. Its manual lists 1800 PSI maximum pressure and 1.2 GPM maximum flow; neither should be renamed a rated operating pressure or a guaranteed simultaneous output. The kit contains a carrying handle, 20 ft high-pressure hose, trigger handle, middle wand, spray wand, 15° and turbo tips, and a separate soap applicator.
This is not an upright wheeled machine with an onboard soap tank. That matters when you choose a place to work: the hose needs a clear route while the compact body remains stable. The 20 ft hose is about 6.1 m long, but bends around a vehicle and slack at the connections reduce how far away you can comfortably work. Do not lift or reposition the running machine by pulling its hose.
Build the water path before connecting power
- Keep the switch OFF and the plug disconnected. Fit the carrying handle as shown in the matched manual and check that the handle is secure before lifting.
- Assemble the supplied wand sections with the trigger handle. Do not omit a section because a nozzle happens to fit another opening. Align threaded connections before tightening; a connection that binds immediately may be cross-threaded.
- Uncoil the high-pressure hose and connect it at the trigger handle and pump. Keep it away from sharp edges and inspect it for splits, bulges or damaged couplings. A damaged pressure hose is a replacement item, not a tape repair.
- Connect a clean garden-water supply and open the tap fully. With no nozzle installed, point the wand in a safe direction and squeeze the trigger until water runs steadily without trapped air. Keep the motor off during this check.
- Before installing a tip, switch off, disconnect power, shut water and release residual pressure. Lock the trigger. Pull back the quick-connect collar, insert the nozzle, release the collar and tug the nozzle to verify retention.
If water still sputters during purging, look for a restricted supply, kinked hose or loose inlet connection. Starting the motor does not compensate for missing water. If a fitting leaks, stop and depressurize before reseating it; never feel for a high-pressure leak with a bare hand.
Treat startup as a check, not a leap to maximum pressure
Test the GFCI protection as instructed before use. A failed protection test or a damaged plug ends the setup; do not bypass it. After fitting a secure tip, reopen the supply and confirm the machine is water-fed before powering on. Hold the trigger assembly with both hands and keep its lock engaged whenever you are not deliberately spraying.
The manual starts the nozzle 1–2 ft from the cleaning surface, then approaches carefully until the required cleaning action is reached. This is an initial test distance, not a promise that every surface is safe at that distance. Test an inconspicuous area and stop if paint lifts, wood fibres roughen or a joint begins to erode. The turbo nozzle concentrates the action: it is not a sensible default simply because it is included.
For a few outdoor chairs, you may spend more time moving and checking angles than spraying. Keep the machine stable, work one accessible side at a time and shut down before carrying it to another position. Do not aim through furniture gaps toward people, pets, windows or electrical equipment behind the work.
Soap goes on the handle, not into the water inlet
The supplied soap applicator connects directly to the trigger handle in place of the spray wand. It is not the same as an onboard tank feeding every high-pressure tip. Fill it with suitable pressure-washer detergent prepared according to the detergent instructions.
To change modes, turn the washer off, disconnect electricity, shut the tap, release pressure and lock the trigger. Remove the wand and fit the applicator correctly. Restore water and the approved startup sequence before applying detergent. The quick guide describes a 20:1 injector dilution and about 5 seconds for detergent to appear; that is an equipment characteristic, not permission to ignore the chemical’s own dilution and surface restrictions.
Plan a small enough section that detergent does not dry before rinsing. To rinse, repeat the isolation and depressurization sequence before replacing the applicator with the assembled wand and appropriate tip. If soap does not appear, check the applicator installation and fluid before assuming the pump is broken. Never use bleach or solvent-based detergent.
Separate included equipment from optional foaming accessories
Some document bundles append instructions for the RY31PF05 foamer. Its 3800 PSI and 3 GPM markings are accessory maximum limits, not this washer’s output. An appendix also does not prove that a particular RY141803 box includes that foamer. Check the box contents and the exact accessory identity before buying replacements.
Likewise, the quick guide’s extension table belongs to this compact model: 25 ft 14 AWG or 50 ft 12 AWG; 100 ft is not allowed. Prefer a suitable nearby outlet with dry connections, and do not transfer that table to another Ryobi washer. A shared brand does not establish identical electrical lead requirements.
Finish with an empty, organized machine
Switch off, disconnect electricity, close the tap and release remaining pressure in a safe direction. Lock the trigger before detaching pressure fittings. Drain the hose, wand and applicator; clean detergent residue rather than storing a partly filled bottle. The OEM quick guide recommends pump protector after use and before storage: follow the protector’s instructions and use a suitable product rather than an improvised chemical.
Store the equipment indoors, protected from freezing and from damage to the cord or hose. Arrange the hose without sharp bends and secure the wand and nozzles so they do not fall during the next lift. A trigger that will not lock, a nozzle that will not retain, a damaged hose or recurrent electrical tripping is a reason to stop and seek service—not to open the pump or modify the plug.
Models referenced