
Water first, then start
Numbered schematic explaining Water first, then start.
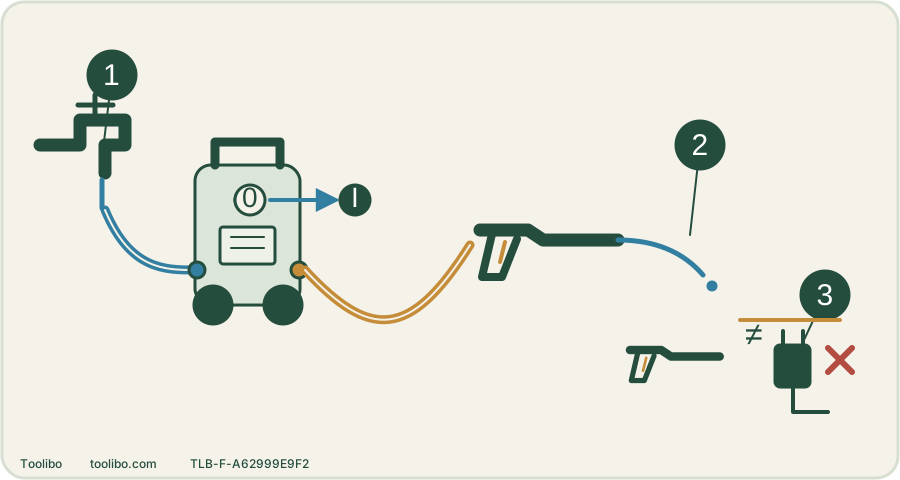
Supply through the inlet filter
Water enters through the correct filtered inlet, not the high-pressure outlet.
Air leaves before pressure builds
In the matched tap-fed procedure, hold the trigger until flow is steady before switching on.
A pause is still pressurized
Trigger release and automatic motor stop do not isolate power or empty the hose.
Identify the inlet and outlet, establish water flow and clear air using the matched instructions before starting the motor. Conceptual schematic, not a product image or scale drawing.
Lay out the whole job before plugging in
Choose a firm, level position where the washer will not be pulled over by its hose. Uncoil the high-pressure hose without kinks and route the supply hose away from wheels and sharp edges. Keep the electrical connection out of standing water and away from the spray. Use the protection and supply specified for the regional machine; a plug adapter does not make the electrical rating compatible.
Check the cable, gun, hose and connectors for damage. A hose with a blister, exposed reinforcement or a leak is not a candidate for a trial run. Wear suitable eye protection and footwear, and clear other people and animals from the working area. Plan where water and loosened dirt will drain before making the surface wet.
Separate the two water connections
The inlet receives comparatively low-pressure supply water through the inlet filter. The outlet carries high-pressure water to the trigger gun. Connect each hose only to its intended port, with the correct seal seated in its connector. Do not make an incompatible fitting fit by tightening it harder.
For tap-fed operation, use a supply hose and tap that meet the washer’s inlet requirements. Flush debris from a separate supply hose before attaching it. Fit the specified inlet filter; removing it to increase flow exposes the pump to dirt. For the 230 V UniversalAquatak 135 example, the manual requires at least 7.5 L/min supply, water no hotter than 40°C and inlet pressure no higher than 1 MPa (10 bar). Its troubleshooting section specifies at least 13 mm supply-hose diameter. A timed bucket test at the supply-hose end can screen delivery before connection. A bucket used as the actual water source is a different setup and needs explicit self-priming support.
Worked sequence: Bosch UniversalAquatak
This sequence is for the UniversalAquatak 125/130/135 instructions, not a universal order for every brand.
- With the machine switch off, connect the supply hose to the water supply and machine. Complete the matched hose and gun assembly.
- Connect to the suitable mains supply with the switch still off, then open the tap.
- Unlock the trigger gun and hold the trigger fully until water flows steadily, clearing air from the machine and supply hose. Release the trigger and engage its lock.
- Turn the machine on. Point the gun downward into a clear safe area, unlock it and squeeze the trigger while holding the gun securely.
If water does not reach the gun during the tap-fed air-clearing step, investigate the closed tap, kink, restricted hose or inlet connection before starting. Do not try to compensate by switching the motor on repeatedly.
Start with a test patch, not full cleaning
Fit the permitted attachment while the equipment is stopped and depressurized. Begin with the least aggressive suitable fan setting and the material maker’s recommended distance. Try an inconspicuous sound section, then inspect it before cleaning the whole item. A steady jet proves delivery, not that the pressure is safe for paint, wood or joints.
Keep the hose slack enough to move without pulling the washer. Do not reach for a leaking high-pressure connection while running; stop, isolate and release retained pressure before inspection. A rotating jet or narrow point jet is not the default starting nozzle.
Recognize a normal pause and a real fault
On these Bosch machines, releasing the trigger stops the motor automatically. Water pressure remains inside, so this is a pause rather than electrical isolation or permission to disconnect a hose. A continuous leak, repeated cycling with the trigger released, an unstable jet or an unusual sound needs investigation. Stop instead of trying to finish the job with a starved supply. For shutdown, follow the separate end-of-use sequence rather than reversing these steps from memory.