
Choose one collection route and empty the bag before it exceeds half full
One outlet accepts either a supplied bag or a suitable hose. A separate fill diagram marks the half-full threshold.
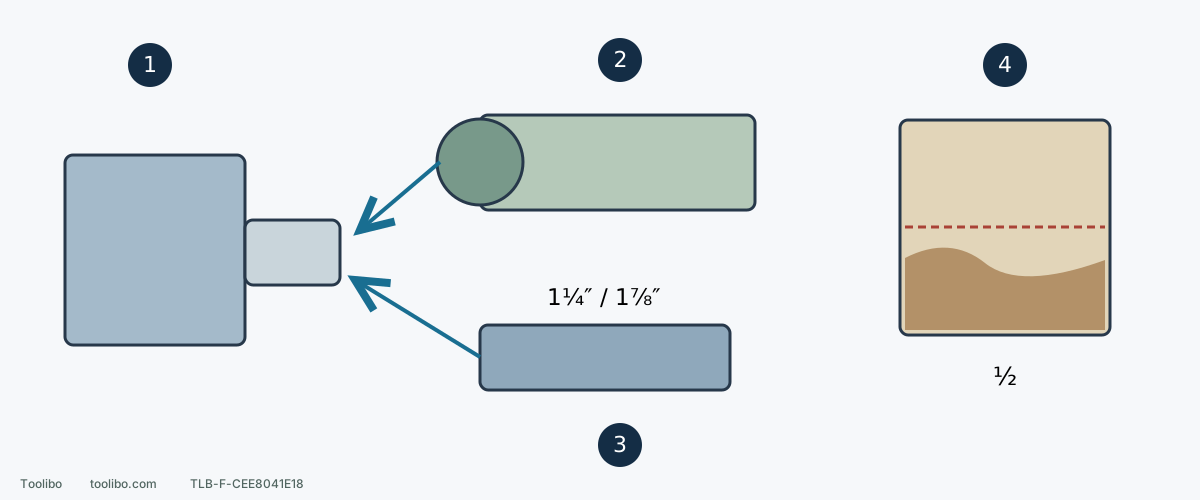
1. Isolated outlet check
Remove the battery and inspect visible blockage, cracks and mating surfaces.
2. Supplied bag
Push on with a slight twisting motion and check retention and clearance.
3. Vacuum route
Remove the bag first; verify a suitable nominal 1-1/4- or 1-7/8-inch end and filtration for the material.
4. Empty by half full
Stop, wait and remove the battery before shaking out dust; empty completely before leaving or storage.
Hose numbers are nominal sizes, not measured outer diameters or a universal seal guarantee. The fill diagram is symbolic, not the bag shape.
Choose the bag or external collection
PCL401 accepts its supplied bag or, after bag removal, suitable nominal 1-1/4- or 1-7/8-inch vacuum connections, approximately 31.8 or 47.6 mm. These are nominal conversions, not proof that every hose end measuring that outside diameter seals correctly. Check end geometry, retention and the collector’s suitability for the dust.
The example task is known bare-wood preparation. Unknown coatings, hazardous dust or material incompatible with the system require a handling plan before work; fitting diameter alone is not authorization.
Configuration one: fit the supplied bag
- Switch off, wait for motion to stop and remove the battery. Inspect outlet and bag mouth for cracks, distortion, blockage and hard debris.
- Align the bag and push onto the outlet with a slight twisting motion. No specified clockwise turns or threaded tightening are implied.
- Gently check stable seating and an unobstructed bag, clear of clamps and the normal grip. Resolve unreliable attachment first.
- Keep the battery out while rehearsing travel so the bag cannot strike a frame, bench or your body and tilt the tool.
After setup, confirm the switch is off before refitting a compatible battery and checking retention; use the same PCL401 start/stop sequence described below for the trial. Do not wait until completely full. Empty when it is no more than half full to maintain airflow, and investigate earlier if efficiency declines. Being below half full is not a reason to ignore poor collection.
Empty and refit the bag
Finish using this model’s order: lift clear before switching off, wait for a stop and remove the battery. Take off the bag and shake debris into collection suitable for the dust, away from your face without spreading a cloud. This routine uses shaking, not unverified washing, solvents or high-pressure air.
Inspect tears and sound connection surfaces. Refit with the same slight twist-and-push action and check retention. Distorted, torn or repeatedly falling connections need suitable parts or fault correction, not taped repairs.
Dust containing finishes such as polyurethane or linseed oil can self-ignite. The model separately calls for frequent emptying, giving 10–15 minutes, and complete emptying before leaving or storing the tool. That is not a requirement to wait the entire interval for every material or leave a full bag on a hot tool.
Configuration two: connect a vacuum
Keep the battery removed and take off the bag. Choose the documented nominal size with an end actually suited to the port, then connect with a slight twist. Check secure contact without hammering, grinding the port or relying on tape. Same nominal size can still conceal incompatible end shapes.
Fit the vacuum’s filters and collection components according to its instructions and the actual material. Suction alone does not establish safe filtration of every fine dust. Leave movement allowance, support heavy hose sections and rehearse the full outward and return route while isolated. Hose recoil must not pull the sander toward an edge.
After connection and route checks, connect and arrange operation of the vacuum according to its own instructions. Confirm the sander switch is off before refitting a compatible battery and checking retention. PCL401 starts clear of the work, reaches speed and is gradually lowered; finish by lifting clear before switching off and waiting. Remove the battery again before inspection or changing back to the bag.
Diagnose declining collection along the path
Stop, wait and remove the battery, then begin nearest the work: are paper holes aligned and fully punched, and is the abrasive loaded or loose? Check the visible outlet and connection next, then a full bag or crushed hose. Before inspecting or servicing the vacuum filter or collection bag, stop and disconnect that machine according to its instructions as well; removing only the sander battery does not isolate the vacuum.
This separates restricted entry, blocked outlet and restricted collection without immediately blaming the motor. Do not probe into the tool housing with sharp objects or modify the internal air path. Persistent leakage, unstable connection or unusual odor calls for stopping and checking damaged components.
Finish with two checks
First, with the tool stopped and battery out, empty the bag completely and dispose of dust according to material and local requirements. Second, check hose, bag mouth and hole path so the next job does not begin damaged or blocked. Correct collection, secure work and suitable protection must all be present; stronger suction cannot replace a missing condition.
Models referenced