
Follow the hole through both boards
Cutaway shows a narrow straight pilot through the upper board into the lower, then a flush screw and closed interface. A separate traditional-screw detail shows clearance only in the upper board.
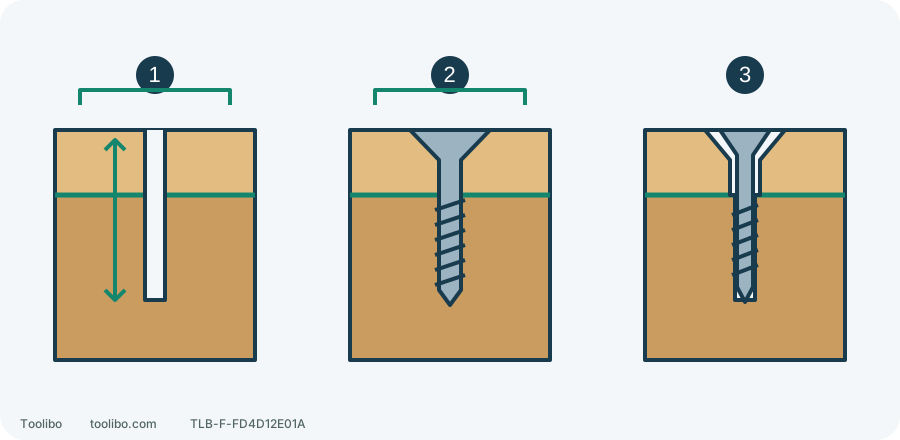
1. Pilot depth
Plan from the final head surface; leave safe material beneath the screw tip.
2. Closed joint
The head seats without crushing; clamping keeps the two faces together.
3. Different upper hole
A design requiring clearance separates upper shank passage from lower thread grip.
Not to scale. Panels 1–2 illustrate the reduced-shank exercise, not a universal no-clearance rule. Panel 3 explains a different joint detail; never enlarge the threaded lower hole merely to match the upper clearance.
Start with the joint, not a drill bit
Use two non-structural hardwood offcuts for this exercise: a 1/4-inch upper piece and a 1¼-inch lower piece, a McFeely’s 0810-FMZ #8 × 1-inch flat-head screw and a #2 square driver. This screw is not for exterior use. These dimensions demonstrate the sequence, not load capacity; do not apply this exercise to stairs, guards, suspended items or other safety-critical connections.
The head bears on the upper piece; the threads enter the lower piece and pull the joint together. Measure from the intended final head position to the screw tip and check that it cannot emerge underneath. Avoid existing fasteners, cracks and weak edges. Required edge distances, screw counts, materials and loads still need an appropriate joint design.
If the tool or battery smokes, leaks or heats abnormally, keep away; do not approach or handle smoking, leaking or dangerously hot equipment, and do not perform routine removal. When stable and safe to approach, release the trigger, wait for a complete stop and remove the battery before fitting bits or adjusting depth.
Three holes have different jobs
A pilot leaves wood for thread engagement while reducing splitting and driving resistance. A clearance hole lets the specified upper shank pass; it is not a reason to enlarge the entire hole to the thread’s outside diameter. A head recess only forms the bearing seat and cannot correct an unsuitable pilot.
Use a straight bit here, not a tapered one. McFeely’s starting recommendation for a #8 straight pilot is 1/8 inch in hardwood and 7/64 inch in softwood; its hardwood tapered-bit column instead gives 11/64 inch. Those columns are not interchangeable. Treat the recommendation as a starting point to test in matching offcuts.
The 0810-FMZ has a reduced shank and deep thread. The maker describes this screw construction as suitable for a straight pilot without an additional enlarged body hole, so this exercise does not add upper-piece clearance. Traditional thick-shank screws, special fittings and other joint designs may require it; follow their specified upper-hole detail instead.
Clamp first, then drill the full pilot
- Mark the pieces’ relative orientation, close the mating faces and clamp the assembly to a stable bench. Keep clamps outside the bit and driver paths and provide safe space underneath. Do not hold the pieces together by hand while drilling.
- With the battery removed, fit an undamaged 1/8-inch straight wood bit. Tighten the shank as the drill requires, check alignment and keep the jaws off cutting edges.
- For this hardwood exercise, plan a pilot to the full screw length, approximately 1 inch below the intended flush surface. Check the depth arrangement and point length on scrap first. A visual depth mark is not a mechanical stop; tape cannot prevent further feed.
- Select ordinary drilling mode, a suitable speed range and forward rotation. Check clamps and hand positions; keep your finger off the trigger while inserting a compatible battery and confirm retention. Start slowly with the tip touching the mark and maintain the axis rather than pushing sideways.
- After a normal drilling pass, release, wait for a stop and remove the battery. Check depth and the underside, then fit a suitable countersink and form a matching seat only at the upper surface. Check countersink retention, forward rotation and the work area; reinstall and secure the battery with your finger off the trigger, then start with a shallow seat. Release, stop and remove the battery before each fit check; the cutter’s maximum diameter is not the required opening diameter. Finish with the battery removed before the driver change.
A jam, shifting work or abnormal smell means stop, not force the bit out or keep drilling. After adjustments, repeat the assembly checks and safe reconnection sequence.
Change the driving settings as well as the bit
While disconnected, fit the #2 square driver and check full engagement with the screw recess. Select screwdriving mode, a suitable low-speed range and a low clutch setting. Keep the two pieces clamped so early thread engagement in the upper piece does not push the joint apart.
Reinstall and secure the battery with your finger off the trigger. Drive slowly on the screw axis, slowing further near the seat. The head should finish flush as planned and the joint stay closed; do not increase the clutch merely to crush the head into the wood. Release, stop and disconnect before changing settings, then repeat assembly and battery-retention checks before each new trial.
Let the trial tell you what to change
Swipe or scroll horizontally to see all columns.
| Trial result | Next action |
|---|---|
| Flush head, uncracked wood and closed joint | Retain the dimensions and settings for another matching trial; this is not load certification |
| Head proud and clutch slipping normally | Check pilot depth, head seat and driver fit before considering a small clutch increase |
| Joint pushed open | Stop and inspect clamping, upper-hole requirements and early thread engagement; do not pull it shut with more torque |
| Screw spinning, torn opening or split wood | Stop using that hole and reassess the joint; a larger screw or improvised packing is not a universal repair |
Only transfer a verified material, screw and hole combination to the actual work. Changing wood, screw or head recess depth calls for a new offcut trial.