
Screw-seat geometry and the cutter-diameter trap
Original cross-sections show a flush conical screw seat, a washer on a flat counterbore floor, and a head smaller than the cutter diameter.
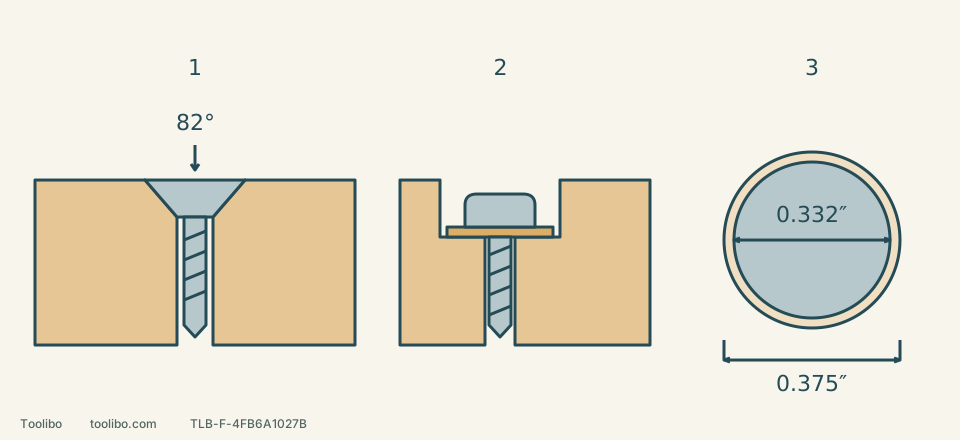
1 · Conical bearing seat
Match the specified 82° head example with a conical seat; the top is flush, and the tapered underside bears on matching wood.
2 · Flat bearing seat
A specified flat washer bears on the horizontal counterbore floor. Its head, washer and access dimensions require their own selection.
3 · Do not cut the entire tool diameter
The published #8 head maximum is 0.332 inch, smaller than the 0.375-inch cutter. Establish depth with the actual head, not with full cutter width.
1 and 2 compare bearing shapes, not interchangeable screw assemblies. In 3, the smaller disc represents the published maximum #8 head diameter; the surrounding ring shows why cutting the full 3/8-inch cutter width is excessive for this flush-head example. Schematic, not a dimensioned joint design.
Look below the head, not just at its top
Examine an uninstalled fastener from the side. A flat-head screw has a flat top but normally a conical underside. A pan head, round head or washer head may bear on a flat surface. If the specified assembly includes a washer, inspect the face of that washer that actually touches the wood.
Swipe or scroll horizontally to see all columns.
| Bearing face | Recess needed | What the wrong shape does |
|---|---|---|
| A cone of a specified angle | A countersink of the same angle | Contact may be confined to a narrow rim rather than the intended seat |
| A flat underside or specified flat washer | A straight-sided, flat-bottomed counterbore large enough for the head or washer | A flat head underside bridges a conical recess; tightening crushes wood instead of fixing the geometry |
| A screw to be hidden by a plug | The correct screw seat below a separately planned plug recess | Room for a plug does not prove that the screw is properly supported |
Snappy SD-3 tools make flat-bottomed counterbores; the 43008 has an 82° conical cutting section. Equal outside diameters do not make them interchangeable. This guide concerns non-structural practice woodwork, not recess depths for beams, railings or other load-bearing connections.
A specific hardwood practice setup
Use sound, flat hardwood offcuts: a 12 mm upper piece and a 25 mm lower piece. These are illustrative practice dimensions, not a load-rated joint design. The screw is McFeely’s 0810-FMZ, #8 × 1 inch, flat head, #2 square drive, reduced shank and zinc finish for indoor use only.
Its production-screw drawing shows an 82° flat head and a #8 head-diameter range of 0.292–0.332 inch. Snappy 43008 supplies a 1/8-inch twist pilot, a 3/8-inch cutter with an 82° seat angle and a 1/4-inch hex shank. Its listed applications include #8 screws in hardwood. McFeely’s straight-bit chart also gives 1/8 inch for #8 hardwood pilots; do not substitute the different tapered-bit column.
Measure the maximum head diameter of the actual screws with calipers and check the packaging and head form. A 3/8-inch cutter is 0.375 inch across, wider than that published head range. Cutting its full width would leave an oversized opening. The goal here is a flush actual head, not a 3/8-inch crater. A different head angle, screw construction or material requires a new choice.
Set shallow, then establish depth on scrap
If a battery is smoking, leaking, swollen or unusually hot, do not approach or handle it to adjust an accessory; stop use and contact the manufacturer. The following sequence assumes sound equipment. Arrange wood-dust collection and appropriate protection. Clamp both layers and leave clearance below the point; never hold the lower piece in your hand.
- Release the trigger, wait for complete stop, lock the direction selector and remove the battery. Fit and set a separate straight 1/8-inch bit for the pilot. For this hardwood example, plan a pilot as deep as the full 1-inch screw, measured from the upper surface. The combined 37 mm thickness is not an instruction to drill through. Use an approved depth-control method, check it on equal-thickness scrap and verify the actual depth rather than relying on a mark alone.
- Keeping your finger off the trigger, refit and latch the specified battery, unlock the selector and choose forward. Use ordinary drilling mode and start slowly with the point touching the wood. After the pilot, release, wait for full stop, lock and remove the battery before fitting 43008. Check that its pilot is securely retained and clamp only the suitable hex shank, not the cutting section.
- Optional rotating stop 43032 fits this 3/8-inch Gold Screw cutter. Install it using its designated channel, supplied fasteners and clamping nut. Set a shallow permitted cut, secure it and calibrate on scrap. It is not universal: it explicitly excludes Tapered Drill Countersinks. Do not invent a depth-per-turn setting, adjust under power or touch the ring while it rotates.
- Restore power, unlock and select forward as in step 2. Align the pilot with the existing hole and cut a shallow cone slowly and gently; do not plunge to the full 3/8-inch width. Release, wait for complete stop, lock and remove the battery before measuring, clearing chips or adjusting the stop. Use a brush for chips, not fingers against the cutting edge.
- Fit an actual screw with a #2 square hand screwdriver. Judge seating, not how hard you can force the head into the wood. Bridge the surface with a straightedge and inspect for a flush top, crushed rim, cracks or one raised side. If evenly proud with the correct seat shape, withdraw the screw, keep the drill isolated and increase depth slightly. Repeat the complete power-restoration sequence before cutting, then stop and isolate again to inspect. Deeper cutting cannot correct an off-axis or oversized hole.
There is no universal rpm or stop-ring turn count here. Small trial cuts and the actual head establish the setting. Transfer only the verified combination and setting to the finished piece; a different material, screw batch or cutter needs another trial.
Read the result before making another cut
Swipe or scroll horizontally to see all columns.
| Result | Next step |
|---|---|
| Evenly proud head, matching cone and straight hole | Adjust slightly while isolated, then repeat the complete restore-and-trial sequence |
| Head below the intended surface or a wide open ring | The cut is too deep or wide; stop rather than hide it with extra torque or loose chips |
| One side high, one side low | Check axis, clamping and seat geometry; verify at a fresh trial hole |
| Split wood, inadequate remaining section or slipping cutter | Stop using that arrangement; revise the design or material, not the acceptance standard |
For a flat-bottomed recess, measure the specified head or washer diameter and thickness, plus access for the driving tool, before choosing the cutter and depth. Do not try to flatten a conical bottom with this 82° cutter. Burying a head farther does not establish a stronger joint. See planning pilots and screw installation for the two-layer drilling sequence.