
Three gates for the fixed-angle owner task
Three panels show WX697L fixed 4° and frequency/voltage identity, a neutral Hyperlock mounting sequence, and a wood cut with separated supports, clamp symbols and an open blade path.
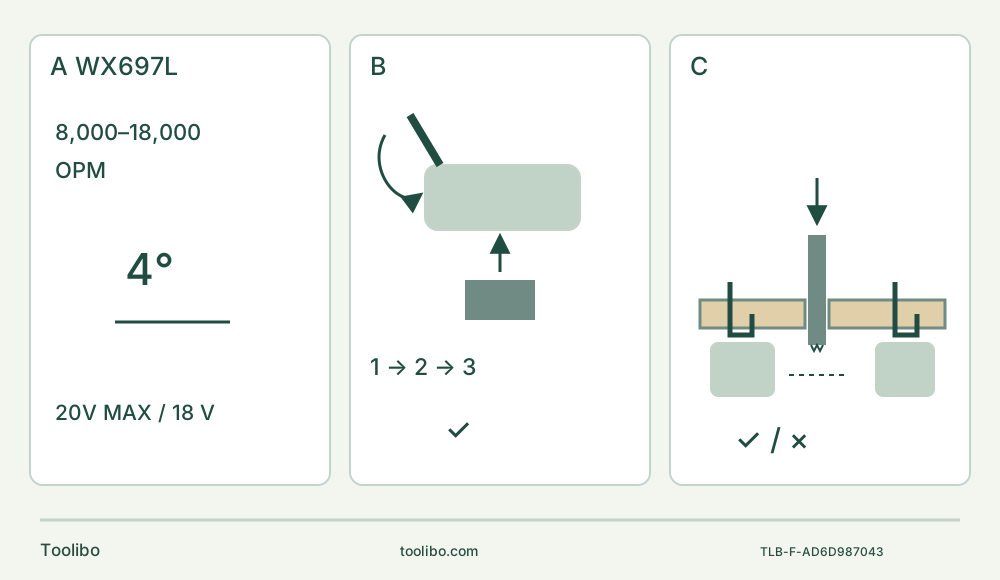
A · Match the fixed-angle body
Confirm WX697L and its supplied instructions: 4° fixed, 8,000–18,000 OPM, 20 V maximum/18 V nominal. Qualify the actual existing power system separately.
B · Isolate, seat and fully close
Remove the battery. Lift and turn the lever, seat the approved accessory, then turn to clamp and fold home; closed-hole accessories require removal and refitting of the matched flange/shaft.
C · Cut, isolate and accept
Clamp known clean wood with the full blade path clear. Start before contact, use light steady cutting, then stop and remove the battery before checking the intended cut and rejecting a shifted or damaged setup.
Original schematic, not measured geometry. B summarizes isolated seating and complete lever closure, not a pin count or turn count; use the actual open-slot or closed-hole route. C is a clean wood-cut concept, not scraping or an installed-work permit. Real support, both-face clearance, insulated grip and hand exclusion remain necessary.
Begin with the fixed-angle US body, not the family FAQ
This project takes a documented WX697L owner from an isolated accessory change to an accepted cut in clean, visible, loose softwood. The matched US instructions, AR01580701, identify WX697L and WX697L.X as the same mechanical tool with package variations. They specify a fixed 4° oscillation angle and 8,000–18,000 oscillations per minute. There is no angle selector to set. A general product-page question about two angles does not override this model’s table. “20 V Max” is the initial no-load maximum; nominal battery voltage is 18 V, not approval for every other 18 V or 20 V system.
Use this guide only when the actual body, clamp and supplied instructions match. It is a documentation-based workflow, not a test of cutting speed or a promise about today’s kit contents. The selected outcome is a small edge cut or notch in an untreated softwood sample, with both faces and the full blade path accessible. Installed trim, concealed services, coated demolition material and unknown fasteners are outside this project.
Qualify the existing power system before starting
The tool’s table lists batteries WA3520, WA3525, WA3575 and WA3578, and chargers WA3742, WA3875 and WA3881. Start with an already commissioned, manufacturer-approved actual battery and charger combination whose own instructions you possess. The tool table alone does not establish a new charging procedure, mains-voltage conversion or arbitrary battery interchangeability. If the pack identity, charger approval or charging instructions cannot be verified, stop before powering the tool.
Inspect the actual battery and tool for damage, modification, contamination or loose parts. Do not use a damaged or modified pack, bridge its contacts with loose metal, expose it to water or heat, or open it. Clean dirty battery terminals only as directed, with a clean dry cloth. The tool manual gives 0–45°C for tool/battery use and storage and 0–40°C for the charging system during charging; the exact battery and charger instructions remain additional requirements, not optional alternatives.
Slide the switch back to OFF. Remove the battery by pressing its release and sliding it away as shown in the manual. OFF alone is not isolation. Keep the pack out during mounting, repositioning, inspection, cleaning and storage. Do not use a lamp or a dark indicator as evidence that the tool cannot start.
Choose a blade and prepare a stable, visible cut
Use an intact accessory expressly suitable for the actual WX697L interface and the intended material. The application table distinguishes a standard wood end-cut blade for wood, plastic and drywall from a precision wood blade for wood and soft plastics. Select the actual wood blade and check its packaging and condition; a similar silhouette is not proof of its tooth material, mounting permission or cutting capacity. The broad “Universal-Fit” brand list is not a promise that every accessory from those brands, or every Starlock tier, will fit safely.
Mark the intended line and finished size. Inspect both faces and the entire cut path for nails, screws and foreign material. Clamp the sample to stable support, leaving the complete blade envelope clear below and beyond the cut. Support the retained piece and arrange the offcut so it cannot fall unexpectedly or close the kerf onto the blade. Never hold the sample in your hand or against your body. If the blade cannot reach the intended cut while preserving that clearance, change the workholding or choose another method; do not force a longer reach by levering the tool.
Provide light and dust control appropriate to the known material. Wear eye and hearing protection and suitable dust protection; avoid loose clothing and keep bystanders away. Hold the insulated gripping surfaces, keep hands outside the blade path on both faces, and do not obstruct the vents. None of the three-panel diagram’s shapes supplies a depth limit or a safe hand-clearance measurement.
Mount the actual open-slot or closed-hole accessory
The WX697L uses Hyperlock, not the removable-wrench procedure of the corded WX686L. With the battery removed, protect your hands from sharp teeth and allow a hot accessory to cool. Keep fingers out of the clamping area.
For the illustrated open-slot accessory, lift the Hyperlock lever and turn it in the unlocking direction shown in Figure A. Slide the accessory into the opened mount and engage its actual locating features fully. Turn the lever in the clamping direction shown in Figure B, then fold it completely down into its home position. Lifting, turning and folding are separate actions; simply folding a loose lever is not the whole fastening procedure. The manual supplies neither a numerical torque nor a universal number of turns, so do not invent one.
For a closed-hole accessory that cannot slide around the shaft, use Figure C’s different route: remove the flange/shaft assembly, position the approved accessory, reinstall the complete matched assembly, then tighten and fully return the lever. Do not omit the flange, substitute a random screw or force the closed hole through the open-slot route. Check that the accessory sits correctly and is securely retained, with no visible mis-seating or loose hardware. An uncertain or damaged holder is a stop for qualified service, not a reason for a powered wobble test.
If you later rotate the blade to distribute wear, switch OFF, wait for complete stop and remove the battery first. Repeat the entire seating and fastening check. The working-hints suggestion to rotate a blade never authorizes adjustment while powered.
Set the control, start clear and make the sample
Check OFF again before inserting the qualified battery. Seat it securely according to its release arrangement. Slide the switch forward to start and back to stop. The speed dial moves toward plus/the hare to increase frequency and toward minus/the tortoise to reduce it. The manual assigns sawing to the high-frequency category, but gives no exact numbered dial recipe for this particular wood sample. Match the actual blade instructions and use a scrap trial rather than borrowing another model’s setting or treating the maximum as a measured performance guarantee.
Start with the blade clear of the material, then bring it to the marked cut under control. Cut with light pressure and steady movement. The manual permits a slight pendulum motion during sawing to clear chips; this is not permission to twist a trapped blade sideways or pry out the waste. Excessive pressure does not improve removal rate and can overload the motor and wear the accessory. Maintain the original support and keep the complete moving blade away from the bench, clamps and hands.
Stop for shifting stock, binding, unexpected vibration, smoke, unusual heat or a loosening accessory. Switch OFF, wait for the blade to stop, remove the battery and investigate the isolated setup. Do not run the tool to diagnose a loose mount or repeatedly restart after an unexplained stop. The manual’s ordinary no-load cooling hint is not used here as a fault-recovery procedure; abnormal behavior requires the matched instructions or qualified service.
Finish with a decision, not just a stopped motor
After completing the cut, cease cutting contact under control, switch OFF and wait for complete stop before setting the tool down. Remove the battery before touching the accessory, clearing waste or inspecting the cut; the blade may still be hot.
Accept the sample only if the intended line and size are achieved, the required cut is complete, and there is no uncontrolled tear-out, scorching or evidence of shifted workholding. There is no invented dimensional tolerance: use the requirements you marked for this sample. If the cut wandered or the support moved, reject that setup and correct the blade choice, support or feed before another trial. A good sample does not approve hidden installed work.
The work light can flash to indicate low battery charge. That indication is not a complete fault diagnosis, proof of battery health or permission to continue a failing cut. Stop and isolate, then follow the actual pack/charger instructions. Do not infer remaining capacity from a light or substitute a different platform’s battery because the voltage label looks similar.
Keep sanding and maintenance as separate permissions
Changing to a sanding pad still requires OFF, full stop and battery removal. Figure D shows the pad/flange arrangement and a correctly fitted sheet. Use the exact approved pad, engage its mount, secure the complete assembly and fit intact matching paper before contact; never start sanding without the paper or let it wear through to the pad. Grit choice and a scrap trial belong to that separate task. The wood-cut setup does not establish a dust-extraction system or approve every abrasive sold under a compatible brand name.
For this tool, the manual specifies no additional lubrication and no user-serviceable internal parts. With the battery removed, wipe with a dry cloth, keep vents and controls free of dust, and store dry. Do not wash it, use chemical cleaners or open the motor housing. Damage, persistent faults or an insecure clamp go to qualified service rather than improvised repairs.
Source basis: WX697L/WX697L.X instruction manual AR01580701, shared figures on pages 2–3, English safety and operating instructions on pages 4–9, and the back-page revision. The exact current US product establishes the model/manual link, not a different angle mechanism or a new charging recipe.
Models referenced