
Platform, parts and a visible sample
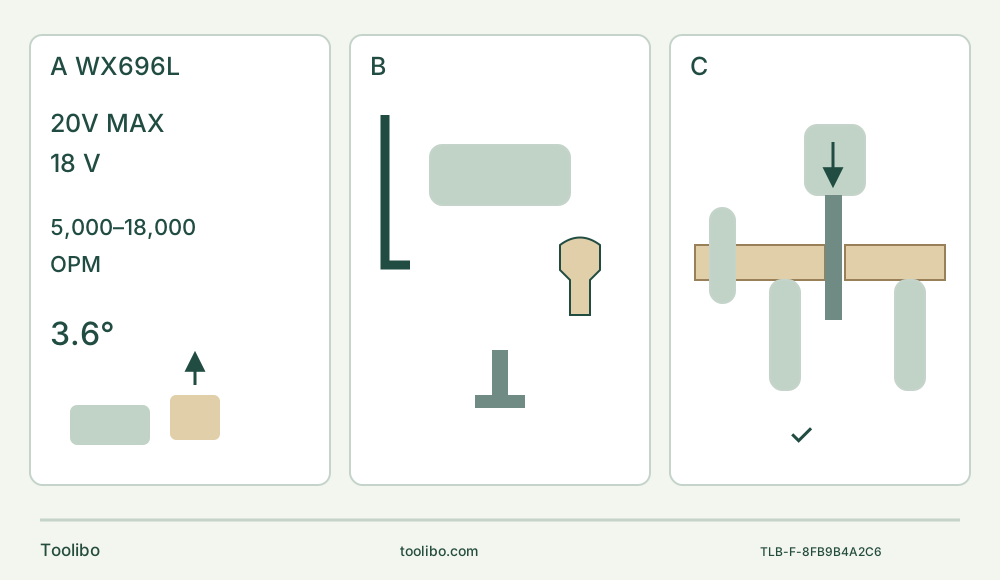
A lists 20 V MAX/18 V nominal, 5,000–18,000 oscillations per minute and 3.6 degrees, with an upward battery-removal cue. B separates the tool, removable hex wrench, neutral blade and joined flange/shaft as an inventory. C shows retained stock clamped, waste independently supported and a visible blade path between supports.
A · Exact cordless system
Keep nominal and initial voltage separate. The upward arrow is removal after pressing the actual release; a low-power worklight flash is not isolation.
B · Correct original parts
The onboard wrench is removed for flange work. Open-ended and closed-ring routes differ; no extra washer, torque invention or powered seating test.
C · Controlled loose-stock result
Clamp retained wood, independently support waste and keep all supports outside the complete blade path. Finish with full stop, battery removal and two-face acceptance.
Original schematic. A is not a capacity or runtime rating; press the actual battery release before lifting upward. B is a nonstacked inventory, not a mounting sequence or pin-count drawing. Follow the correct B1/B2 source route, tighten with the wrench, then withdraw and re-store it while the battery remains removed. C shows no rated depth; verify actual full sweep, support and underside clearance, stop completely and remove the pack before acceptance.
Trim loose wood with the actual wrench-mounted WX696L
The useful first outcome is a short, marked cut on loose, new, uncoated softwood whose faces and underside are visible—not trimming installed casing beside hidden services. This guide covers the US WX696L body under the manufacturer-linked WX696LM instructions, copyright 2020. Match the actual tool and supplied instructions before using it.
The manual explicitly treats WX696L.X suffixes as packaging or accessory variants. A WX696L.9 tool-only listing or WX696L.1 package is not another mechanical model. The current product’s promotional blade list and inconsistent battery-capacity fields do not tell you what is in an older owner’s bag. We use the actual identified original recommended HCS wood end-cut blade, not an assumed kit or anonymous universal accessory.
The distinctive installation tool is a removable onboard hex wrench. It is not a captive Hyperlock lever, and the flange still needs deliberate tightening. Battery isolation, the open-ended versus closed-ring accessory route and wrench re-storage all matter before starting the slide-switch tool.
Establish the existing power system
The manual defines 20 V MAX as initial voltage without a workload and 18 V as nominal voltage. Its exact page 7 table lists packs WA3520, WA3525, WA3575 and WA3578, and chargers WA3742, WA3875 and WA3881. Use an already commissioned original listed system whose actual battery and charger instructions are available and satisfied. This guide does not establish a new pairing or teach charging from the general platform name.
Do not transfer a different WORX tool’s current battery list, charge indicators or protection behavior. The product’s capacity and old kit descriptions are not proof of the reader’s pack identity. Check its actual label, condition and instructions. Never force a pack to fit, modify it, open it or expose its terminals to loose metal. A damaged, modified, leaking or mechanically shocked battery must not be tested by operating the tool; use the actual safe-disposition and qualified-service instructions.
The tool instructions give 0–45°C for tool/pack use and storage and 0–40°C for the charging system; the actual power-item instructions still govern their own use. The best-performance room-temperature statement is not a new charging range. Keep the battery clean and dry and remove it when the tool is not in use.
With the switch OFF and battery removed, inspect the accessible housing, controls, holder, flange, wrench and blade. Missing original hardware, an unreliable switch, damaged threads or unexplained looseness holds the project. Do not energize the tool to see whether an accessory will stay attached.
Bound the blade, material and whole path
The manual’s application table supports a standard HCS wood end-cut blade for wood, plastic and drywall. This project selects only clean softwood and the actual positively identified recommended original blade. Check its packaging or matched manufacturer information, material approval, working condition and geometry. Broad “Universal Fit” marketing and the named-brand list are not a complete approval of every accessory or its application.
Reject cracked, bent, broken, dull or suspected-damaged cutting accessories. Check that the exposed working part reaches the entire intended cut without the holder entering the wood. Include the full oscillating envelope, the approach and the withdrawal, not just the drawn line. No nominal blade length, product photo or fixed angle is a guaranteed cutting capacity.
Inspect every face and the proposed cut for nails, screws, foreign material and any service. Mark a short straight separation beginning at an open edge. Clamp the retained part to a stable platform and independently support the waste so it can separate without falling onto the blade or closing the kerf. Do not rigidly trap the waste. All supports and clamps must stay outside the blade’s full path. Never hand-hold the stock or catch the waste underneath.
Work in good light with stable footing and bystanders clear. Wear eye and hearing protection, suitable respiratory protection and the protective gloves shown for accessory work; avoid hot teeth and edges. Provide ventilation and appropriate material-specific dust controls. If extraction equipment is provided, it must be correctly connected and used under its actual instructions. The tool manual does not establish a new extractor assembly or a universal safe-dust threshold. Hold work if its dust controls cannot be qualified.
Battery removed: use the wrench, then store it
Wait for any old accessory to cool. Keep the switch OFF and battery physically removed throughout the mounting work. Slide the onboard wrench forward out of its storage position. Insert it in the shaft and turn counterclockwise, following the unlocked direction in the actual B figures, to loosen the original flange. Before seating the replacement, remove the cooled old accessory with protective gloves: slide an open-ended accessory out of the loosened clamp, or remove the flange and shaft to lift off a closed-ring accessory. Do not stack a new accessory over an old one.
Open-ended blade: the B1 route allows the actual matching open-ended accessory to slide into the loosened clamp. Seat it fully in the intended interface and orientation. Do not assume that a partly inserted slot is adequate simply because it appears under the flange.
Closed-ring blade: B2 instead shows removal of the flange and its shaft, placement of the actual matching blade, and refitting the original flange. This is not the open-blade shortcut. Do not force a closed ring sideways through a gap or substitute an extra washer. The separate B3 pad drawing passes the removed flange through the pad; it is not permission to start sanding without its complete paper and dust setup.
After the correct route, turn the wrench clockwise as Figure C shows to tighten the flange securely. There is no stated numeric torque to invent. Check seating and retention while isolated. Then withdraw the wrench upward from the working socket and slide it back into its onboard storage position, as D and E show. The stored wrench is not a running control. Confirm it is no longer left engaged in the shaft before any battery insertion.
If the correct clean parts will not seat and retain the blade, stop for service. Do not add hardware, prolong the wrench with a pipe or use a powered “settling” test. Changing blade orientation later requires the same battery-out loosening, positioning, tightening and wrench-removal sequence.
Separate the switch, speed and low-power light
The actual switch figure is shown with the head to the left: slide toward the head for ON and rearward for OFF. It is a maintained slide switch, not a momentary trigger. Confirm OFF before fitting the battery and do not infer restart protection from the absence of motion.
The speed dial selects oscillation frequency. The manual states 5,000–18,000 per minute and a fixed 3.6° angle. The product page’s “RPM” label does not turn this into a rotary tool, and neither source supplies six precise per-position rates. The application table places sawing in the high-frequency category; it does not specify a universal numbered wood setting. Qualify the actual blade/material combination rather than copying another model’s dial.
The front LED also has a documented low-power indication: flashing means battery power is low. It is not a holder-retention check, a calibrated remaining-runtime estimate or a generic overheat code. Stop and handle the power system under its actual instructions rather than repeatedly restarting to exhaust the pack. Do not invent an LED colour or transfer a brushless Nitro model’s diagnostics.
With the switch OFF, fit the qualified pack down onto the rear rails as H2 shows and check secure seating. For removal, press its release and lift the pack up out of the tool as H1 shows. Do not reverse those arrows from another model or treat OFF as battery isolation.
Make the controlled cut and accept it while isolated
Complete the support, blade, wrench, dust and power checks before starting. Hold the tool firmly by its insulated gripping surfaces, keep fingers and any free hand away from the cutting area and underside, and keep vents unobstructed. Preserve access to the OFF switch. Do not hold the work with the other hand.
Start with the blade clear of the stock, then enter the marked cut under control. The manual calls for light pressure and constant movement; during plunging and sawing a slight pendulum motion helps chip clearance. That is not permission to twist a trapped blade, pry a remaining bridge or sweep into a support. Heavy pressure does not increase removal rate; it wears the accessory and can overload the motor.
Stop if the work moves, the blade binds, a support enters the path or unusual heat, sound or behavior develops. Switch OFF, wait for complete standstill and remove the battery before investigating. Do not deliberately reproduce a fault under power or release a clamp to make an unsafe cut possible.
After complete separation, cease cutting, switch OFF and wait for full stop before withdrawal and setting the tool down safely. Remove the battery before handling the work or changing the setup. Inspect both faces for the intended line and size, full separation, support movement, uncontrolled tear-out and scorching. Accept only the intended complete outcome; no invented dimensional tolerance applies. Correct a documented setup issue while isolated, but refer unexplained tool behavior to qualified service.
Care is not a fault-recovery experiment
Avoid prolonged very-low-speed operation and keep the blade sharp. The manual’s ordinary motor-heat advice is maximum no-load speed for two to three minutes after low-speed use. Do not use that as a method to restart an unsafe, damaged or unexplained stopped system; this project does not teach energized fault cooling.
Remove the battery for cleaning and storage. Wipe the tool with a dry cloth, keep vents and controls free of dust, and use no water or chemical cleaners. The manual says no additional lubrication is required and there are no user-serviceable internal parts. Its comment about occasional visible sparks does not remotely certify an abnormal tool as safe. Maintain the original power instructions and keep unresolved condition problems out of service.
The completed result is a correctly mounted blade, a controlled visible trim and an isolated acceptance decision. It does not qualify installed trim, unknown metals, another brand’s accessory or an unfinished sanding setup.
Source basis: WX696LM, cover, complete English 2–12, actual figures A–I and page 7 power table; current exact US WX696L product and its direct Owner’s Manual link. This is a document-based workflow, not hands-on testing, a kit guarantee or a performance ranking.
Models referenced