
Inspect the consumable and preserve the correct system
Four panels show A a damaged triangular pad rejected with a cross; B PMF 220 CE pad and clamping bolt below an extraction collar symbol; C XMT03 dust attachment, felt ring, pad and holder bolt in order; D an enlarged abstract sheet-and-pad aperture aligned.
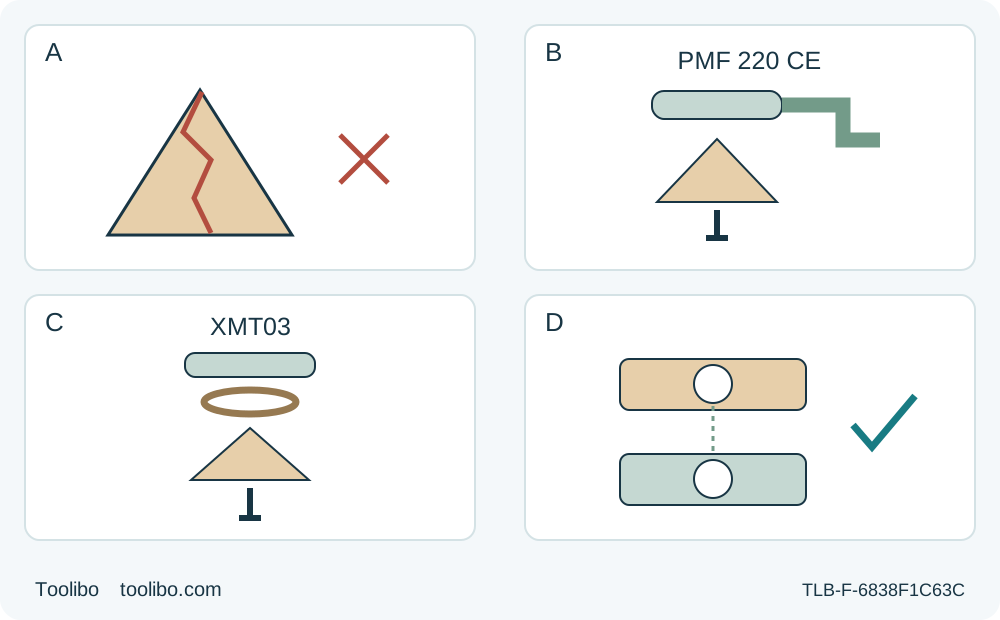
A · Reject damaged consumables
Inspect the exposed pad and removed sheet; cracks, failed retention or worn-away grit are not repaired by rotation or glue.
B · PMF 220 CE system
Preserve the correctly seated clamping bolt and full extraction assembly; MagnetHold alone does not fasten the pad.
C · XMT03 system
Keep the dust attachment, felt ring, pad and holder bolt in the documented order; retain the full nozzle-band system.
D · Abrasive acceptance
Match the actual holes, secure the sheet and verify grit and material history before the isolated assembly is accepted.
Simplified component relationships, not assembly-scale drawings or complete hole patterns. A rejects damage rather than rotating it away. B retains the Bosch clamping bolt and extraction collar; C retains the Makita felt ring between attachment and pad plus its holder bolt. Full model-specific fastening, nozzle-band and hose requirements are in the text. D is one enlarged alignment concept, not a claim about hole number or geometry. Work only when cool and isolated.
Restore an identified sanding assembly, not merely a fresh sheet
A new abrasive cannot rescue a cracked backing pad, a loose holder or a missing dust-stack component. This guide ends with an identified, mechanically checked sanding assembly and a written reuse, replacement or service decision. It covers only the UK Bosch PMF 220 CE matching manual 1 609 92A E62, and the US Makita XMT03 matching 885329-940 / XMT03-1. It is not a compatibility chart for every triangular pad or a claim that these two systems share parts.
Use the complete matching owner instructions and an already qualified tool. The XMT03 must have its documented, already commissioned genuine power system; no charging or pack-selection procedure is supplied here. The maintenance work below is isolated and dry. Its purpose is consumable identification, inspection and correct reassembly, not housing cleaning, internal repair or a first-project cutting tutorial. A previously damaged or malfunctioning tool cannot be cleared merely by replacing its abrasive.
Cool, isolate and preserve the material history
Switch OFF, wait for complete standstill and allow the pad and abrasive to cool before handling. Unplug the PMF 220 CE; remove the XMT03 battery. Keep the tool isolated throughout inspection, removal, installation and adjustment. Wear appropriate protection when handling sharp or hot accessories, and control the dust already present. Do not wet the sheet or pad to cool it, dissolve deposits or improve sanding: both selected systems are for dry work.
Before peeling the sheet off, record its grit, material designation and previous use. Keep a legible packet or other exact identification with replacement sheets. A missing grit marking is not a reason to guess from colour. Record whether the last work involved metal, clean untreated wood, a coating or an unknown material; this history may determine whether the sheet can be used again even if it still looks sharp.
Bosch says not to use a sheet on other materials after it has worked metal. Makita specifically forbids using metal-sanding paper on wood. Keep those statements distinct, and conservatively segregate used abrasives by known material. Do not return an unidentifiable or contaminated sheet to clean-wood work. Unknown paint, adhesive or other hazardous residue is a hold for material and dust assessment, not an invitation to brush it into the room.
Decide whether to keep the sheet, replace the pad or stop
With power isolated and the assembly cool, lift a corner/end of the sheet and peel it from the hook-and-loop pad. Support the tool stably rather than pulling against a loose holder. Inspect both the removed sheet and the exposed pad: look for tears, worn-away grit, blocked extraction holes, loss of adhesion, cracking, separation of layers, distortion and damage around the mounting interface.
A worn or gritless Makita sheet must not be reused; Bosch calls for sound sheets. Replace a torn, exhausted, unidentified or poorly adhering abrasive with a correctly identified sheet rather than gluing it back on. This guide does not authorize washing abrasive, adding adhesive, cutting oversized paper to an improvised shape or punching a new hole pattern.
Makita explicitly requires the pad to have no cracks or breakage before use. Treat cracks, distortion, delamination, failed hook-and-loop retention or a damaged mounting area as rejection of the pad, not a defect to work around by rotating its tip. Replace only with an exact pad recommended for that tool and confirmed by the matching owner documentation or manufacturer. If the correct replacement cannot be identified, hold the assembly; a triangle that appears to fit is not enough.
Damage to the tool flange, holder, clamp components or locking mechanism is a service issue, not simply a consumable replacement. Do not file locating features, add washers, bend a plate flat or force a bolt to compensate for poor seating. Separate a rejected consumable from reusable stock so it cannot accidentally return to service.
PMF 220 CE: preserve the bolt fastening and extraction system
Use the original Bosch sanding system for this matched tool. The E62 manual identifies the Bosch Delta 93 mm sheet range; shape alone does not establish another pad’s approval. Keep the tool’s magnet away from implants and medical devices, such as pacemakers or insulin pumps, and keep the tool away from magnetic data carriers and magnetically sensitive equipment. Before replacing the pad, unplug and use the hex key to loosen the clamping bolt and remove the old accessory. Keep the correct bolt and key identified with the tool. MagnetHold assists positioning; it does not replace the bolt, and this is not an AutoClic release system.
For the supported sanding setup, always connect dust extraction. If installing or inspecting its attachment, remove the accessory and depth stop first. Slide the specified extraction system fully over the accessory holder onto the tool collar. Turn it to the required position, not directly under the tool, and close its clamping lever to secure it. Do not leave the sawing depth stop in this sanding stack.
Fit the sound, approved pad on the holder in the documented orientation: the depressed mounting centre faces downwards, with the accessory text legible from above. Engage the holder’s cams fully. The magnet holds the accessory in position while you fit the clamping bolt. Tighten the bolt with the hex key until it is flush with the accessory, as the manual specifies, and verify secure seating. Do not invent a torque value, rely on magnetic attraction alone or add an unrelated adapter.
Tap the pad’s hook-and-loop surface as specified to clear loose dust and restore contact, using appropriate dust controls. Place the correct sheet flush with one side of the pad, align its extraction holes with the pad holes, then press it on firmly. Inspect the entire edge and the actual holes, not just the tip. If the hooks cannot retain a sound correct sheet, reject the pad rather than applying more pressure during use.
Insert the extraction adapter into the hose until it clicks; connect the adapter to the extraction outlet and the hose to a suitable extractor. Check the whole path for missing parts, blockage and damaged connections. E62 recommends a 35 mm nominal hose and HEPA or dust class M filtration; it requires at least 220 mbar (220 hPa) vacuum and 34 l/s (122.4 m³/h) flow at the power tool’s extraction connection. A vacuum motor rating or an unrestricted hose-end claim is not proof that the installed system meets those values. Use the extractor’s instructions and suitable evidence for the actual assembly; an unverified system remains on hold. The extractor must suit the material, with a special extractor for especially hazardous or carcinogenic dry dust.
The maximum sanding setting for this E62 system is level 4, also subject to the accessory’s own limits. Higher speed is not a remedy for a glazed sheet or a worn pad. Stop work if suction drops and correct the cause. The manual requires dust-reducing measures, ventilation and suitable respiratory protection, and warns against overheating and dust accumulation; empty the dust container before a work break using the extractor’s safe procedure. These requirements remain part of returning the sanding system to use.
XMT03: retain the removable holder bolt and felt-ring stack
With the switch OFF and battery removed, open the lock lever fully and remove the holder bolt. Remove the old pad without forcing the flange. Install the exact recommended replacement in the proper direction, never upside down, with the tool-flange protrusions seated in the pad’s matching holes. Insert the holder bolt all the way to its stop, then return the lock lever to its original position. Keep fingers clear of the lever’s sudden closing/pinch area. This is not the Bosch hex-key tightening procedure, and the tool must not run with the lever open.
For an existing matched optional dust-extraction assembly, retain the entire documented system: dust nozzle, dust attachment, nozzle band, felt ring, pad and holder bolt. Install the dust nozzle and dust attachment. Fit the nozzle band so its protrusions engage the holes in the tool and secure it. Place the felt ring and sanding pad on the dust attachment, then secure them with the holder bolt using the full lever-and-bolt procedure above. The actual manual’s Figure 014561, page 8, shows this stack; the felt ring sits between the dust attachment and pad. Do not omit it, replace it with an improvised washer or transfer the Bosch collar to this tool.
If a part is missing, damaged or unidentified, hold this extraction-equipped assembly until the exact correct component is supplied. No present kit contents or adapter part number is promised here. Connect the vacuum hose to the specified dust-extraction attachment and follow the extractor’s material and dust instructions. The XMT03 manual presents this extraction attachment as optional; that does not cancel its ventilation and suitable respiratory-protection requirements. The Bosch pressure and flow thresholds above do not become Makita specifications.
Match the sheet’s direction to the pad and align every extraction hole. Press the hook-and-loop sheet securely into place. Makita recommends using one grit until the whole workpiece is completed; when renewing a worn sheet during that stage, record and maintain the same grit rather than accidentally changing the finish. A deliberate later grit stage belongs in the finishing plan. The correct operating rate is established on suitable test material under the owner procedure; do not import Bosch’s level 4 ceiling as an XMT03 dial instruction.
The XMT03 manual calls for periodic dust removal and lubrication of the lock lever’s moving part, but does not identify a lubricant in the selected passage. That is not permission to spray the pad, felt ring or unknown mechanism. If lever care requires clarification or the lever remains stiff or damaged, obtain Makita service guidance rather than inventing a product or repair method. Its maintenance section also prohibits gasoline, benzine, thinner, alcohol and similar agents.
Accept the rebuilt assembly before returning it to work
While still isolated, check the identified pad for soundness, the exact fastening for full seating, the sheet for secure full contact and correct grit/material history, and every extraction component for correct placement. Ensure the hose route will not pull the tool or obstruct handling. No movement, missing spacer, unseated bolt or partially returned lever is acceptable merely because the sheet feels attached.
Record one of three outcomes: reusable identified assembly, consumable replaced and isolated assembly checks passed, or hold for parts/service/material clarification. Include tool identity, pad identity, sheet grit and material history, replaced components, extraction configuration and the remaining pre-use requirements. Keep rejected pads and sheets out of the ready-use supply. Store reusable dry consumables without crushing their backing or loading their hook-and-loop faces with debris.
Only an undamaged assembly that passes those checks may proceed to the complete normal owner setup for a small, secured, known-material sample, with the proper dust controls and model-specific speed. Stop and isolate if adhesion fails, the pad moves, extraction drops, overheating or abnormal vibration occurs; never press harder to hide a failed assembly. After normal shutdown, standstill, isolation and cooling, inspect retention and the sample finish before accepting the sanding result. A poor finish with an intact assembly still requires review of grit, material and technique, not an automatic tool repair.
Source limits are deliberate: Bosch E62, printed pages 16–22 and figures A–C on pages 3–5, and Makita 885329-940, pages 3–4 and 7–9. These documents support the exact assemblies and maintenance decisions above. They do not authorize a universal pad, repaired backing, borrowed adapter, liquid sanding or a performance ranking between the tools.
Models referenced