
Two holder completions, two whole-system decisions
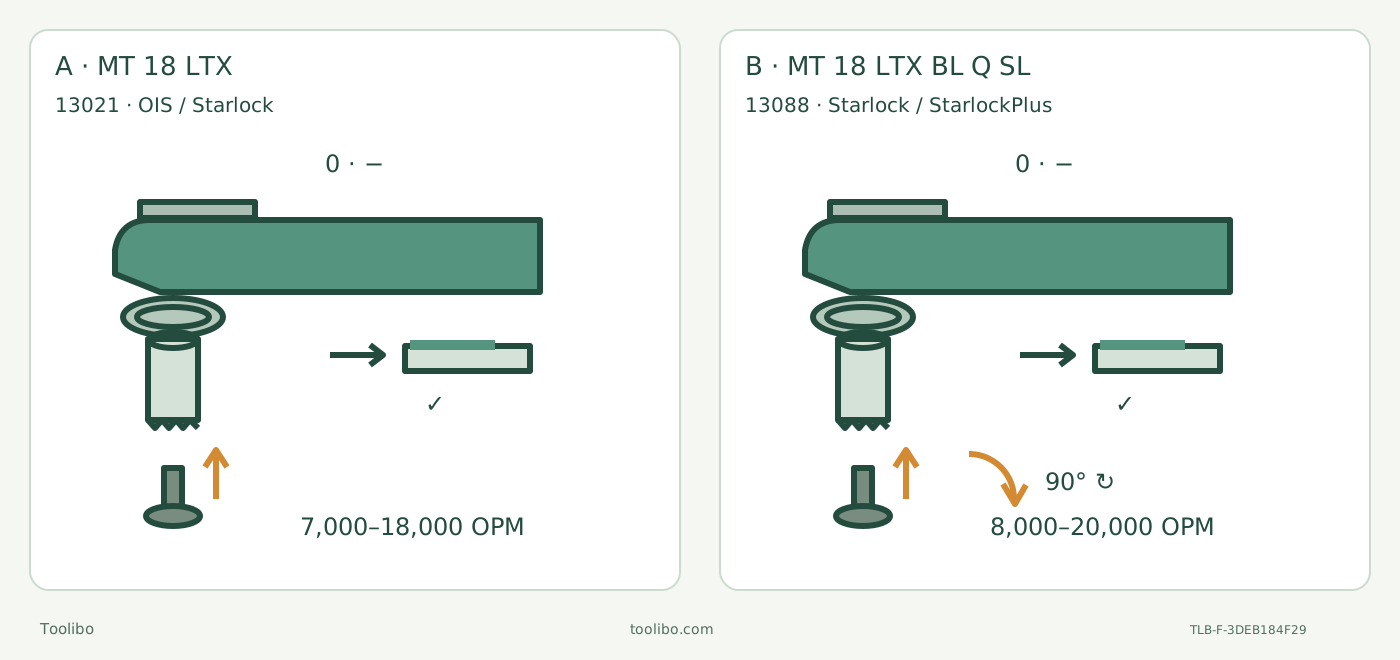
Two panels contrast legacy OIS/illustrated Starlock cam engagement and pin insertion to the stop with Q SL Starlock/Plus engagement and 90-degree clockwise pin completion before flush lever closure.
A · Retain a documented legacy system
OIS or an exactly supported compatible accessory can justify retaining the complete 13021 wood-cut system. Seat cams, insert the correct pin to the stop and close the lever flush; retain the actual qualified power pair.
B · Qualify Q SL as a whole system
A specific StarlockPlus task can justify Q SL only after the accessory, commissioned power and any required extraction are complete. Seat cams, insert and turn the pin 90° clockwise, then close flush. Unresolved parts or battery identity mean hold.
Original schematic with uncounted holder geometry. Both begin OFF with the battery removed and accessory cams fully engaged; both require the lever flush to the housing and an isolated hold check. The legacy insertion arrow is insertion to the stop, not a quarter-turn. Q SL requires its clockwise turn. Interface labels are bounded by the exact manuals, not blanket cross-brand fit.
Choose a complete system, not the shorter model name
“MT 18 LTX” and “MT 18 LTX BL Q SL” are not interchangeable labels for one holder. This decision compares the existing legacy serial family 13021, matched to manual 17027331–1222, with the Austrian Q SL product 613088840, service selection 13088000 and manual 170 27 6760–0323. Match the actual body, regional documents and supplied instructions first. A “Compact” listing within the legacy family is not another mechanical model here.
The question is practical: can you retain a documented older accessory system, or does a specific StarlockPlus task justify completing the Q SL system? The answer must include the actual mount parts, power system, material accessory and any required extraction—not just a shared 18 V label. This is a documentation-based selection workflow, not a performance ranking, current-stock promise or hands-on test.
The worked choices use either a small visible clean-wood cut or a small flat sanding trial on loose untreated softwood. They exclude installed structures, hidden services, unknown coatings, wet surfaces and adhesive chemistry. The final decision can be retain the complete legacy system, qualify a complete Q SL system, or pause both pending identified parts and evidence.
Inventory before deciding what to keep
With both tools OFF, stopped and their batteries removed, record each body’s full model and serial identity. Keep each holder’s pin, lever and documented adapter with that body; do not pool loose hardware just because it looks similar. Wear protective gloves for sharp/hot accessories and pinching mechanisms, allow cooling and keep fingers out of the closing lever path.
For every blade or pad, record its actual manufacturer/model, interface, intended material and condition. An unmarked accessory is not “probably compatible.” Reject cracked, distorted or damaged items; do not grind a mount to make it fit. List the actual pack and charger models and the documents that approve them. For sanding, include the complete extraction attachment, adapter, suitable hose, qualified extractor, pad and matching perforated sheet.
This inventory prevents a false economy: an apparently complete body with no correct spring pin, an unidentified pad or an unresolved power system is not a ready tool. Obtain exact parts/compatibility evidence or a qualified-service quotation before treating missing pieces as a simple accessory purchase. No price estimate or arbitrary wear tolerance is supplied here.
The interface decision comes before the pin movement
The legacy manual specifies OIS or a compatible holder. Its actual page 2 shows OIS and Starlock examples and a distinct illustrated adapter for the shown FEIN accessories. That is not blanket StarlockPlus/Max or all-FEIN approval. A documented original OIS blade that fits the stated material task can support retaining the legacy system; an unknown “universal” blade cannot.
Q SL’s actual page 11 permits Starlock and StarlockPlus, not StarlockMax. If your required, specifically identified and material-approved accessory is StarlockPlus, Q SL offers a documented interface route that the legacy source does not establish. This is a reason to investigate that complete system, not permission to buy the bare body and improvise the rest. An OIS-only accessory collection is not automatically reusable on Q SL.
Do not compare only the top frequency. The legacy table states 7,000–18,000 OPM; Q SL states 8,000–20,000 OPM. Both list 1.6° movement to each side. Those specifications do not establish a cutting-speed, finish, vibration or runtime winner. Neither manual supplies a universal numeric dial-to-task recipe for this choice.
Two spring pins, two different completion steps
Both routes require OFF, full standstill and complete battery removal before changing an accessory. Both require actual holder-cam engagement before final pin/clamp completion, and both end with the lever fully against the housing and an isolated firm-hold check. Neither authorizes an energized seating test or a guessed tightening torque.
For legacy 13021, open the release lever to its stop and remove the spring pin. Place the qualified accessory in the intended position with its holes engaged on the holder cams. Insert the pin all the way to its stop, then close and lock the lever fully against the housing. The manual does not tell you to add a quarter-turn to this pin.
For Q SL, swing the clamping lever forward through 180°, turn its spring pin slightly counterclockwise and remove it. Seat the permitted accessory with the cams engaged. Insert the pin and turn it 90° clockwise; only then close and engage the lever fully against the housing. Do not omit the turn because the legacy pin merely pushes in. The lever can spring back, so gloves and finger clearance matter throughout.
If an intact correct accessory does not seat, the pin does not complete its documented movement or the lever will not close correctly, stop. Switching bodies, adding a washer, forcing the lever or trying a powered wobble test is not the correction.
Close power identity separately for each candidate
For the narrow legacy example, the tool’s illustrated list names the 625596 2 Ah pack; the exact battery document 170281470–1124 identifies 625596000 as 18 V 2.0 Ah Li-Power. The matched ASC 55 documentation supports the corresponding Li-Power capacity. Retaining that existing genuine pair still requires actual nameplate and supplied-instruction agreement. It is not a present-kit statement.
Q SL’s manual lists 625367000 and ASC 55/ASC 145 among its examples, and the existing-owner route requires a physically identified, already commissioned original Metabo or approved CAS combination with its complete compatible instructions. Do not transfer the legacy charging lesson solely because both tools say 18 V.
There is also a document inconsistency worth preserving: Q SL’s accessory list calls 625596000 2 Ah “LiHD,” while the exact battery document identifies that number as Li-Power. Do not silently relabel the physical battery or use the discrepancy to certify a new Q SL combination. Resolve the actual component documents with the manufacturer if that identity is relevant to your purchase. Until then, use only the already qualified owner system or keep the power decision on hold.
This comparison does not commission or charge a new system. The legacy charger instructions include mains matching, indoor use, ventilation clearance and protective-device requirements; component conditions cannot be replaced by a shared battery-platform badge. Damaged packs are not repaired by the owner, and protection electronics do not electrically isolate either tool.
Worked choice A: preserve a documented legacy wood-cutting system
Suppose you already have the identified 13021 body, its correct pin, a sharp original recommended OIS wood blade with confirmed reach, and the qualified existing power pair. Your task is a short visible cut in known loose uncoated softwood, not a Plus-specific accessory operation. Retaining that complete system is a supported choice. The higher maximum OPM of Q SL alone does not prove a useful upgrade.
Before use, mark the intended line, clamp the retained stock to a stable support and support the waste so it cannot drop, pinch the blade or require a hand near the cut. Check both faces and the underside, blade reach and the full travel envelope. Perform the complete isolated legacy mounting sequence, with the blade oriented for two-hand control and clear vents.
Use goggles, appropriate hearing and respiratory protection, suitable dust controls and ventilation. Both manuals require two-hand tool control and a secure stance; keep hands out of the cut and do not reach underneath. Start the tool clear of the work by pushing the slide forward. Cutting/sawing calls for high oscillating frequency and even pressure without jamming, not a numeric setting borrowed from another tool.
Stop for shifting support, binding or abnormal behavior. Switch backward OFF, wait for complete stop and remove the battery before clearing material or correcting setup. At completion inspect the isolated sample for the intended cut, full separation, unwanted tear-out, scorching and signs of moved support. A failed trial means correct a documented cause or obtain assistance before repeating—not assume the other model will cure an unsafe setup.
Worked choice B: complete the Q SL sanding system instead
Suppose the desired sanding accessory is an accurately identified, material-approved triangular StarlockPlus plate, and the actual Q SL power system is already qualified. That interface supports considering Q SL, but the job is not ready until the correct plate/sheet and extraction are complete. If the needed parts are unidentified or unobtainable, the decision remains “pause,” not “adapt the legacy holder.”
With OFF selected, full stop reached and battery removed, remove the accessory and fit Q SL’s extraction body to its housing flange in the desired position using its designated screw and screwdriver. Fit the extraction adapter and suitable hose/extractor, then install the plate with the complete cam, clockwise-pin and flush-lever sequence. Align the sheet holes. Its illustrated connection is 28 mm; hose diameter alone does not qualify an extractor.
Do not borrow the legacy extraction arrangement: that body uses the documented movable B and anti-twist A positions on its gearbox flange, rather than Q SL’s screw-secured installation. Both attachments are specified for triangular sanding, not saw-blade capture. Q SL’s separate depth-guide screw is not the extraction mounting screw and does not create a hidden-service guarantee.
Clamp a dry known sample, route the hose clear of the pad and grip, and select the setting through a controlled scrap trial under the actual pad limits. Q SL’s separate maximum setting 8 for a 150 mm plate is not a command for an unidentified triangular pad. Start clear, approach with both hands and sand with moderate pressure and controlled back-and-forth motion. If extraction fails, the paper shifts or the stock moves, OFF, stop and isolate both tool and extraction equipment before inspection under their actual instructions.
Finish the pass, remove contact, switch OFF, wait for standstill and remove the battery. Accept only an even intended surface without unwanted rounding, gouges, scorching or moved support. This acceptance concerns the prepared sample, not certified flatness or a claim that one brand of paper performs better.
Record a choice that remains safe after a pause
Both manuals distinguish a flashing battery-capacity indication from a flashing tool worklight with no start, and from a temperature cutout after prolonged overload. A nearly flat pack follows its actual approved charging instructions. A tool worklight indicating restart inhibition calls for deliberate OFF then ON only after the setup is safe; never use that protection as the routine for inserting a pack with ON selected.
Cooling notes are conditional, not permission to force a stopped motor to run or use an unqualified charger. Isolate for physical checks, allow cooling and seek service for recurring or unexplained faults. Keep a written system choice: body/document identity, approved accessory and material, correct pin completion, actual power pair and any complete extraction requirements. If one of those is unresolved, “seek evidence or qualified service” is the successful decision—not buying a model name and hoping the rest fits.
Models referenced